


VannaTapestrySupport
-
Posts
59 -
Joined
-
Last visited
VannaTapestrySupport's Achievements
18 months (3/7)
2
Reputation
-
We’ve introduced some highly requested improvements to our Nursery Management System. New: Multiple age ranges & staff ratios per room You can now set multiple age ranges within a single room. Tapestry will automatically calculate staff requirements based on the different ages of children in that room, helping you manage ratios more accurately and efficiently. Setting up rooms with multiple age ranges: https://support.tapestry.info/tutorials/set-up-tapestry-management-system#rooms New: Xero and QuickBooks integrations Tapestry now supports exporting invoicing data for use with Xero and QuickBooks. Simply export your invoices as a compatible CSV file and upload it directly into your accounting software for reporting and bookkeeping. Get started: Configure your account for accounting software: https://support.tapestry.info/tutorials/set-up-tapestry-management-system-part-2#accounting-software Export invoicing information for accounting software: https://support.tapestry.info/tutorials/management-system-exports/#invoice Updated: Invoice format improvements Invoices have been refreshed to remain compliant with updated regulations requiring additional charges to be clearly itemised. A new summary section has been added to present itemised information clearly without creating multiple invoice pages. This section highlights: Regular sessions Extra bookings Custom charges Learn more about the new invoice layout: https://support.tapestry.info/tutorials/set-up-tapestry-management-system-part-2#invoice-format
-
nursery Closure Days / Bank Holidays
VannaTapestrySupport replied to SAPLINGSNURSERY's topic in Early Years Setting Management
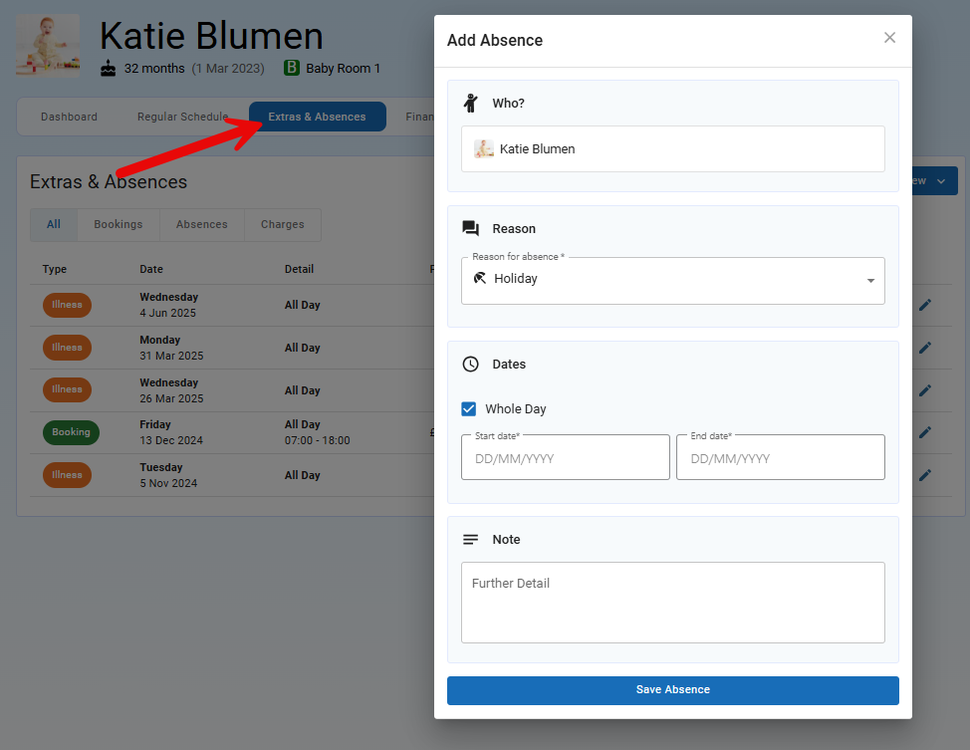
Hi, When you create a child's schedule, you'll have the option of selecting whether they attend during school holidays or not, please see below: If you charge for training days, bank holidays etc. once you have added these as a school holiday (Config > School Holidays and Closures), then any child with this box ticked and has a booking that falls onto one of these days, will still be charged. If a child is on holiday and therefore absent, if you do not know of this in advance you can mark them as absent on the register. Alternatively, if you know of these holidays in advance, you can add their absence through the child's 'Extras and Absences' tab. Please see below: This will then note the child's absence, but again if they have a booking that falls within this period, they will still be charged. I hope this clarifies things. Best wishes, Vanna
-
nursery Closure Days / Bank Holidays
VannaTapestrySupport replied to SAPLINGSNURSERY's topic in Early Years Setting Management
Hi, When setting up your closures and school holidays, please bear in mind that closures are not charged for, therefore if you do charge for these then you you'll need to set these up as a school holiday, but can name it 'Bank Holiday' for example. If children are still charged within these periods, then when you create their schedules you'll need to be sure to tick the 'Attends during school holidays box'. With regard to children going on holiday, if you still charge them then ticking this box will take bookings that fall into this period into consideration. However, when they are actually absent during this period, you will need to mark the absence on the register where you can add the reason for it, such as holiday within the notes. Absences are always charged for. The child's attendance will then reflect accurately through the attendance reporting screen as well as in the absence export. You can read more about adding and editing your closures and holidays in this guide here. Best wishes, Vanna -
Hi Emma, Apologies for the delay in getting back to you about this feature request! The Care Diary feature is available via the IOS app. The Care Diary can be made visible to relatives by enabling it for them to view. This can be done through the Control Panel (or Configuration if you're using the new look) > Features > Care Diary > Care Diary Settings > and tick 'Enabled for relatives'. Then when relatives login, they'll be able to view any entries you have made for their child throughout the day. Please note, if you also tick 'Staff must approve relative access to entries', then you'll need to approve the entry before the relatives will be able to see them through their account. Feel free to pop any further queries to customer.service@eyfs.info. Best wishes, Vanna
-
Hello, I'm afraid we don't have a time frame on when this feature will be released. However we will be sure to update you on this post as soon as it is! Best wishes, Vanna
-
Hi Abigail, Thanks for getting in touch! If you have added 'food' as an extra charge, and this is part of a child's regular schedule, then you'll be able to create a new schedule for the period they are on holiday. When creating the schedule for that week/s, just be sure to remove the extra charge of food. If their current schedule doesn't have an end date, this will pick back up after the holiday schedule has ended. You can read more about adding a new schedule by clicking here. Get in touch with us on customer.service@eyfs.info for any further support.
-
Invoicing: change the invoice number?
VannaTapestrySupport replied to Tweetinat's topic in Tapestry user conversations
Hello, Thanks for getting in touch! At the moment I'm afraid it's not possible to amend the invoice number. Although I can definitely see how this would be beneficial! So I've made a note of your request for this feature and fed it back to our development team. Something that might help in the meantime is the ability to add internal notes? You can add a note to a generated invoice by opening on the invoice > clicking the cog > 'Add Internal Notes'. These notes are not visible to relatives, but is somewhere that you can add an additional invoice reference. If you have any further questions or feature requests please let us know! Best wishes, Vanna -
Invoicing on Tapestry
VannaTapestrySupport replied to BenLittleT's topic in Early Years Setting Management
Hi Ben, I responded to your question via our customer support email, but just in case the answer below can help anyone else, I have copied the reply here as well. If you need for children's schedules to have some weeks that are funded and have other weeks unfunded, what you'll need to do is add new schedules for the child for each period. So you have one schedule which includes funded hours which you end date. You then add a new schedule which starts the day after which has no funded hours. And you can just do that as many times as needed. If you just leave the term time schedule without an end date (assuming the same pattern does pick up again after term break) then when you add in that different week's schedule it will essentially slot itself within the child's regular term schedule, which will just carry on again without you needing to add it again as a new schedule. You'll just need to tick that they attend during the school holidays for those half term schedules so they are invoiced for it. This guide shows you how: https://scribehow.com/viewer/How_to_Add_a_non-funded_period_to_a_Childs_Booking_Schedule__Ia7ii9NRR22C23yOjECp0Q?referrer=workspace But, if you are using annualised billing, then please note that the price each month is worked out from the first week of the schedule within that month. The calculation is as follows: [schedule's weekly cost] x [weeks entered] / [months entered]. That will mean for the months that the half term falls into, unless it falls on the first week of the month, the half term unfunded hours will not be taken into consideration. In this case, you can either add an additional line item to that months invoice for the charge of the unfunded hours, or change the invoice calculation to fixed monthly fee for the month the half term falls in. This would mean you needing to calculate the cost of the invoice for that month, and also ensuring to change the calculation back to annualised monthly fee for the following month. We are looking at an enhancement to Tapestry to allow children to be assigned to more than one schedule, to allow different attendance patterns to be accommodated which you mention your current system does now. So, I've made a note of your interest and fed this back to our development team. If we have an update about this feature we'll be sure to let you know. I hope this helps. Let us know if you have any further questions. Best wishes, Vanna- 1 reply
-
- 1
-

-
Adding Policies and procedures onto Tapestry
VannaTapestrySupport replied to tawny222's topic in Tapestry user conversations
Hi, It isn't currently possible for relatives to sign documents through Tapestry, but this is something we are looking to introduce. When this becomes available, we will get in touch to let you know! If you have any further queries or questions, feel free to contact us on customer.service@eyfs.info. Best wishes, Vanna Tapestry Support Team -
Emergency contacts
VannaTapestrySupport replied to thelearningtreederby's topic in Weavers Future Development Suggestions
Good morning, Thanks for reaching out! I have passed on your feedback to our development team and we will get back to you if we have any updates on this feature. Pop us any future questions or queries you have to us on customer.service@eyfs.info if you need anything else :) Best wishes, Vanna Tapestry Product Support -
In this tutorial we are going to look at enabling fingerprint unlocking on the Android app. Begin by logging into the Tapestry app and going to 'Settings' (1) at the bottom of the screen. To enable fingerprint unlocking for your PIN, tap on 'Allow PIN unlocking with fingerprint' (1). Enter your PIN (2) and if you are happy to to confirm saving it, tap 'Yes' (3). You will then receive confirmation that you can use your fingerprint instead of your PIN. Tap OK to continue. For your password, tap on 'Allow login with with fingerprint' (1). Enter your email address (1) and password (2) and tap 'Save' (3). If you decide you do not want to proceed then tap 'Cancel' (4). You'll then be able to login to the app using your fingerprint. If you wish to disable this feature at any time, proceed back to 'Settings' and you can disable it. And that is enabling the fingerprint unlocking on the Android app. If you need any further support, please contact us on customer.service@eyfs.info. Back to Main Tutorials Page


-
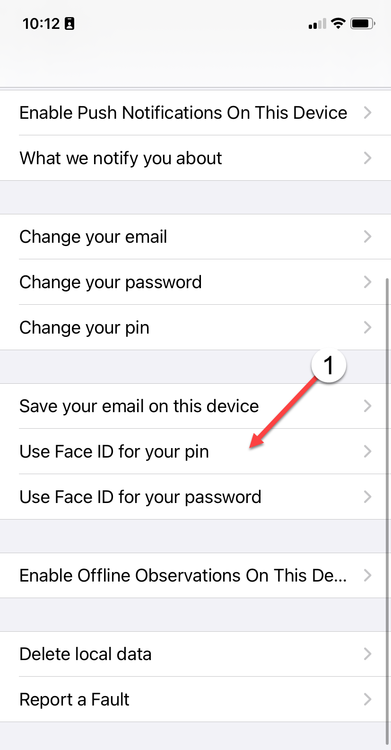
Enabling Face ID / Touch ID on the iOS app
VannaTapestrySupport posted a topic in Tapestry tutorials
In this tutorial we are going to look at enabling either Face ID or Touch ID on the iOS app. Based on the iOS device you have will depend on the option you are given. Start by logging in to the app and tap 'You' (1) at the bottom of the screen. Touch ID For your PIN, tap on 'Use Touch ID for your pin' (1). Enter your PIN (2) and then tap 'Save' (3). When you go to enter your PIN going forward, you will be given the option to use your fingerprint. For your password, tap on 'Use Touch ID for your password' (1). Enter your password (2) and then tap 'Save' (3). When you go to enter your password going forward, you will be given the option to use your fingerprint. Face ID As before, tap 'You' (1) at the bottom of the screen. For your PIN, tap on 'Use Face ID for your pin' (1). Enter your PIN (2) and then tap 'Save' (3). When you go to enter your PIN going forward, you will be given the option to use your Face ID. For your password, tap on 'Use Touch ID for your password' (1). Enter your password (2) and then tap 'Save' (3). When you go to enter your password going forward, you will be given the option to use your Face ID. And that is enabling Touch ID/Face ID on the iOS app. If you wish to disable this feature at any time, proceed back to 'You' and disable it. If you need any further support, please contact us on customer.service@eyfs.info. Back to Main Tutorials Page


-
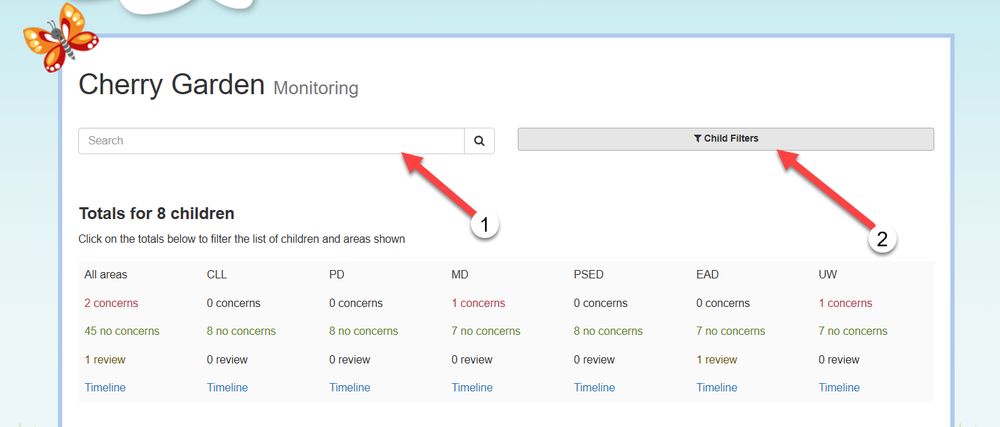
In this tutorial we will be going through how to use the Monitoring Group View for the Cherry Garden Framework. The Group View screen was designed as the quickest way to monitor individual, groups of, or all children at once. To find this screen, simply click on “Tracking” (1), then find “Cherry Garden” (2) on your list of frameworks, and then beneath "Monitoring", select “Group View” (3). At the top of this screen you will see an option to “Search” (1) and the usual “Child Filters” (2) selection box. The Search box (1) is useful if you are just trying to assess one child amongst all of them on your account. If you want to filter more specifically, such as via gender, EAL, Key Person etc. then you could use the “Child Filters” (2) as you can see below. Once you have selected the children you are going to assess at this point, scroll down to the next section. Judgments against the different areas have been split into three categories: Concerns, No Concerns and Review. Very simply, this is the judgment you will assign for each area for each child, based on your knowledge of the child and the information you have collected so far. From this “totals” box, you can quickly see the distribution of these judgments for all children that you have selected (or just all children on your account if you haven’t used any filters). As you can see on my account, all 8 children are “no concerns” for all areas. That’s because “no concerns” is the default. Each of these judgements is also a link, so if I wanted to see only those children with “no concerns” in CL, for example, I could click there (1) and it will automatically filter those results for me (2). This is a helpful feature if you are only inputting judgements for a specific area at this point. If you are sitting down to make judgments on all the areas at once, you can leave the “totals” box as is, and just scroll down. Here you will see all areas for the children, and you can simply apply your judgments to each area by clicking either the “Concerns" (1), “No Concerns” (2) or “Review” (3) boxes. You will also notice some hyperlinks underneath the child’s name and each of the areas. One for Observations and one called Timeline. You can click these hyperlinks at any point and it will show you all the Observations linked to that specific area. Here you can see Abby has an Observation linked to UW. If I click there, I can review the Observations and that will help inform my judgement. The “Timeline” button shows you a chronological order of events for that area. Here you can see the Timeline for Abby’s Mathematical Development. If you wish to create a reflection for a child, you can do so by clicking 'Reflect'/'Reflect on this' beneath the Timeline. To create a general reflection, select 'Reflect' (1), or to link it to a specific area of learning, select 'Reflect on this' beneath the area (2). A new tab will open up on the reflections screen, linking the title to the Cherry Garden framework (and area if selected), as well as linking it to the child. You can proceed with writing and saving your reflection. The last things to consider on the screen are at the very bottom of the page: (1) Is your option for exporting this screen. As with most of the others, you can export this screen to PDF or CSV. (2) Is where you can change the date range for when this screen pulls in data. In other words, you can choose for it to only take into account Reflections and Observations from your “Current Assessment Period”, from the “Past 12 Months” or “All Available” So that’s how you can make your judgments on the Group View screen for the Cherry Garden framework. Back to Main Tutorials Page


-
Hi @Tweetinat, I am getting back in touch to let you know that Full Staff users and 'PIN' only staff users can now add absences through the register! Registers are available on the browser and on both Android and IOS devices. I have attached some guides for support below: Using the Online Register for children on the Android app Using the Online Register on the iOS app Online Register for children Do let us know if you have any questions about this feature🙂
-
In this tutorial we are going to look at how to bulk export your Care Diary data. I'll go through doing this for individual children and for multiple children. Please note, as this is done through the 'Control Panel', only managers on Tapestry will be able to export Care Diary entries. Let's start with individual children. Begin by heading to the Control Panel by selecting your name (1) and then 'Control Panel' (2). Next, navigate to 'Manage Children' (3). Select which child that you would like to export Care Diary entries for (1). Click the cog icon next to their name (2) and then 'Bulk export care diary' (3). Start by choosing which type of entry, or entries, you would like to export (1). By default, all options will be ticked. You can untick any entry types you don't want to include but you must leave at least one selected. Then, choose the time frame of entries that you want to export (2). You can choose what order these are shown in with either latest or oldest showing first. Next, you need to select how you would like to sort the PDF export (3). This can be done by date or by entry type. Lastly, you'll need to decide whether you wish to include comments (4). If you do not wish to proceed you can choose to cancel (5) or, if you are happy, select download PDF (6). The PDF will be generated through your downloads. The next screen you are taken to will allow you to 'View your Downloads' (1) or, go back to the 'Manage Children' page (2). To proceed with accessing the PDF, head to your downloads and select, 'Download' (1). This page can also be accessed through the 'Control Panel' > 'Downloads' (2). A ZIP file will then be generated which you can 'Download' (1). Once accessed (2), you can store/print the Care Diary data as needed. To export the Care Diary for multiple children, make sure you are back on the 'Manage Children' page. Select the boxes next to the children's names (1) or, if you want to select all children on the page, change 'Select Items' to 'All' (2). When the pop-up appears on the bottom right, choose 'Export care diary as PDF's' (3) and then click 'Go' (4). As before, the next page you will be taken to is where you can decide what to include in the export. At the top of the page you will see which children will be included and you can always include more by clicking 'Select Children' (1) and adding them. When you are happy with the details included, click 'Download PDF' (2). Making your way back to your downloads by either selecting 'View Downloads' on the next screen or, accessing it through the Control Panel > Downloads, click 'Download (1) to create the ZIP file containing the PDF (2). Back to Main Tutorials Page


