We are no longer supporting Internet Explorer for security reasons, please use an alternative browser.
-
Posts
34 -
Joined
-
Last visited
Content Type
Profiles
EYFS Articles
Local Authority
Newsletters
Topic support
Book recommendations and reviews
Courses and events
Vacancies
Help documents
News items
Tapestry Newsletters
Podcasts
Tapestry Import
Forums
Downloads
Events
Gallery
Store
Everything posted by KatTapestrySupport
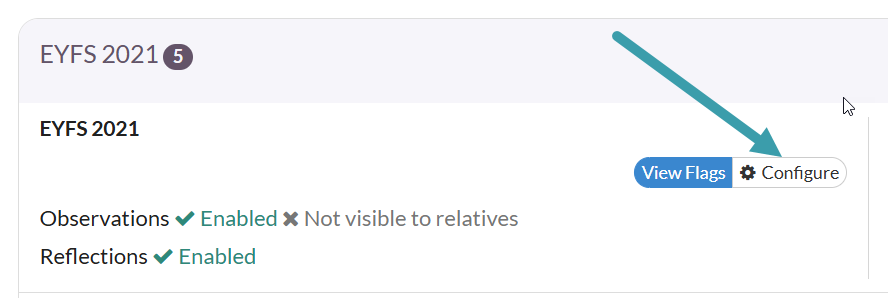
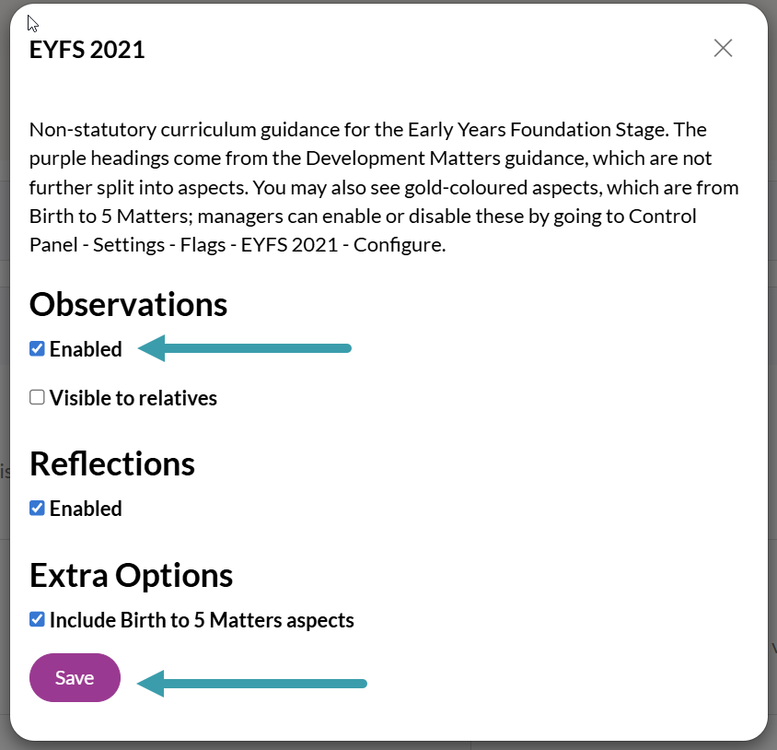
-
There is a new deletion state available to you called Partial Deletion. Partial Deletion allows you to retain some key information about the child on your account, while deleting the rest and freeing up a space on your account. Partially deleted children will have the following data retained: Their name Their date of birth Their booking, registration, invoice and payment data Their accident forms Any reflections they are attached to All their other data, such as photos and videos, will be deleted after 90 days. It will remain in our backups for a further 90 days and then that data is permanently deleted.
-
Hi Emma, Thank you for your feedback 🙂 are you referring to register exports (printable versions), rather than the online register on Tapestry? Number of children down the side of the register for ease Do you mean you would like to see the total number of children expected on the register? This is something we are looking at adding, along with displaying the number of absences expected on the selected day/selected period; I have put you down on our contact list for when this goes live, but do let us know if you mean something else. Child's names on one line - possibly less space for comments so that each days register does not go over onto two pages Again, is this referring to when you export the register to PDF? I can put a request to the team to look at ways of making the register more compact, so that it doesn't go over so many pages. You can use the 'Layout Options' section when exporting a register and untick the columns you don't want to include if that helps in the meantime. Possibility of exporting the register to excel so that the data can be manipulated to suit each individual setting We are also in discussion about this as well; I have added you to the contact list for this and we will keep you posted. Sundry items - we have currently set up our hot dinners as a session so that the charge appears on the invoices but because you have to add a time it also appears on our registers. Is there any plan to include the facility to add sundry items to invoices without them having to be set up as a session? There is currently the option to add 'Additional Line Items' to and invoice, but we will be releasing 'Extra Charges' as part of the next Invoices update, which is due within the next couple of weeks (provided testing goes well). It will give you the ability to add meals and other items as 'Extra Charges' and set prices for them, then you will be able to add these alongside sessions as part of a regular schedule (if you are charging for them consistently), or ad hoc as required from a child's dashboard. The Extra Charges will have their own section on the invoices so you can see which charge is which. Will this suit your needs? As I say, it is due out very soon so do keep an eye on our social media and for a yellow banner within Tapestry itself for when we announce its release 😁 If you have any questions about the above or would like to add some more information for us, please do let us know. Best wishes, Kat Tapestry Support
-
You'll never guess who I met!!!!
KatTapestrySupport replied to SueFinanceManager's topic in Staff Lounge
She was soooooooo funny and you are absolutely right; many things said at the table that night (from all of us!) were probably not for the faint of heart! -
You'll never guess who I met!!!!
KatTapestrySupport replied to SueFinanceManager's topic in Staff Lounge
I was very lucky in 2014 to have a curry with Miriam Margoyles (one of my absolute icons!), while I was living in Adelaide, Australia. My uncle, Julian, was directing a play for The State Theatre Company of South Australia called 'Neighbourhood Watch', where she was the star of the show and after one evening's rehearsal, she came to my uncle's house for dinner (I was living with them at the time). My favourite part was when she tucked a napkin into her collar and said to me, with gusto and a huge grin on her face, "You will excuse me, I am a very messy eater!" It was the most fun I've ever had at a family dinner 🤣 -
Information system
KatTapestrySupport replied to MarshaD's topic in Weavers Future Development Suggestions
Hi, We've also added Registers to our management tools. The register can be online or printed, and information for it is taken directly from details put into Booking (as per Emily's post above). You can find out more about Registers on this post and also how to use online registers in this tutorial. Our next bit release will be Invoices, which is currently due for June this year; we are on track so far, but will be keeping everyone up to date via our social channels and our newsletter. You can have a sneak preview of Invoices on this page here. If you have any questions, please do let us know. Best wishes, Kat -
key person
KatTapestrySupport replied to AliceinWonderland's topic in Weavers Future Development Suggestions
Hi @Claire_Stemp, No problem - I have added you to the contact list for this feature. We will keep you posted on this when we know more! Please note we have some larger projects in the works at the moment, so there will be a bit of a wait still on this one 🙂 thank you for your understanding. Best wishes, Kat -
Pin observations
KatTapestrySupport replied to Claire_Stemp's topic in Weavers Future Development Suggestions
Hi! Thank you for your suggestion! This is something that has been brought up before and it is on our 'to-do' list for a future date; I have added your comments to the discussion and we will keep you posted on our progress with this. Please note however that we have several larger features that our developers are working on at the moment, so there will be a bit of a wait before something like this would be started on 🙂 If you have any questions about this though, do let us know. Best wishes, Kat -
Hi @Amesbury I'm afraid we don't yet have history entries relating to access for Memos at this stage, although it is something we are looking at adding to the History section of the Control Panel! I've made a note that you have asked for it so we can keep you updated 🙂 I'm sorry we can't be of more help just yet! Kat Tapestry Product Support
-
Exporting Reports in Word
KatTapestrySupport replied to CLG's topic in Weavers Future Development Suggestions
Hi, When exporting reports, you can choose to hide empty spaces if you need to; it is one of the options the export model gives you; another thing you can try is choosing a different Format from the drop down that appears when you go to export a report. The drop down gives you three options; Default, Compact and Printer Friendly. Do any of these change the way the export looks for you? You can also do what Emily suggests above and open the PDF file in Word, in order to move things around a bit. If there is a specific issue that is affecting the layout of your report exports though, do let us know and we can feed it back to the team. Thanks, Kat -
Child Log In on the App
KatTapestrySupport replied to cmreception's topic in Weavers Future Development Suggestions
Hi, Thanks for getting in touch and for your suggestions; we are already in discussion about adding the Child Login to the app, so we can keep you updated on this, no problem. Regarding the option of adding titles, I can certainly put this to the team for you - we are always looking for feedback and suggestions regarding Child Login and how to make it easier/more usable for children and staff. Leave it with us! Best wishes, Kat -
No problem at all Kat
-
Hi BethB, I can certainly see how this would be useful, so I have put it to the team to see if this is something we can look into. In the meantime, if you do not need to receive notifications for all children, then you can allocate your class/a set group as Key Children and then restrict your notifications to only see things related to them; we have a guide for linking staff to Key Children here. Once you are linked to your Key Children, you can click your username in the top right, go to 'Edit Preferences' -> 'Change Notification Preferences' and then make sure this box is ticked: This won't differentiate your notifications between relatives and staff uploads, but it may help to reduce the number of notifications you receive. I hope this helps! Kat
-
Hi, As finleysmaid kindly mentioned above, we have a few tutorials that can help you with adding and activating parents I have linked them for you below: Adding relatives individually Creating a CSV file (spreadsheet) for adding relatives Adding relatives in bulk via CSV (spreadsheet) file Linking relatives to children As you can see, you can choose to add them individually, or if you want to add them in bulk you can use a .csv file (which can be created in Excel); tutorial 2 goes over what this .csv should look like. Once the relatives are added and activated (tutorial 1 covers activation), it will just be a case of linking them to their respective children. I hope this helps! Best wishes, Kat
-
Hi Mya, The iPod Touch will certainly support our iOS Tapestry app, as the app is currently usable on Apple devices that are running iOS 9 or later From what we've heard from other customers using this device, the pros and cons seem to be the following: Pros The device is pocket sized, so is less conspicuous and easy to transport around a setting Just like other iOS devices, it runs apps like Safari and other browsers, so if you need to access the browser version of Tapestry you can do Works similarly to a phone device, so is more compact and may be more comfortable for users Cons Doesn't have cellular connectivity - this may not be a huge problem if your previous devices weren't using a data network either, but this can be useful if you experience problems with your setting's WiFi Smaller screens and keyboards - visibility and typing are slightly more difficult because of the small size, which might make viewing summative assessments and tracking screens a bit trickier on the browser version if you are only using these devices Depending on what model of iPod Touch you get will depend on what it can access; older, cheaper models may not have all the capabilities you need, so it is worth checking carefully to make sure the model you want to go with has the access you want (such as email etc.) From what we've heard, the iPod Touch does seem to work well for several other settings, but it really is down to your personal preference as to whether you think it will be better than using a larger device. I hope this helps! Best wishes, Kat
-
This tutorial is for if you have already created a group login page, but when a child goes to log in, they either can't see the whole group login page, or just can't see themselves on it. There are a few things that it might be caused by so I'll go through each of those and how to fix them in turn. If you're looking for how to turn on the Child Login feature, take a look at our 'Enabling the Child Login feature' tutorial. To skip to a specific section of this tutorial, please use the numbered links below. If the whole group login page isn't there. These potential causes and solutions are for if the child has gone to log in, but the group login page they were expecting to see isn't there at all. 1. Your Tapestry subscription has expired 2. The group login page is turned off 3. The group login page is not enabled for the device you're using (it was never set up, or has expired) (jump to) 7. None of the above If the whole group login page is there, but the child isn't in the group. These potential causes and solutions are for if the child has gone to log in, and can see their group login page, but they aren't in it. 4. The child has not been added to the group login page 5. The child's profile has been deactivated/deleted 6. The user permissions for that child are stopping them from appearing 7. None of the above 1. Your Tapestry subscription has expired If you cannot see any group login pages at all when you click on 'Child login', or you can see some, but they are for children from a separate Tapestry account (this might happen if you have different accounts for different year groups and multiple year groups share the computer you're using), your account might have expired. To check that, try to log in to the Tapestry account yourself. If you are unable to and you see a message saying your account is not currently active then the most likely cause is that your subscription has expired. As soon as your invoice is paid, the Child Login feature will reappear. if you have any questions about your subscription, please direct them to customer.service@eyfs.info. If you are able to log in though, that isn't the problem so go to potential cause number 2! 2. The group login page is turned off The group login page will need to be active before the children can see it. To check whether it is, and to turn it on if it's not, log in as either a manager, the staff member who created the group, or a staff member who is allowed to see and manage login pages created by someone else. Then go to to the 'Child Login' tab (1) and find the group login in the list. If you didn't create the group login page yourself you might need to click on (2) 'Show class or group login pages set up by your colleagues'. Once you have found the group login page that you want the children to use to log in with, look for a button to the right of it saying either 'Turn On' or 'Turn Off' (3). If it says 'Turn On', then you should click on that because it will make the group login page active for the children to use. That should solve the problem, but if that's already turned on, or the login page still doesn't appear, move onto number 3. 3. The group login page is not enabled for the device you're using This step is for 2 cases, but I've combined them into this one section because the solution is the same. - If the group of children have never logged in on the device in question then it may be that the group login page was never added to that tablet/computer. - If they have logged in before, but the cookies have been cleared, they're using a different profile, they're using a different browser, or they haven't used it for more than 6 months, then the connection to the login page will have expired. This is especially likely to be the case if the children are using another device that does display the specific group login page that you're after. If you're with a whole class of children and need to get them on asap, then the quickest thing to do is log in as a staff member (again you'll have to be a manager, the staff member who created the account, or a staff member who has access to the group login pages created by other staff), go to the 'Child Login' tab (1), and find the group login page you want by looking in your list/the list of all group login pages (2). Then press 'Add this login page to another computer' (3). On that page you will see the option to enable the login page for the computer you are working on, or you can choose to set it up for others. If the computer you are working on has already been activated for that group to use, it will say 'Enabled' next to it (1). If not, but you want the children to use the computer you're logged in from, click 'This computer' (2). That will enable it immediately. Alternatively, if you want to get the group login page onto another computer, click 'Other school computers (3). Now you have a choice. You can enable the group login page via a QR code, via a very long web address (so long that you'll want to send a copy of it to the computer you want to enable so it can be copied and pasted), or via some 'magic words'. You can read about all three options in detail in our tutorial for enabling the same group login page on other computers but if you're in a bit of a rush, I'd recommend that you go for the third option - the magic words. Clicking on that will take you to a page with instructions re what the children need to do (they have to say they're at school, then click on the button about magic words) and the magic words you need to give them. Once they have typed those in, the group login page will appear, and they'll be able to sign in! If that doesn't work either though, and you've already looked at step 2, you'll need to get in touch with us by emailing customer.service@eyfs.info (step 7 for this tutorial). These next steps are for if the whole group login page is there, but a specific child isn't appearing in the group. 4. The child has not been added to the group login page The most likely cause behind a child not appearing in their group login page, is that they haven't been added to it. If they were there at some point, it might be that the group has changed seemingly by itself. That can be caused by a couple of things - the group (in Manage Groups) changing, or the user permissions of the staff 'owner' of the group login page changing. In order to fix it though, you need to log in yourself (provided you're a manager, the staff member who created the account, or a staff member who has access to the group login pages created by other staff), go to the 'Child Login' tab (1), and find the group login page you want by looking in your list/the list of all group login pages (2). Then press 'Manage' (3). Scroll down the page it takes you to until you can see the children. Double check the child in question isn't there, then, if they're not, press 'Edit'. On this next page scroll down and you'll be able to see whether the group login page is for all the children in the group (1), or just some (2). If option 1, leave this page and go and edit the group itself from Manage Groups (you'll need to ask a manager to do that if you're not one). See this tutorial for more details. If you can see just some of the group have been selected (1), you will be able to tick any children not already selected (2) but who are part of the group (the one you can see in Manage Groups). If the child doesn't appear in that list, then go and add them to the group first of all as above by following this tutorial. If you can't see the child on your account anywhere though, move onto step 5. 5. The child's profile has been deactivated/deleted A less likely, but still possible explanation is that the child's profile has been deactivated or deleted. You'll need to be a manager to fix this one too because it involves going to the Manage Children section in the Control Panel (1 then 2). Make sure you're looking for all children (1) then search for the child in question by typing in their name into the search bar (2). If they have the status 'Inactive' or 'Awaiting Deletion' (3) then you'll need to make them active again by clicking the cog next to their name (4) and selecting to make them active (5). It is worth thinking about whether they were purposely deactivated/deleted before you do this though (e.g. have their parents said they don't want them to have a Tapestry profile). If the child is already active, move onto step 6. If they aren't there at all though, move onto step 7 and contact us by emailing customer.service@eyfs.info. 6. The user permissions for that child are stopping them from appearing The last possibility is that the child is not allowed to log in. In order to check and fix this, a manager needs to go to the Control Panel (1), User Permissions (2), then in the section within that for the children's permissions (3), they need to open the 'Logging in at school and at home' section (4) and check that the child in question hasn't been individually set to not be able to log in (5). If this is the problem, you should make sure that wasn't done for a specific reason. If it was just a mistake or no longer relevant, you can permit the child to log in again by clicking on the edit button (1) and changing their individual permission (2). Once you've saved that change, the child should reappear in the list of children able to log in. 7. None of the above If none of the solutions above work, then it's possibly a bigger issue. Email us on customer.service@eyfs.info with details and we'll investigate. Go back to Main Tutorials Page
-
As well as logging in whilst at school, using the Child Login children can log into Tapestry from home via their parents'/carers' relative accounts, if you've allowed that. This might be something you want to set up if you're putting activities for home learning on Tapestry. Please note you will need to make sure that the child is linked to an active relative on your Tapestry and they are with that parent/carer when they want to log in. For information on linking relatives with children on Tapestry, please see this tutorial. To see how the children log in once this is set up, you can have a look at the guide for children on logging in at home and the one for relatives for to get their children logged in. This guide will take you through the home access set up steps; you should only need to carry out these steps: At the start of the school year When you have a new class or group First though, some FAQs! Why do relatives need to log in first? Passwords used by children need to be easy to type and easy to remember, but this means the passwords may be easier to guess. Children may also not be particularly security conscious when it comes to keeping their password a secret. By having a relative log in first, the child's account and data is kept more secure. This feature also allows you to optionally not give a child a password but instead only require their relative to log in. What are the security implications? By allowing children to log in at home, you should be aware that relatives will have easy access to their child's account; anything visible to a child will be visible to a relative who has the ability to log in as their child. Even if the child is given a password, the child is likely to share it with their relatives. This is something to bear in mind when you reach the part in the process that allows you to choose which relative accounts the child can use to access their account. We'll start by looking at how you can allow children to log in from home. To skip to the section on restricting access, click here. Allowing children to log in from home Start by going to the 'Child Login' tab (1) and then clicking on 'Manage whether children can log in at home' (2). You will see that Tapestry gives you three options of what you can do from here; select the first option, 'Allow children to log in at home'. That will take you to an information page, essentially just telling you what I said above about relatives needing to log in first and the security implications. You just need to click 'Set up home access'. On the next page you can choose the group you want to grant home access to from the drop-down list. The groups that appear are those you have set up in Manage Groups within the Control Panel. If you haven't set any up yet but you'd like to, take a look at this tutorial. You don't have to do this one small group at a time. If you're setting this up for all classes, you might want to just choose 'All children', which will be the last group in the list. Once you have selected a group, the names of the children in that group will then appear below and you can choose whether you'd like to include all of those children (1), or just some of them (2). If you do only want to include some of them, you will be able to tick the ones you like using the tick boxes next to their names (3). It's worth knowing here that if you select the whole group, the included children will change if you change the group within 'Manage Groups'. You can read about that in our tutorial about editing a group login page. When you are ready, click 'Next' (4). The next page will allow you to choose which relative accounts you want the child to be able to use to login in through. Similarly to the last screen, you can either allow all (1), or you can use the same process as above to allocate specific relative accounts to use the Child Login feature (2). When you are happy with your choices, click 'Next' at the bottom of the page. The last step is for you to choose whether the children need to use a password when they log in through their relatives' Tapestry accounts and whether it's different for different relatives. When you are happy though, you can press Finish. Restricting access to home login There may come a point when you want to remove a child's access to home login altogether, or remove this option from a particular relative's profile - either of these can be done by altering either the permissions for the child or for the relative. Full instructions can be found in Tapestry itself. Start by going to 'Child Login' (1), then 'Manage whether children can log in from home' (2). Then select 'Stop children logging in at home'. A page with full instructions will then appear along with direct links to the respective permissions pages that you will need to access. If you right-click on either of the 'Open Permissions' buttons and choose 'Open in a new tab', you can leave the page you're currently on open to refer to whilst making the changes to the permissions on the other newly opened tab. You can also view and change the permissions by going to 'Control Panel' (1) -> 'User Permissions' (2) and you will find them under the 'Relative' and 'Children' tabs (3) respectively. On the 'Relatives' tab on the User Permissions page, open up the 'Child Login' section. Here you just need to click on the 'Edit' button to change the permission 'Child allowed to log in at this relative's home'. This tutorial will talk you through the whole process of setting up user permission for relatives. Alternatively you can do this from the 'Children' tab on the User Permissions page. Select the section 'Logging in at school at home' and for the option 'Log in at home', click on the 'Edit' button. Go back to Main Tutorials Page
-
In this tutorial I'm going to show you how to edit a group login page for Child Login within your school. To skip to a relevant section, please use the links below. 1) Adding/changing a profile picture to your group login page, changing the group login page name, and changing what the children see when they use it (re their names and passwords) 2) Adding and removing children from a group login page Add/remove a child from an existing group login page and from an established group (from Manage Groups in the Control Panel) This might be useful if a child has permanently joined or left your class/the session you use Tapestry in, and if you've been organising your children by groups across the rest of Tapestry i.e. you've created a group for them in 'Manage Groups' and filter by them when you're using other Tapestry features. Add/remove a child to an existing group login page only This is most likely to be the option you need if the group login pages you set up have children picked out from the 'all children' list and you don't really use groups in other aspects of Tapestry. 1) Profile pictures, group login page name, and child name and password visibility Adding or changing a profile picture of a group login page, changing the group login page name, changing how the children can be distinguished (profile pic, first name, last name or a combination), and changing what the children see when they type in their passwords can all be done from the same place. You'll need to go to 'Child Login' (1) then click 'Manage' next to the group you want to make changes to (2)- -and then click 'Edit' in any of the places you can see it on the page (there are a few but the first one is right at the top). You'll need to look at these sections and make which ever changes you want. When you are happy, you can click 'Save login page' right at the very bottom and the system will return you to the main group login page. From there you can add the link for this group login page to a new computer or log yourself in as one of the children in that group if you like. 2) Adding and removing children from a group login page You might want to change the children who can actually access the group login page. To do this you can either: Add/remove a child from an existing group login page and from an established group (from Manage Groups in the Control Panel) This is for if you've created a group for them in 'Manage Groups' and have used that group when creating the group login page. Add/remove a child to an existing group login page only This is for if you don't really use 'Manage groups' and have chosen the children for your group login page from your list of all children. Add/remove a child from an existing group login page and from an established group You don't actually do this from the Child Login section of your account. Instead you need to go to the Control Panel and edit the group within Manage Groups. To do this you will need to be a manager on your account. So, go to 'Control Panel' (1), then 'Manage Groups' (2). Find the group you want to add the child to in the list and click 'Edit Children'. A pop-up box will appear showing you a list of active children and you can either use the search bar to find the child you want (1), or scroll down the page until you see their name. When you have found them, put a tick in the little box to the right of their name if you want to add them (2), or untick it if they're already in the group and you want to remove them. Then click 'Done' (3). If you're removing a child (and you selected this group when you were setting up the group login page), they'll automatically be removed and won't be able to login from that group login page anymore. If you're adding a new child, they'll automatically appear in the group login page provided that when you created the page you chose to include the all the children in the group. Side note: Remember that children need passwords to be able to login. If the child you've just added doesn't have one yet and you need to know how to generate one for them, check out this tutorial on generating passwords. If you chose 'just some of the group' or you're not sure and need to check, then go to Child Login (1) and click to manage the page (2). Here, scroll to the bottom of the page. You'll be able to see the children who can sign in using this group login page. If the child you're looking for isn't here though, click Edit. Now scroll down the page until you see the section titled 'Which children can log in?'. What you should see here, is the group you've just edited (1) and ticks next to some of their names (2). Scroll through this list, put ticks next to the names of the children you want to also appear in this group (1), then to finish off, press 'Save login page'. If a different group of children is appearing, and it makes sense to, you can always change the selected group. You don't have to though! The most important thing is that every child you want to use this group login page is visible and has a tick next to their name. Also, as mentioned above, make sure they have a password set - this tutorial explains how to do that if you're not sure. Add/remove a child to an existing group login page only If you need to just add/remove a child from the group login page and not from the group itself, you can do this by editing the group login page on the 'Child Login' tab. Start by going to the 'Child Login' tab (1), find the group you want to remove the child from and click 'Manage' (2). If you scroll down, you will see a list of the children that are in this group. Click 'Edit' on the right. If you scroll down to the bottom of the Edit page, you will see the list of children again under the title 'Which children can log in?'. Here you'll see whichever group you chose when setting up this group login page, and whether you chose to include all of them or just some. If you're removing a child, remove the tick in the box next to their name. If you're adding a child then add a tick next in said box! If the child you want to add isn't in the list of available children then you might want to go back further up this tutorial and actually add them to the group from 'Manage Groups' (follow the directions for Add/remove a child from an existing group login page and from an established group). Alternatively you can change the group you've selected to 'All children' and tick any children you want to be able to login in. When you're done though, remember to save! Go back to Main Tutorials Page
-
Once you've set up a group login page (see our tutorial on that) you can set up the tablets and computers you'd like the children to access the login page from. You can set up as many as you like, and in fact, you will need to set up several if you'd like multiple children to be logging in at the same time. There are 4 ways of enabling a group login page, so within this tutorial, I will go through each of them in their own section. You can also use the links below to jump to a specific section. 1) On a computer you're already logged into 2) Using the camera on the device you'd like to set up to scan a QR code 3) Using a web address link you've sent to the device you'd like to set up 4) Using magic words via the Tapestry Login page on the other device In all cases though, you will need to get the part of Tapestry where you can choose your option. There are 2 places you'll find that, but the one that is appropriate for you depends on whether you're currently setting up the group login page, or if that's already been done. Scenario A - When you are setting up the group login page Towards the end of that process you will get to a screen that looks like this. Scenario B - You're setting up the other devices after the group login page has already been created Go to 'Child Login' (1) as a manager, the staff member who created the group login page originally, or a staff member who is allowed to manage the group login pages set up by other staff members. Then find the group login page either in your own list, or by clicking on 'show class or group login pages set up by your colleagues' (2). From there, look at the 'Add this login page to a new computer' section. Okay, just before we look at your 4 options, there is a bit of a caveat with all of them. If you have different login 'profiles' on the computer/tablet you're trying to set up i.e. you have to choose your name/type in your email address and password when you start up the computer, then you need to make sure you're on the profile the children will be using too. Also, if you have multiple browsers e.g. Internet Explorer, Firefox, and Chrome, you need to make sure you're using the one the children will be. Normally, those things are irrelevant when you sign into Tapestry, but in this case, Tapestry decides whether a group login page will appear or not based on the 'cookies' it can see. Those are linked to the computer user profile and the browser you're on. If you're logged into your staff user profile (on the computer, not just on Tapestry), or if each child has their own user profile (again when starting up the computer), then your best bet might be to get the children to enable the login screen when they first try to log in. The best options for that are Option 2 (QR code) and Option 4 (magic words). Option 1: Giving access to children on the device you're already logged into For those of you in Scenario A (you're currently setting up the group login page) you need to click on 'This Computer'. For those of you in scenario B you also need to click on 'This Computer', but it looks like this. And that's it. If you go back to the Login page, you'll be able to see the group you're setting this up for. Option 2: Using the camera on the device you'd like to set up to scan a QR code You might want to use this if you want the children to access Tapestry from a computer you're not currently logged into. The devices you want to set up will need to have a camera so it'll probably be the best option for you if you're setting up chromebooks with a QR reader already installed or fairly modern tablets. You don't have to enable all the devices right away, if you'd rather get the children to help you by setting up their own devices, you can just print the QR code for them and give it to them to use when the lesson starts. What you need to do to get that QR code, is click on 'Other school computers' if you're in Scenario A. And then 'yes' to the first option. Or, if you're in Scenario B, click QR Code. Either way, a page will appear with a QR code and some instructions. Once you (or the children) are ready to set the devices up, you can scan that QR code by opening the camera on the device you're setting up and holding that up to the QR code (as though you were going to take a picture of the QR code, but you don't actually have to take the picture), or opening your QR reader app and holding that up to it. At this point you might get a little pop up asking if you want to open a web page. If you do, say yes! That will add the cookies to the device's default browser and the next time you or anyone else goes to tapestryjournal.com on that device, they will be able to see the group login page. Option 3: Using a web address link you've sent to the device you'd like to set up This next option will give you a web address to go to. You'll need to send that to the device you want to enable the login page for. The most common way would be to email it across, but if you have any other way of sending information between devices e.g. a chat system or shared document system, you could use that instead. The web address is very very long though and has a mix of upper case letters, lower case letters, and numbers, so although you technically could just try to copy it across to another device by writing it down and typing it in, it will take ages and your eyes might hurt by the end of it (mine did when I tried!). If you want to do something like that, jump to option 4 - that's a much easier way to do it. To get the web address, if you're in Scenario A, you'll need to click on 'Other school computers' again, then choose the second option. If you're in Scenario B, you should click on 'Magic Link'. In both cases that will open up a page with the link in and some instructions. That is the link you should send across to the device you want the children to login with. Option 4: Using magic words via the Tapestry Login page on the other device This final option is one you should use if you can get to tapestryjournal.com on the device and user profile the children will be using. As with the QR code, you might want to let the children enable the group login screen for themselves. In Scenario A, you need to choose 'Other school computers' again, then choose the third option. In Scenario B you should choose 'Magic Words'. That will bring you to a page that contains screenshots and instructions for what to do next, and finally 4 magic words at the bottom. You or the child enabling the login page can follow those instructions, making a note of the four magic words at the bottom and typing them in when prompted. Those magic words will change daily, so you might need to go and get new ones between lessons if the group login page disappears or you want to use a new device. So that's it! You don't always need to stick to just one option. Feel free to try them all out and see which one works best for you! One final thing to know, is that once a group login page is added to a computer, it'll stay there until the cookies are cleared, the ability to login is turned off (see the final section in this tutorial), the group login page is deleted, or until it expires. It will expire if it's not used for 6 months. Back to Main Tutorials Page
-
Once the Child Login has been enabled (see how to do that our Enabling Child Login tutorial), you can start setting up groups of children to use it. The first thing you'll need to do, is go to the 'Child Login' page. You only need to set up one login page for each group of children, even if they have lots of different teachers. As long as you're a manager, or you have permission to see the pages set up by your colleagues, you can check what's already been made by clicking on 'Show class or group log in pages set up by your colleagues'. Please note this section will not appear if you and your colleagues have not yet set up any login pages. If the group you're looking for doesn't seem to have their own page yet though, you'll want to set it up for them. To do that, either click on '+ Create a page for a new class of group', or 'Set up school computers for children'. If you can see the group you want to use Child Login, but you're not sure how to make sure they can use it from the devices you have, check out our tutorial on enabling group login pages for other computers. If you click '+ Create a page for a new class of group', then you'll skip the next two screens I'm going to show you. If you click on 'Set up school computers for children' though, you'll first be taken to a page explaining why you need to set a login page up for each group. If it is your first time setting up a group login page you will need to choose the option to 'Set up school computers for children'. Then, when you click to 'set up school computers' you'll be taken to a screen where you can see any login pages you've already set up (1), a link back to the explanation from the previous page (2), and the option to create a new class/group login page (3). Let's click on option 3. Now you need to choose which children you want to create this login page for. If they have already been set up as a group within 'Manage Groups' (see our tutorial on setting up groups), you can choose that one from the drop down (1). If you want to select children that aren't already in their own defined group though, you can create a new one by selecting 'Edit groups' (2). That will take you to the control panel, so when you're finished there, you will need to click back on 'Child Login' in the blue menu at the top of the page and go through the same process as above until you are back at the 'Create a new class or group login' page. That's only really necessary if you think you'll want to see them as a group in another circumstance though. If you're specifically selecting children just for this login process, you can choose an existing group with them all in (All Children if there isn't a smaller one) and say you only want to include some of that group (3). If you do choose to only include some of the group, the children who can use this login page will only change if you edit it from the main 'Child Login' page specifically (or if they leave your school and their profiles are made inactive/deleted). If you choose 'All children in the group' though and then change this group from the 'Manage Groups' page in the Control Panel, those changes will be reflected in the login page you're about to create. So, if you have a group set up called 'Otters', and you create a group login page for them, then a new child joins and is placed in the Otters group, you can make sure they are added to the group you see across the rest of your account and to this login page just by adding them to Otters from the 'Manage Groups' page on the Control Panel. Equally, if you were to remove a child from Otters in 'Manage Groups', that child will no longer be able to log in using this login page. Our tutorial on editing a group login page explains that in more depth though! Click Next at the bottom of the page when you are ready. The next page will give you several options about how the group is displayed on the Child Login page; you can choose a group picture (1), how the child should be shown on the login page (as their profile picture, first name, last name, or any combination of that) (2), and what visibility the children will have when they type in their passwords (3). When you are happy, click Next (4). The following page will confirm your choices - if you want to change any of these, just click 'Back' (1). As well as confirming your choices, you can also choose a name for the group login page, although one will be automatically generated for you to start with based on the group name (2). When you are ready, click 'Create Login Page' (3). If all/some of the children haven't got passwords set already, at this point Tapestry will give you the option to generate passwords for them. You can choose the strength of the passwords from the drop down (1) and click 'Generate passwords for these children' (2), or if you'd rather do this at another time, you can click 'Skip' (3). If the children already have had passwords set for them though, this page will not appear. If you need to set passwords for some or all of the children, we would recommend taking a look at our child password setting advice tutorial. Tapestry will then give you the option to preview what the login page will look like to the children when they go to log in (1). If you need to change something, you can do so by clicking 'Make Changes' (2). When you are ready, click 'Next' (3). You can now choose whether you want to allow children to use the computer/tablet you are setting up the group login page from (1) or if you'd like them to use different devices (2). You can read more about the options for setting up other computers in our 'Enabling the same group login page on other computers' tutorial but for now, lets select 'This computer'. That will take you to a page which confirms that children can now log in using the browser on your computer and explains when they won't be able to log in. The ability to log in is tied to the cookies on your browser, so if you know those are cleared frequently, you might also want to take a copy of the direct link which will add those cookies again. You can now click 'Finished'. You are all done now, but Tapestry will show you a page with details on how you/the children can find the login page now that it has been created, and how you can turn that access off and on again. When you are happy, click 'Finished' again at the bottom of the page and the system will return you to the Child Login main page. You will be able to see your new group in the list (1) and a button to turn access for them off (2). So, that's how to set up group login pages for the Child Login. This tutorial will then talk you through how to use the Child Login. Go back to Main Tutorials Page
-
The Child Login feature can be used to allow children at your setting to view observations and activities they have been attached to, leave comments, and upload their own posts about their learning. Each child will have their own password and can be set up to access Tapestry whilst at school and at home. Note: Before you start using Child Login you should think about how you're intending it to be used and update any policies you have which might be affected. For example, take a look at the user permissions for your account to see whether children and relatives are allowed to comment on group observations. If they are, are you happy with that still, and do you need to discuss with the relatives or children when you would expect them to comment and the sorts of things you'd expect them to say? You can find out more about how to find and amend user permission at the end of this tutorial. You should also consider whether the children aware of who they're sharing the things they put on Tapestry with (the school, Tapestry, and in some cases their relatives, other children's relatives, and other children). To use this feature, you will need to make sure that it has been enabled for your setting. You can do this by going to the 'Control Panel' (1), then 'Features' (2). Scroll down the Features list to find 'Child Login' (1) and click to enable the feature on the right (2). If the Child Login feature has a 'Disable' button on display and the text 'Currently Enabled' next to it - - then this means the feature is already enabled and you should be able to see 'Child Login' as an option in the blue menu at the top of your screen, alongside other the features such as 'Observations' and 'Documents'. As with other features in the Features list, you will also see there are buttons relating to the settings and permissions for the Child Login feature. You can use these to set or change permissions for children, relatives and staff and use the settings to customise the password visibility for when children go to log in. You can access the Child Login settings from within the Control Panel by selecting 'Settings' from the left-hand menu (1) and then 'Child Login' from the drop-down menu (2). Here you can set whether when a staff member or relative switches to login as a child, you want the child's password to show up automatically when entered, to allow a button which they can click to show the password or to never show their password. The user permissions for children, staff and relatives can also be changed at any point by selecting 'User Permissions' from within the Control Panel (1) and then choosing the appropriate user type from the tabs at the top (2). Below you can find tutorials talking you through how to set permissions for staff, relatives and children. Setting user permissions for staff Setting user permissions for relatives Setting user permissions for children So, that's how to enable and set up Child Login on your account. Linked below you can find tutorials explaining how to generate passwords for children, set up login pages, set up home access and how to use this feature. Generating passwords for children for the Child Login Setting up the login pages for groups of children Setting up home access to the child login How to use the Child Login feature Go back to Main Tutorials Page
-
Hi, Aha, gotcha! Righto, I will pass on your idea to the rest of the team, although I'm not sure from a data protection point of view if this is something we'll be able to add or not - but it is certainly always worth an ask. Leave it with us and we'll see what we can come up with Kat
-
Hi, Do you mean that you are wanting to start the transfer yourself, as the receiving setting? Or are you looking for a way to contact the sending through Tapestry to prompt them to start the transfer process? If you are looking at the former, I'm afraid it is not possible to request a transfer from another setting directly as the receiving setting - the setting that holds the data (so the 'sending' setting) has to first generate a transfer name and key, then pass it on to the receiving setting before anything can be transferred. The reason it was set up this way is because the sending setting is responsible for the child's data before it is sent anywhere else, therefore it cannot be sent out before they give permission to do so and they also have to decide which parts of the child's profile they wish to send to the receiving setting (so for example, they may be happy to send out the child's observations, but they may wish to not send certain reports). Ultimately, it is the sending setting that holds responsibility for the child's personal data and so they have to be the one to initiate the transfer. The 'merge child accounts' function was created so as to help mitigate the issue you have raised, in that a child may start with you before any previous profile is transferred. We appreciate it takes slightly longer, but the transfer system must comply with Data Protection. I hope this clarifies things a bit, but let us know if this is not what you meant! Kat