


EmilyTapestrySupport
-
Posts
1,005 -
Joined
-
Last visited
-
Days Won
9
Content Type
Profiles
EYFS Articles
Local Authority
Newsletters
Topic support
Book recommendations and reviews
Courses and events
Vacancies
Help documents
News items
Tapestry Newsletters
Podcasts
Tapestry Import
Forums
Downloads
Events
Gallery
Store
Everything posted by EmilyTapestrySupport
-
 The ability to record payments and see a child's account balance was added to Tapestry on 11/12/23. If you have already started using the Nursery Management system on Tapestry, you will notice some changes as to how this works with the addition of these new features. I'll run through these changes in this post. New invoice format option As part of this new release we have included a new format option for your invoices, so you may want to consider this before generating any more invoices on your account. You can access this from the 'Config' section (1) -> 'Invoices' (2). It's called 'Balance Brought Forward' (3). If you have this enabled, at the bottom of all your invoices you will see a line that says 'Balance Brought Forward' and it will show the child's account balance at the time of the invoice creation. To see what this would look like click on the 'Show Example' button (4). New 'Finance' tab on a child's page When you go the 'Children' tab on the left-hand side menu and click on a child's name, you'll notice the previous 'Invoices' tab has been replaced with 'Finance' (the other tabs remain unchanged). If you click on the new Finance tab, you'll see a green box with an announcement about the new account balances functionality. Once you've read this you can click on the 'X' to stop displaying it (1). Previously the Invoices screen here showed a list of all invoices for a child. You'll see there are now two different tabs, one called 'Transactions' (2) and the other called 'Invoices' (3). The transactions tab will show you a list of all payments and invoices for the child, with the most recent transaction appearing at the top. The Invoices tab displays just the invoices for the child as the Invoices screen did before. Let's look at the Transactions tab in more detail. Here you can see: A. The date of the transaction. B. What type of transaction it is, either an invoice or a payment (if it's a payment it will show what type of payment). C. The amount. If this is in orange it shows an account deduction, so the parent owes you money. If it is green this means money coming in to you, the setting. D. The account balance after the transaction. Each individual transaction can be clicked on to see more information. Any invoices you created for a child prior to account balances and payments being enabled will display here (E). You may notice there are some 'Other payments (F). These are system generated payments for invoices that have been previously marked as paid. This is to ensure that your account balance is correct for your historical invoices going forward. In the top right-hand corner above the list of transactions or invoices, you can choose to show any cancelled transactions/invoices (4) and add a new invoice or payment for the child (5). I've linked below the tutorials that talk you through how to do both of these things. Invoices: Generating an invoice Invoices: Recording payments On the right-hand side of the screen you will be able to see the current account balance for the child (6), the child's bill payers (7) and the child's billing address (8). The account balance you see here will take into account any previously generated paid and unpaid invoices for a child. If there are any outstanding invoices for the child you'll see the account balance will be negative. The tutorials underneath explain these features in more depth. Invoices: Account Balances Invoices: Assigning Bill Payers Invoices: Adding/editing a billing address for a child Changes to the Finance tab There are a few changes and additions to the 'Finance' section (1) in the left-hand side menu. The 'Invoices' screen (2) is still there, with a few small alterations which I'll go through. Also, There is now a new Account Balances screen (3). I'll go through the changes on the Invoices screen first. This screen looks very much the same as it did before, but instead of a 'Status' column there are now two different columns. The first, Payment (1), shows whether the invoice is unpaid, paid or partially paid and the second one shows if the invoice has been sent or not (2). As I mentioned earlier, you can now record payments for children on Tapestry. You can do this from the Finance page for an individual child, as shown above, and you can also do this from here. To add a payment from here, just click on the cog button for a child that has an invoice in the period you are viewing (3). Then from the drop-down, select 'Add Payment' (4). The Account Balances screen (1) is completely new with this release. This screen shows you each child (2), their current account balance (3), when their most recent invoice was and how much it was for (4) and when their last payment was and how much it was for (5). Please see this tutorial for more information about Account Balances on Tapestry. New Extra Charges screen As part of this release we have included another new screen. This page allows you to see the number of extra charges for any given day and week. This can be found from 'Rooms' (1), then either selecting to view the whole setting or a specific room (2), then clicking on the 'Extra Charges' tab at the top (3). This tutorial talks you through the screen in more depth. Export your invoice data The last new feature included in this release is the ability to export your invoice data. You can access this from the 'Exports' tab (1), then selecting 'Invoice Data Export' (2). Here you can choose a date range (3), what children's data you want to include in the export (4) and the format type (5). Once you've done this, click 'Generate CSV' (6). To see how to do this in more detail, what the different format options are and what the CSV looks like, take a look at this tutorial. So, those are all the new additions included in this release. We hope you find them helpful! If you have any questions about them, or the Nursery Management system on Tapestry in general, please get in touch with us by emailing customer.service@eyfs.info.


-
Letters for Parents
EmilyTapestrySupport replied to Home-School Tutoring HCB's topic in Tapestry user conversations
Hi Clare, These resources are now housed on our info site; you can find all the template we have on this page here. It's also worth bearing in mind that we have a separate tutorials page for parents which you may want to link them to. You can find this here. I hope this helps! Best wishes, Emily -
If your child's setting (nursery, pre-school, childminder etc.) have decided to use the Booking and Invoices features on Tapestry, they are able to book children into sessions and then invoice them accordingly. After they have created an invoice for a child, they can choose to send this to you directly via email. Once they have sent an invoice through their Tapestry account, you will receive an email with a link in that you can follow to open the invoice. The email will have the subject 'New Invoice from Tapestry'. If your child's setting have told you they have sent an invoice to you but you have not received an email, do check your spam/junk folder as it may have been filtered into there. Once you open the email you can click where it says 'View Invoice' to open up a PDF of the invoice (1). Please note, invoice emails are sent from our noreply email address, so any replies directly to the invoice email will not be received. If you have any questions about an invoice, please direct them to your child's setting. If they have set up a contact email for relatives, this will appear in the body of the email (2). As well as receiving an email with a link to your invoice, you will receive an internal notification within your Tapestry account. If you log in to the browser version of Tapestry, you'll see a bell icon in the top right-hand corner by your name. If you have a new notification, a number will show up next to this icon indicating the amount of unread notifications you have. If you click on the bell icon it will bring up a list of your notifications. You can click on the invoice notification to open the invoice as a PDF. Below you can see an example invoice. I'll go through what you can see here: At the top you will see some basic information about the invoice including: the setting name, the child's name the invoice is for, the period it covers, the invoice number, the invoice date and due date for payment. If you see some extra text/information above the 'Summary' section, this will have been inputted by your child's setting. In the 'Summary' section you will see a breakdown of the charges included in the invoice. You may see an extra section with a blue heading in the 'Summary' which breaks down the bookings that are included in a child's regular schedule. Whether you see this or not is dependent on your child's nursery/pre-school/childminder's settings. Underneath the summary you will see the total amount due. If you see some extra text/information below the 'Total to Pay' section, this will have been inputted by your child's setting. Depending on what your child's setting have decided to include on invoices, it may be spread across several pages. At the top you can see how many pages are included in the invoice. If you have extra pages, you may see a heading in blue at the top that says 'Regular Schedule Bookings'. This is a more detailed breakdown of the sessions that are included in the invoice. Back to contents page


-
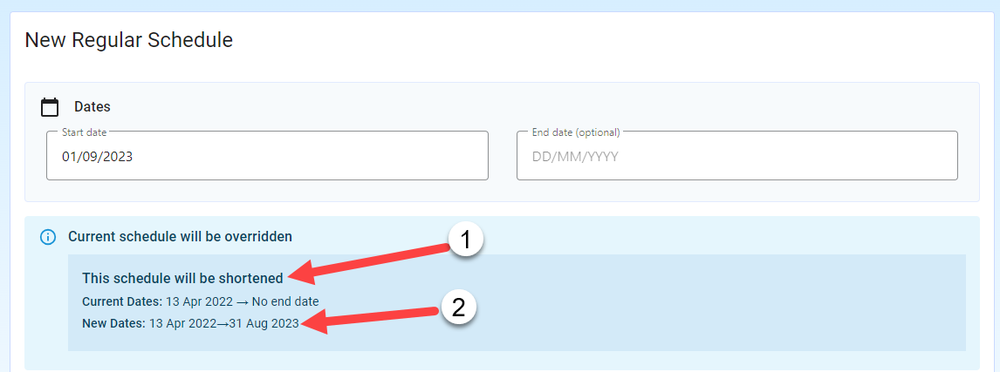
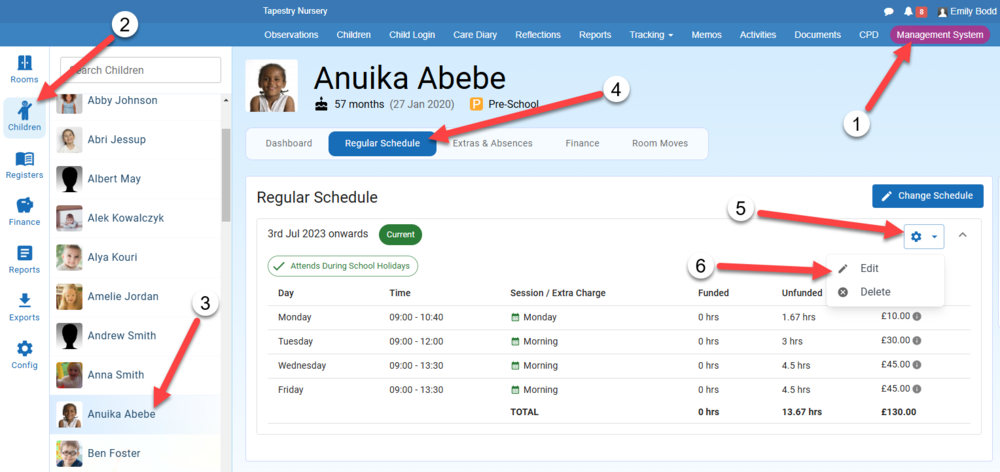
In this tutorial I'll show you how you can apply the extra charges on your account to a child's regular schedule. Extra charges can be any additional product/service/consumable that you wish to charge for, such as nappies or lunches. Before you are able to apply extra charges to a child's schedule, you'll firstly need to set these up in your Config. This tutorial will talk you through how to do this. Once you've set up your extra charges there are two ways in which you can proceed. How you proceed will depend on: A) Whether or not you have set up regular schedules for children yet. B) If you have set them up already, whether you want to edit these existing schedules or create new ones. The first way I'll go through will be the one to follow if you haven't set up children's regular schedules yet, or you want to set up new regular schedules for your children. Please find quick links for both options below: How to apply extra charges to new regular schedules How to edit existing regular schedules to add extra charges How to apply extra charges to new regular schedules To do this you'll need to go to the 'Management System' tab at the top of the page (1) and select 'Children' from the left-hand side menu (2). Then click on the child you want to add extra charges for (3). This will take you through to their dashboard. You can add a new schedule for the child either by navigating to the 'Regular Schedule' section (4) on their dashboard and clicking on the 'Change Schedule' button (5) or by going to the 'Regular Schedule' tab at the top (6). If you have already set up a regular schedule for a child but want to add a new one for them which includes their extra charges, you can proceed in the same way as above. In the 'Regular Schedule' section you'll see their current regular schedule (1). Click on the '+ New Schedule' button to proceed (2). Here you'll need to add a start date for the schedule (1) and you can also add an optional end date (2). Next you can select whether they attend during school holidays (3) and what funding type they receive (4). If you haven't set up your funding types yet, this tutorial will talk you through how. Before you are able to proceed you will need to add a start date for the schedule (5). Once you have entered a start date, the 'Sessions' section will appear (1). If you haven't previously added a regular schedule for this child, all the sessions will be blank. You can choose which session/s the child attends for each day using the '+ Add Booking' button (2). This tutorial talks you through the process of adding a regular schedule for a child in full. You can add extra charges for each day by clicking on the '+ Add Extra Charge' button (3). If you have already added a regular schedule for this child and the start date for this new schedule falls within that schedule's period, once you've entered a start date, you will see a message appears telling you the current schedule will be shortened (1) and it will show you the new dates for that schedule (2). Once you have entered a start date, and you have an existing schedule for this child, you will see your sessions are already populated with the information from the previous schedule (1). If you want you can change a session (2), the start or end times (3) or the number of funded hours (4). You can also remove the session completely from the child's schedule (5). To add extra charges for a day, just click on the '+ Add Extra Charge' button underneath the session/s (6). After clicking on the button to add an extra charge, you will be able to select one of your extra charges from the drop-down (1) and the quantity (2). If you add an extra charge by accident, you can delete it using the bin icon (3). If you need to add more than one extra charge for each day just click on the '+ Add Extra Charge' button again (4). At the bottom of the screen you'll see a 'Summary' box (1) where you can see the totals of the number of chargeable/funded hours as well as the total cost for this child for the week. You can either cancel any changes you've made (2) or save the new schedule (3). Now let's look at how to add extra charges by editing an existing schedule. How to edit existing regular schedules to add extra charges If you have an existing schedule for a child and you want to edit that as opposed to create a new schedule, you'll need to be on the 'Management System' tab (1), then select 'Children' from the left-hand menu (2) and click on the child you want to do this for (3). Once on their profile, select the 'Regular Schedule' tab along the top (4). You'll then need to click on the cog button for the schedule (5) and choose 'Edit' from the drop-down (6). If the schedule has already started you'll see a note stating that editing the schedule may affect historical bookings (1). Please note: if there are time periods within this schedule which have not been invoiced yet, the Extra Charges you add now will be included on any new invoices you create. This includes invoices for past periods. If the existing invoices cover the schedule's start to end date, the extra charges you add now will only appear on new invoices from today. You'll also notice you can't make any changes to the sessions at the moment (2). To do this, you'll need to click on the 'Edit Sessions' button (3). Clicking on the 'Edit Sessions' button will bring a pop-up box where you will need to confirm if you want to go ahead with editing the schedule (1) or start a new schedule (2). To cancel going ahead with the edits you can select 'Close' (3). You'll see that after you click to proceed with editing, you can then make changes to the sessions. To add an extra charge or charges to a day, click on the '+ Add Extra Charge' button underneath any sessions for the day. You'll then be able to select an extra charge from the drop-down (1) and a quantity (2). If you want to delete an extra charge, click on the bin icon (3). To add multiple extra charges for a day just click on the '+ Add Extra Charge' button again (4). At the bottom you will see a Summary section where you can see the total, funded, and chargeable hours (1). If you change your mind at any point you can 'Cancel' (2) or to proceed, click 'Save Schedule' (3). Go back to Main Tutorials Page


-
In this tutorial we will look at how you can add a one off extra charge. If a child has extra charges that will need to be charged for regularly, e.g. lunches for every day they attend, you can apply these charges to their regular schedule. This tutorial will talk you through how to do this. Extra charges can be any additional product/service/consumable that you wish to regularly charge for such as lunches, nappies and trips! Before you are able to add an Extra Charge you will need to set up some Extra Charges in your 'Config'. If you haven't done that yet then this tutorial will guide you through it. The first thing you'll need to do is to navigate to the 'Management System' page (1) and then select 'Children' from the menu on the left-hand side (2). Then click on the child you wish to add an extra charge for (3). This will take you to that child's dashboard. Here you can see any extra charges, extra bookings or planned absences the child already has in the bottom left-hand corner (1). To add a new extra charge, click on the 'New' button in this section (2) and then select 'Charge' from the drop-down list (3). You can also go to the 'Extras & Absences' tab at the top to do this (4). On the pop-up you will need to select the type of extra charge (1), the quantity of that extra charge (2) and a start date (3). You will then be able to see the price of this extra charge which will be reflective of the quantity of the extra charge (4). You can also decide whether you would like the extra booking to repeat weekly (5) - if you do this you will be able to select an end date. In the last section, you have the option to add a note (6) which will appear next to the extra charge when you select to view all of your extras and absences. On the right you can access links to open the child's regular schedules, room moves or extras and absences in a new tab (7). Once you are done, click the 'Create Extra Charge' button at the bottom right (8). You should now be able to see your extra charge under in the 'Extras & Absences' section. You can use the buttons to the right of your booking to make any edits (1) or delete it (2). If you are doing this from 'Extras & Absences' tab (1) you will also see the price of the extra charge (2). Back to Main Tutorials Page


-
In this tutorial we are going to take a look at adding a planned absence. Please note that if you are using 'Invoices' on Tapestry any absences you add will not be discounted from the invoices you generate. The process for adding planned absences is very similar to adding extra bookings, so if you have read the extra bookings tutorial it will be familiar. To start you will need to go to the 'Management System' tab (1), select 'Children' on the left (2) then click the child you would like to book the absence for (3). This will take you to a child's dashboard. In the 'Extras & Absences' section of the dashboard you can see any extra bookings, absences or charges that have already been added (1). To add a new absence click on the 'New' button (2) and then select 'Absence' from the drop-down menu (3). You can also do this from the 'Extras & Planned Absences' tab (4). You will then be able to select the reason for the child's absence (1) - either 'Holiday', 'Illness' or 'Other Absence' - and the dates they will be absent (2). If you untick the 'Whole Day' box (3) this will give you the option to select a start and end time as well as the date, so you can use this to signify that they will be absent for part of the day. You will also have the option to add a note (4), which will appear next to the absence when you view the child's absences and extra bookings. Once you are done, click the 'Save Absence' button at the bottom (5). You will then be able to see your absence under the 'Extras & Absences' section (1). If you need to edit (2) or delete (3) the absence you can do so by using the buttons to the right. You'll also be able to see any absences on the child's calendar (1), these will be displayed both at the top of the calendar as well as over the child's regular schedule (2). You'll also be able to see how long the absence is for on each day (3) and the absence type (4). Back to Main Tutorials Page


-
In this tutorial we will look at how to add an extra booking. The first thing you will need to do, whether you are adding an extra booking or a planned absence, is to navigate to the Management System (1), select 'Children' (2) and then the child you would like to add the extra booking or planned absence for (3). This will take you to that child's dashboard. Here you can see any extra bookings, planned absences or charges the child already is in the bottom left-hand corner (1). To add a new extra booking, click on the 'New' button in this section (2). You can also go to the 'Extras & Absences' tab at the top to do this (3). When you click the 'New' button (1) you will see three options appear, just select 'Booking' (2). It is the same process to do this from the 'Extras & Absences' tab. You will then be able to select a session, as well as choose a start and end time (1), select a date (2), and decide whether you would like the extra booking to repeat weekly (3) - if you do this you will be able to select an end date. You will also have the option to add a note (4) which will appear next to the booking when you select to view all of your extra bookings and absences. On the right you can access links to open the child's regular schedule, room moves or extra bookings and absences in a new tab (5). It's worth noting you will not be able to add the booking if it clashes with their regular schedule, or any other extra bookings or planned absences. Once you are done, click the 'Create Booking' button at the bottom right (6). You should now be able to see your booking under the 'Extras & Absences' section (1). You can use the buttons to the right of your booking to make any edits (1) or delete it (2). If you are doing this from 'Extras & Absences' tab (1) you will also see the price of the extra booking (2). You can also see the extra booking in the child's calendar (1) where you'll be able to see the session type (2) and time the extra booking starts and ends (3). Back to Main Tutorials Page


-
Once Messaging is enabled on your account, you can access it by clicking the speech bubble icon at the top of the screen (1). Your conversations will appear on this page. However, if you have just enabled the feature this will likely be blank, like the screenshot below. To start a new conversation, click the 'New Conversation' button at the top left (2). You will then be given a list of all staff and relatives on your account. To start a conversation with a user, click on their name (1). You can also search for a specific user using the search bar at the top (2). Under each relatives' name, the names of linked children, and their relationship to them will appear (3). To send a message, type your message into the box (1) and click the arrow icon (2). Messages you have sent will appear in a green-shaded box, and received messages appear in a grey-shaded box (3). You can delete messages by clicking the bin icon above them (4). You will be able to see your other conversations on the left hand side (5), allowing you to easily switch between them. A number will appear attached to the envelope icon to indicate that you have new messages in that conversation (6). If you are not in the Messaging page, a number will appear next to the speech bubble icon, to let you know you have unread messages (1). If you are a manager you will be able to view other staff members' messages by clicking 'View another user's messages'. You will then be able to click a staff member's name from the list (1) to view their messages. You can also use the search bar at the top to find a specific staff member (2). You will then see that staff member's conversations - if they have any. You can click on on of the conversations to open it. As with your own, it is possible to delete another user's messages by clicking the bin icon (1). However, it is not possible to reply to another user's conversation. You can use the buttons at the top of the page to go back to your own messages (2), to return to the previous page (3), or to view another staff member's messages (4). Back to Main Tutorials Page


-
In this tutorial we are going to look at how draft observations work on the iOS app. This feature will allow you to save what you're doing without adding it as an actual observation. You can then return back at a later time to complete it and upload it to Tapestry. Please note that drafts are saved for up to 91 days for staff members and after this they will be deleted. Also, drafts are stored on the device they were created on and are tied to the user's account that created them. They will only be visible when the user that created them logs in onto that specific device. So to do this, while creating an observation you can "Cancel" adding the observation at any time (1) and this will give you the option to either "Keep draft" or "Delete draft" (2). Please note, you will need to add a title before you can save a draft. A draft won't show up in your main list of observations, but if you have any on your device, these will be listed at the top of your observation list. To continue editing your draft, simply click where it says "[1] draft observation on this device" and then click the title of the draft you wish to edit. This will take you back to your Observation and you can continue to edit as needed. If you are happy with it and wish to upload this as a full observation, just click "Upload" in top corner. Alternatively, If you want to delete or continue editing the observation at a later time, then just click "Cancel" (1) and select either "Delete draft" or "Keep draft" (2). Please note that drafts are saved for up to 91 days for staff members and after this they will be deleted. Also, drafts are stored on the device they were created on and will only be visible when the user that created them logs in onto that specific device. If you have any questions or feedback about the iOS app, please contact us by emailing customer.service@eyfs.info. Back to Main Tutorials Page


-
When adding an assessment framework to your observation, a handy feature is the ability to 'bookmark' an assessment framework, and also bookmark aspects/areas and age bands/levels/stages within that framework. You can use this to quickly add assessments to observations from your most used ones. To add a bookmark you first need to select the relevant framework. Then click on the 'Add Bookmark' button on the bottom right-hand side corner. This will bookmark a whole assessment framework but you can also bookmark specific areas/aspects of a framework by selecting the appropriate area/aspect and again tapping on 'Add Bookmark' in the bottom right-hand corner. Now that you've added your bookmarks, when you select 'Pick assessments', you'll be able to click on 'Bookmarks' on the bottom left-hand side corner. And here you will see a list of your bookmarked assessments or the areas/aspects within them. To remove a bookmark you just need to slide the assessment you wish to remove to the left. Then, click on 'Remove' (1). You can also select 'Clear All' (2) to delete them in bulk, or 'Hide Bookmarks' (3) to return to your assessment picker screen. And that's it! For more details on adding an observation within the app please have a look at this tutorial. Back to Main Tutorials Page


-
In this tutorial we will look at how you can use the Online Register for children on the iOS Tapestry app. If you want to learn how to take a staff register, please take a look at this tutorial. To open the Online Register, tap on the 'Register' button at the bottom of the screen. You should see a list of your children, along with their expected times for the day. You can mark a child as 'in' or 'out' using the 'In' icon on the left-hand side (1) and the 'Out' icon on the right-hand side (2). The times they have been marked in or out will then show up under the 'Registrations' column (3). If children are expected in and have not been marked as 'In', they will show up as late (4). Children who are marked as 'In' are shaded green (5) and children who are marked as 'Out' are shaded orange (6). At the top of page you will see options to register 'Children' or 'Staff' (1). We are staying on the 'Children' tab but to learn more about the staff register, take a look at this tutorial. You can change the day you are viewing (2), filter your list by a specific room (3), and change the sorting order of the list of children (4). There is also a box you can tick to show children who do not have bookings that day (5). If you are viewing a past register you should see a message stating this (6). If you click on a child's name (1), this will bring up an expanded view for that child. Here you will be able to mark the child as in or out (2), as well as edit the times they are registered as being marked in or out (3). Here you can also see when they are expected to be in for the day you are viewing (4) and you can add an absence for them (5). Lastly, you can see their bookings for the day you are viewing (6) and you can add register notes for them (7). If you select to add an absence for a child, a menu will pop up that will allow you to select the reason for their absence. The options are: 'Illness', 'Holiday' or 'Other Absence' (1). You can also add the dates and times they are expected to be absent (2), and any notes (3). Once you are done, click the 'Save Absence' button (4). In the screenshot below, I have returned to the main register screen after adding a register note and an "Illness" absence for the child, Alan Wilkinson. The register note is indicated by the document icon in the corner of the child's portrait (1), and the absence appears under their expected times (2). And that's how you use the online register on the iOS app. Back to contents page


-
You can access the Comments section of our Care Diary feature by navigating to the Care Diary (1) and then selecting 'Comments' (2) next to your child that you'd like to view the comments for. You'll be taken to the comments page where you a can view the comments from the last 7 days (1). To change the date just click on the arrows to scroll forward or back (2). Alternatively, click on the day shown (3) to open up a calendar. You can select a new date from here (4) and then click 'Done' (5) to select the new date. You can view comments (1) and, if you've been permitted by the setting or school, type out your own in the comments box (2). Press the send arrow to post your comment (3) which you'll then see appear in the comments thread (4). To like a comment click on the thumbs up symbol to the right of it (1). If you select a comment (2) you'll get a pop up with all of it's information (3) and have the ability to reply directly to that comment (4) in a new thread. Back to Tutorials Page


-
If your child's school, nursery or childminder have decided to share Care Diary entries with you, you'll be able to access this feature on the iOS app by navigating to the Care Diary tab at the bottom. If you receive notifications through Tapestry and your child's setting notify you of a new entry/entries, the bell icon in the app will alert you to of this. If you tap on the bell icon, you'll then see the notification for the new Care Diary entry in the list (1). If you tap on that you'll see details of the entry (2). Once you are on the Care Diary tab you'll see profile cards for any children you are linked to. Here you have two options: View entries for a child. View comments between you and staff at the setting for this child. This tutorial talks you through sending/receiving comments through the Care Diary. Choosing the option to view entries will take you to the child's entries for a day. You'll see them listed on the screen (1). You'll only be able to see Care Diary entries for a day at a time but you can view entries for previous days by using the calendar and the left/right arrows at the top of the screen (2). And that's how to view entries on the Care Diary on the iOS app. If you have any questions, please direct them to your child's school/nursery. Back to contents page


-
In this tutorial we will look at viewing, editing and deleting entries on the Care Diary on the iOS app, as well as permitting access and notifying relatives of these entries. Please note, entries will only need to be permitted if you have the setting 'Staff must approve relative access to entries' set to enabled. Quick links: Viewing your Care Diary entries Permitting relative access and notifying relatives Editing and deleting entries To begin, log into the Tapestry app on your device and select the Care Diary option at the bottom of the screen. Viewing your Care Diary entries Once on the Care Diary screen, you will see your list of children. Select the 'Entries' button to view a child's entries for a day (1). If you are looking for an active Accident report (an accident that needs approving by a manager or an accident that's not yet marked as discussed), you can instead use the 'Accidents' option at the top of the screen (2). To see more information on how to record accidents on the iOS app, please see this tutorial here. Next to the 'Accidents button'. The entries screen will show you all the entries made on a particular day (1). You can use the calendar option to change the day you are viewing. You can also use the arrows to view previous and next days (2). You can tap on an individual entry to view it in more detail (3). Here you can see the entry in full. Permitting relative access and notifying relatives As I mentioned earlier in the tutorial, staff will only need to permit relative access to entries if the option 'Staff must approve relative access to entries' is enabled on your account. A manager can enable/disable this from the browser by clicking on their name in the top right-hand corner (1) and selecting 'Control Panel' from the drop-down (2). Then from the left-hand menu, select 'Settings' (3) and then 'Care Diary' (4). From the Care Diary settings page they'll see this option where they can tick or untick it (5) and then 'Save' (6). If this option is enabled, you can permit relative access to an individual entry by opening that entry and selecting the 'Permit relative access' button at the bottom. Alternatively you can permit relative access to all of a child's entries for a day from their main entries page. Please note that if you add any further entries for a child, for that day, these would need to be permitted as well. Once you have permitted relative access you will then see the option to notify relatives (1). You will also be able to remove relative access (2). After relatives have been permitted access to a child's entries for a day and been notified, you will only be left with the option to remove relative access. Editing and Deleting Entries To edit or delete an entry just go to the 'Entries' page for a child. Then select the entry you want to edit or delete. When viewing an entry you can make any edits simply by changing the information on this screen (1). You'll find the delete button at the bottom (2). Back to Main Tutorials Page


-
In this tutorial we will look at how to add, edit, delete and publish draft Care Diary entries using the iOS Tapestry app. Using drafts can be helpful if you would like to start an entry and then finish it later. It's worth noting that drafts are local to both the user and the device they were created on. So if you sign into your account on a different device your drafts will not appear. Similarly, if a different user signs in on the device you used to create a draft entry, this will not be visible to them. There are two ways you can add Care Diary entries. The first way is to open the Care Diary (1) then go to a child's entries (2). You will then need to select 'Add Entry for [child's name]'' (1) and choose the type of entry you would like to create (2). The second way to add an entry from the Care Diary screen is to tap the profile icons of any children you would like to add an entry for (1) and then at the bottom, select the add entry button (2). This will bring up a pop-up menu where you can choose what type of entry you want to make. When adding an entry, to save it as a draft, select 'Cancel' in the top left-hand corner (1). This will bring up two options for you, select 'Save as draft' (2). You can view drafts one of two ways. Firstly, you can view all drafts for all children on your device by tapping on the 'Drafts' button at the top of the list of children. This will bring up a list of all drafts made on your device for a day (1). Tap on a draft to edit, save or delete it (2). On this screen you can also delete all drafts on your device (3). When viewing a draft you make further changes to the entry and then 'Save' (1) or you can delete it (2). Saving the draft will upload it as a full entry straight away. Alternatively you can view the drafts for a particular child by selecting the 'Entries' button (1). Here you will see a section called 'Drafts' (2) where you will see any drafts that have been saved for this child for the day you are viewing. Again tap on the draft to edit, save or delete it. Back to Main Tutorials Page


-
You'll never guess who I met!!!!
EmilyTapestrySupport replied to SueFinanceManager's topic in Staff Lounge
The best celebrity I ever met, I actually lived with for many years. It was..... our family dog Teddy 😂 When I was about 13/14 our dog Phoebe had puppies and we kept one. We registered them on the Kennel Club website and an animal trainer (who happened to be Gerry Cott of the Boomtown Rats!) got in touch with my mum asking if any of the puppies wanted to be a film they were making for TV. It was called After Thomas and it was about a little boy with Autism who gets a puppy and the bond him and this dog had. This is Teddy on the main menu of the DVD and in the sweetest scene where he had to fall asleep in bed with the little boy. He happily obliged!

-
Information system
EmilyTapestrySupport replied to MarshaD's topic in Weavers Future Development Suggestions
Hi all, I'm just getting in touch to let you know that Invoices is now live on Tapestry! This video quickly walks you through how it works and what it includes. I've also linked below some of the tutorials so you can get more of an idea of how you can use it: Invoices: Generating an invoice Invoices: Viewing an invoice Invoices: Marking an invoice as sent or paid This is just the first release of Invoices on Tapestry. We are already working on the next stage, which will include the ability to add your own Products/Additional items. Future releases will also include account balances, discounts, the ability to send invoices directly to parents via Tapestry and more! Do let us know if you have any questions about it. -
Attendance Register
EmilyTapestrySupport replied to carolyn_cresswell's topic in Tapestry user conversations
Hi all, I just wanted to let you know that Invoices is now live on Tapestry! 😁 This video quickly walks you through how it works and what it includes. I've also linked below some of the tutorials so you can get more of an idea of how you can use it: Invoices: Generating an invoice Invoices: Viewing an invoice Invoices: Marking an invoice as sent or paid This is just the first release of Invoices on Tapestry. We are already working on the next stage, which will include the ability to add your own Products/Additional items. Future releases will also include account balances, discounts, the ability to send invoices directly to parents via Tapestry and more! Do let us know if you have any questions about it. -
In this tutorial I'm going to talk you through how to use the 'Invoices' feature if you've already set up 'Booking' on your account. You can access 'Invoices' through the 'Booking' tab at the top of the page (1). From here click on 'Finance' from the left-hand menu and then select 'Invoices' (3). This will take you to a set up screen where you'll see we recommend you complete the following four actions before starting to use Invoices: A. Configuring your invoices B. Add pricing to your sessions C. Add your funding types D. Add funded hours to children's regular schedules I'll go through these actions in that order but you can click on the links above to skip to a specific section. A. Configuring your invoices This screen is where you can set what information shows on PDFs you generate of invoices. If you need to change the information you enter here, you can access this page at any point by going to the 'Config' tab (1) and then selecting 'Invoices' (2). At the top you can choose whether your setting logo appears on your invoices (3). If you haven't added your own logo but keep this option selected, the Tapestry logo will be used. You can see how to change your logo here. Underneath you can choose what text appears in the header and footer sections of an invoice (4). In the 'Due Dates' section you can set the number of days after an invoice is generated that it becomes due (5). Once you are done on this page hit 'Save' (6) and then you can return to the set up screen (7). B. Add pricing to your sessions If you have already set up your sessions on your account you will need to edit these to add your prices. If you haven't set up sessions yet, please refer to this tutorial. You can go back and edit your sessions, make them inactive or add new ones at any point by going to the 'Config' tab (1) and then selecting 'Sessions' (2). Here you will see a list of sessions already set up on your account (3). To add pricing to a session just click on the 'Edit' button for it (4). Clicking on the edit button will bring up a pop-up box. At the bottom of this you will see there is an option for 'Pricing', in this section click on the 'Add Pricing' button. Clicking on this will bring up more options for you. The first option you'll see is whether you base your pricing per session or per hour (1). Then underneath that you can see the option to base the pricing on children's ages (2). If you select this tick box you will see the price boxes underneath will change so you can enter prices for 0-2 year olds, children aged 2 years and children aged 3+ years. This price box is where you can enter how much you charge for this session (3). You can go in and delete pricing or a price change for a session at any point using the red bin icon (4) and if you want to add a price change in the future, you just need to edit the session again and click on the '+ Add Price Change' option (5). Once you are done here just click 'Save' (6). C. Add your funding types Something you won't have done when setting up Booking is add your Funding Types. Like the other options, you can change these at any point from the 'Config' menu (1). For this setting, just click 'Funding Types' (2). This page will be empty at first but once you add funding types you will see them here. Click on the 'Add Funding Type' button to proceed (3). This will bring up a pop-up box where you can enter the funding type name (1) and an optional description. By default the status will be 'active' but you can disable a funding type at any point by editing it and changing the status to 'inactive' (2). The rate you receive from your Local Authority for this funding type can be entered by clicking on the 'Add Rate' button (3). Please note, whilst you can assign funding types to children's regular schedules, the rates you input are just there for your own reference. Once you're finished click 'Save Funding Type' at the bottom (4). This tutorial will talk you through setting up funding types in more detail. D. Add funded hours to children's regular schedules The last option on the set up screen is to add funded hours to children's regular schedules. Clicking on that link will take you to the 'Regular Schedule' tab for the first child in your list of children. You can also access this by going to the 'Children' tab on the left-hand menu (1), selecting a child (2) and then clicking on the 'Regular Schedule' tab on their profile (3). If you have already added regular schedules for children on your account there are two options as to how you can proceed. 1. Add new regular schedules for the children 2. Edit the existing regular schedules If you haven't added regular schedules yet please take a look at this tutorial. We'll start by going through adding new regular schedules for the children. 1. Adding new regular schedules To do this click on the 'New Schedule' button from the child's Regular Schedule tab. At the top you will need to enter a start date for the new schedule (1). You can also add and end date but this is optional (2). If the start date for your new schedule falls within the period of their current schedule you will get a message notifying you of this (3). This doesn't mean you can't proceed with adding the new schedule, it means when you save it, the current schedule will be end-dated the day before the new schedule starts. At the top you can also select whether the child attends during school holidays (4) and you can apply one of the funding types you set up in step C if you offer funded hours for this child (5). Then in the 'Sessions' section you can select which sessions the child attends. This is the same process as before, just with a few additions. Click on the 'Add' button (1) to select a session for a day. By default the start and end times will be the session's start and end times but you can change these if you wish (2). What you won't have done before is add the number of funded hours the child receives for this session (3). When you enter a figure into this box it will change the number of unfunded hours for the session (4) and the price will be updated (5). At the bottom you will now see a weekly summary for the child which shows their total hours, unfunded and chargeable hours and the total cost (6). Once you are finished press 'Save' (7). 2. Editing an existing schedule for a child Generally we don't recommend editing an existing schedule if you need to make changes to it. For example, if you were adding a new session a child starts attending every week it would be best to create a new regular schedule instead of editing the existing one. That being said, editing the schedule might be easier option when adding funded hours. To do this just click on the pencil button for a child's current regular schedule. When you get to the edit page you'll see most of the options are greyed out, so you can't fill anything in (1). If the schedule started in the past, you will also see a message informing you that making edits will affect historical bookings (2). So that you can make the necessary changes here, click on the 'Edit Sessions' button (3). You'll then get a pop-up box asking if you want to proceed. You have two options here, add a new schedule (1) or proceed with editing the existing schedule (2). If you proceed with editing the schedule you'll see the options are no longer greyed out. This means you can now apply a funding type (1) and add the number of funded hours the child receives for each session. So, that's everything you need to do to set up Invoices on your account to use alongside the Booking system. If you have any questions about this, please get in touch by emailing customer.service@eyfs.info.


-
If you make changes within a period after it has already been invoiced then you have three options: 1) Cancel the original invoice, and reissue a new invoice for the same period with the new charges. The new invoice will automatically include most up to date charges for the period. 2) Keep the original invoice, and issue an additional invoice for the same period with the new charges. The new invoice will automatically include most up to date charges for the period. 3) Keep the original invoice, and let the new charges carry over to the next invoiced period. This is shown on the next invoice as an adjustment, and this is what we'll look at during this tutorial. This is also what will happen by default if you don't purposely do options 1 or 2. An adjustment can be either a positive or a negative charge, depending on whether the previously issued invoice had overcharged or undercharged. Adjustments can appear as a result of: Adding or cancelling an Extra Booking Changing a child's Regular Schedule dates or Regular Schedule funding Changing a session price Adding or removing a school closure Adding or removing a school holiday if the child doesn't attend their regular schedule during holidays When you make a change to any of the above that will result in an adjustment, you will see an orange warning message that looks something like this: This text will vary depending on what you are changing. For example, if you amend a school closure it would say "This closure is within an invoiced period". Or when changing a Regular Schedule date it would say "This schedule is within an invoiced period", etc. When creating your invoices, if there are adjustments, you will notice a message beneath it. Depending on the type of adjustment, the wording will change. Positive charges A positive adjustment will show as a charge on an invoice, as a result of the child being undercharged on a previous invoice. The adjustment in the below example has been created by: Generating an invoice for Abby for the month of May. Adding an extra booking for Abby in May after the initial invoice has been created. Generating an invoice for Abby for the month of June. This will include the extra booking from May. On the invoice you can see a section for adjustments (1). If you click on the drop down (2) you can hide and expand the details of the adjustment, and in this case we can see that Abby had an extra booking on May 16th for a Late Session (3). You will notice a blue notification explaining the reason for the adjustment. For more support and to bring you back to this tutorial, click 'More info' (4). Similarly, on the PDF invoice you will see the adjustment within the summary (1), and at the end of the PDF you can find a breakdown of this positive adjustment (2) under the section for "Adjustments from a previous period" (3). Negative charges A negative adjustment will show as a refund on an invoice, as a result of the child being overcharged on a previous invoice. The adjustment in the below example has been created from: Generating an invoice for Abby for the month of June. Adding a school closure in June for a date that Abby is scheduled to attend. Generating an invoice for Abby for the month of July. This will include the refund from the closure in June. On the invoice on Tapestry you can see a section for the adjustments (1). If you click on the drop down (2) you can hide or expand the details of the adjustment, and in this case we can see that this child has been refunded for an Afternoon and Late session on June 3rd (3). This session didn't take place due to the school closure. You will notice a blue notification explaining the reason for the refund. For more support and to bring you back to this tutorial, click 'More info' (4). Similarly, on the PDF invoice you will see the adjustment within the summary (1), and at the end of the PDF you can find a breakdown of this refund (2) under the section for "Adjustments from a previous period" (3). Positive and negative charges If we combine the above scenarios (an extra booking + school closure) then we'd end up with an invoice that contains two adjustments: a positive charge and a refund. On the invoice on Tapestry you'll see positive (1) and negative (2) adjustments under different headings, which you can again expand or collapse to view the details for (3). You will notice a blue notification explaining the reason for the adjustment and the refund. For more support and to bring you back to this tutorial, click 'More info' (4). On the PDF you'll see both adjustments listed in the summary (1). And at the end of the PDF, under the section for adjustments (2), the negative (3) and positive charges (4) will be detailed separately. And that's it! If you have any questions please get in touch at customer.service@eyfs.info and we'll be happy to help. Back to Main Tutorials Page


-
Once an invoice has been generated in the 'Invoices' section of the management system on Tapestry, you can complete the following actions with it: send it to parents, mark it as having been sent, add a payment for it, or cancel it. When a payment is added for an invoice that covers the total in full, it is marked as 'Paid'. If the payment added doesn't cover the full amount of the invoice, it will be given the payment status of 'Partially Paid'. In this tutorial we'll cover the actions which can change the 'Sent' and 'Payment' status of an invoice. To learn how to generate an invoice, please refer to this tutorial. If you have invoices which you created before payments were introduced to 'Management System', please refer to this tutorial here for more information. To start with, click on 'Management System' at the top of the screen on the Tapestry navigation toolbar. Once here, click on 'Finance' (2) and then 'Invoices' (3) to bring up the list of invoices for your setting. You can either use the search bar to search for a particular invoice (4) or change the Month/Year or Room to narrow down the list of invoices selected (5). Once you've located your invoice click the cog icon (1) to bring up a drop down list of options. For 'Unsent' invoices there is an option to send them to the bill payer by email (2), if the child has a bill payer set up set up: For more information on adding bill payers refer to this tutorial here. You can also mark the invoice as sent if you do not want to send the invoice to the bill payer by email but you do want to mark that the bill payer as having received the invoice (3). You can also create a payment for the invoice (4), either to pay in full or enter a part payment for that invoice. Recording payments are covered in more detail in this tutorial. The options you see on the cog menu will vary depending on the status of the invoice. Once you have sent the invoice or marked it as sent, you will see this change reflected in the 'Sent' column; a cross in the 'Sent' column shows that invoice has not been sent yet and a tick shows that it has been sent to the bill payer via email or has been marked as sent. If you enter a payment for the invoice, you will see the value in the 'Payment' column shows as blank (if no payment has yet been made for that invoice), 'Paid', or 'Part Paid', if the invoice has not yet been paid in full. Go back to Main Tutorials Page


-
There are two main screens you can use to view an invoice within the 'Invoices' section of the management system on Tapestry. Invoices need to be created manually here, so if you haven't done this already, this tutorial talks you through how to generate an invoice. The first way is through the main Invoices screen which is found by selecting the "Management System" tab from the top of the page (1), then choosing "Finance" (2) from the left-hand menu and selecting "Invoices" from there (3). By default, you will see all the invoices for current month, but you can choose to view a different month or a custom date range (1). You will also see all invoices for all children on your account by default. To narrow down the invoices, you see you can filter by room (2) and by invoice status (3). For each invoice you will be able to see the following information: A. The child's name. B. The invoice number. C. The period the invoice covers. D. The invoice total. E. When the invoice was generated. F. When the invoice is due. G. The payment status of the invoice (Paid/ Unpaid/Part-Paid) H. Sent - ✓ or Unsent - X I. Any notes for the invoice You can click anywhere on an invoice to view it in more detail. When viewing an individual invoice you can see the following information. The child's bill payer/s. This tutorial talks you through how to set up bill payers for a child. The invoice number. The name of the child. The period the invoice covers. The date the invoice was generated The date payment is due. This is based on when the invoice is generated. This tutorial explains how you can set the due dates for your invoices. The payment status of the invoice (Paid/Unpaid/Part-Paid) The status of the invoice. (Sent/Unsent) The summary section. This will show what is included in the invoice, such as regular bookings, extra bookings, extra charges, and any additional items, as well as show adjustments and refunds if they apply. This tutorial explains adjustments in more depth. The balance brought forward which comes from the child's account balance. This could be a negative or positive amount depending on payments that already have or have not been made. The total due on the invoice. This will be affected if you choose to show the balance brought forward and there is a positive or negative total to the child's account balance. Where you can add a payment to for the invoice The history, which shows any changes made, and who generated the invoice. All types of the same item, e.g. regular schedule bookings, are grouped together when you view an invoice but you can expand the grouping to see all the individual items. To do this click on the "Expand All" button. You can now see a full itemised list of all the individual items. Click on the "Collapse all" button to hide these again. When viewing an invoice you can also download a PDF of it (1). If you click on the cog icon you will see a list of possible actions (2). These will be different depending on the current status of the invoice. In the screenshot below you can see we have the options to: Resend the invoice to a child's bill payers. This tutorial talks you through this process in more depth. Mark it as unsent which is an option that will appear when the invoice has already been sent. For how to send invoices, look at this tutorial. Add a payment to the invoice Add internal notes, which I'll cover just below in this tutorial. Cancel the invoice. This tutorial looks through cancelling invoices. If you click the option to add internal notes it will bring up a text box where you can add notes for the invoice (1). Once you're done, press "Save Notes" (2). Your notes will then appear on your invoice (1). You can edit the notes at any time by clicking on the cog icon (2) then selecting "Edit Internal Notes" (3). You can also view invoices for individual children by clicking the "Children" tab on the far left of the page (1), then selecting the name of the child (2). This will take you to the child's page within our management system. To view their invoices, click the "Finance" tab (3). Here you can carry out the same tasks as above, including creating a PDF, sending, cancelling and adding payments to unpaid/part-paid invoices. Go back to Main Tutorials Page


-
In this tutorial we're going to cover how to cancel an invoice that has been generated on your account for a child. There are two different ways you can find an invoice you wish to cancel. The first way to find an invoice is under "Management System" (1), and then choosing "Finance" (2) and selecting "Invoices" (3). Here you can use the "Search" box (1), to find a particular invoice by number, or by searching for a child's name. You can also find an invoice within "Management System" (1), under "Children" (2), and selecting the child who's invoice you wish to find (3). This takes you to the child's page, from where you can select the "Finance" page (4). By clicking the 'Invoices' tab (1) you will be able to see a list of all the invoices generated for this child (2). For either option of finding an invoice, the process of cancelling an invoice is the same. For the rest of the screenshots in this tutorial I will be cancelling an invoice from the Finance -> Invoices page. Once you have found the invoice you wish to cancel, click the cog menu next to the invoice (1), and you will get a series of options for what you can do with the invoice. One of the options will be to cancel the invoice (2). You will not see this option if the invoice has already been cancelled. Once you select the "Cancel Invoice" option and you will see a warning message asking you to confirm deletion (1). Here you have the options to 'Go Back' (2) or to confirm the cancellation (3). Please note that once the invoice is cancelled, it cannot be reinstated. If you choose to go ahead with cancelling the invoice, once you have confirmed, you will return to the Invoice Enquiry screen. To see your cancelled invoices, select the 'Show Cancelled' box (1). The cancelled invoices will then appear in the list and you will see that the status of the invoice as "Cancelled" (2). Back to Main Tutorials Page


-
In this tutorial we will cover how to generate an invoice for an individual child but if you would like to do this in bulk for a group of children, you can take a look this tutorial here. Before generating your first invoice, we would recommend making sure you have your Invoice Configuration section filled in. This is where you can set what information is displayed in the header and footer sections of all PDFs you generate of invoices on your account. Here you can also the default due date for your invoices, which is the number of days after an invoice is generated that it becomes due. You can read more about how to do this here. By default, all children will be invoiced based on the actual session and extra charge prices within the invoiced period. Alternatively, your invoices can be based on a set fixed monthly fee or an annualised monthly fee. If you'd like to set a fixed fee for a child you can refer to this tutorial to see how. Once you've completed these configurations, you can now generate your first invoice. To get to the main Invoices page you will need to go to the 'Management System' tab (1), then click 'Finance' on the left-hand menu (2) and select 'Invoices' (3). If this is your first invoice this page will be mostly blank. To create a new invoice you can either click on the blue "+ New" button in top right (4) or you can select the "+ Create Invoice" button for a specific child (5). Alternatively, you can generate invoices for multiple children at once by clicking the 'Bulk Invoice' button (6). On the invoice generation page, you'll need to choose which child the invoice is for by using the drop-down menu (1). If you selected the "+ Create Invoice" button next to a specific child then this will already be filled in with their name. Then, select the date range you want this invoice to cover (2). By default the rate range will be a whole month and it will be the month you are currently in. The invoice will automatically include any sessions (3), extra bookings (4), and extra charges (5) that fall within the selected date range. If adjustments are shown you then can refer to this tutorial to find out why. For example, here we can see that Eva has 37 regular schedule sessions and one extra booking (6) within this invoice period of September 1st to September 30th (2). You can also see how many funded and unfunded hours Eva has within this period (7). At the end of each item's row you will see the price (8) and then at the bottom you can see the total to pay (9). If you have selected a fixed or monthly invoice calculation method for the child then the invoice will reflect this charge instead. If you have 'Balance Brought Forward' turned on, this will also appear. If it is a positive amount as shown in this invoice (10), it will be deducted from the total due. If it is a negative amount, this will be added to the total of the invoice. You can click on the drop-down icon to show the full details of each item type (1), or use the "Expand All" button in the top right (2) to detail everything. The other thing you can add to your invoices at this stage are "Additional Line Items" (1). This is where you can add anything additional to your invoice that isn't covered by the child's schedule, extra bookings, or extra charges. You can add positive amounts to charge for something, and you can also add negative amounts for refunds or discounts, etc. Just add in your item name (2) and price (3), and you'll see the invoice total update (4). The total will also take into consideration the balance brought forward (5). Additional Line Items can be removed if needed (6). Once you are happy with these details you just need to click one of the blue "Generate" buttons (7). After generating an invoice, you will be taken back to view it. From here you can create an invoice for the next child in the list that doesn't have an invoice for that period (1), or you can return back to the main invoice page (2). Here you can also download a PDF copy of the invoice (3) and/or mark it as sent (4). Marking as sent is for when you will manually send the invoice to the relative yourself. To send a copy directly to the child's bill payer/s through Tapestry, click on "Send" (5). In order to do this you'll need to make sure that you have the child's relative/s assigned as their bill payers (6). After pressing "Send" for the first time, or "Select Bill Payers", a pop-up box will appear listing all of the child's linked relatives. If they have no linked relatives you can go to the Manage Relatives page (1) to either add their relative/s or link the child to existing relative/s. Once a relative is linked they'll appear here and you can select them as the child's bill payer by ticking the box next to their name (2) and selecting "Confirm" (3). Once you have at least one bill payer, you can then "Send". This will send the invoice directly to the relative through Tapestry. This will be confirmed in the history at the bottom of the invoice. Back on the main Invoices page, you will see the invoice you have just created. Here is the example on we did for Eva. From this page you can also manage the statuses of your invoices. You can read more about that in this this tutorial. Go back to Main Tutorials Page


-
This screen is where you can set what information is displayed in all PDFs you generate of invoices on your account. Here you can also the default due date for your invoices, which is the number of days after an invoice is generated that it becomes due. You can adjust the formatting for your invoices by clicking 'Management System' at the top of the screen (1), then selecting 'Config' (2), then 'Invoices' (3) from the menu on the left. In the first section on this screen you can select whether you would like your logo to appear at the top of your invoices (1). The logo will be the one you use for your Tapestry account. You can find our tutorial on how to add your logo to Tapestry here. You can also add any text which to the header (2) or footer (3) sections on your invoices. Next you can set the due date for invoices generated on your account (4). This is the number of days after an invoice invoice is generated that it becomes due. Do note that this will apply to all invoices generated on your account. You can also choose to show a child's balance brought forward and total now due on all invoices generated from the moment you configure this option. To do so you only need to tick/untick the checkbox (5). Click on the 'Show Example' button to see an example of what this would look like (6). In the last section on this screen you can also choose whether a summary of the child's regular schedule is included on PDFs (7) and whether those rates are shown (8). Click on the 'Show Example' button to see an example of what this would look like (9). You can also choose to include a detailed breakdown section on PDFs (10) and whether those rates are shown (11). Once again you can see an example of this using the 'Show Example' button (12). Once you are happy with your format for invoices, click 'Save' at the bottom (13). Below you can see an example PDF of an invoice for a child. At the top you can see what the logo would look like if you opt to show this (1). You can also see the header and footer text (2) and what the 'Regular Schedule Summary' section looks like if you ticked to include that (3), as well as the 'Balance Brought Forward' and 'Total Now Due' (4) if you also ticked to include that. Should you opt for the 'Detailed Breakdown Section,' it will be presented on additional pages within the invoice (5). Back to Main Tutorials Page


