VannaTapestrySupport
-
Posts
65 -
Joined
-
Last visited
Content Type
Profiles
EYFS Articles
Local Authority
Newsletters
Topic support
Book recommendations and reviews
Courses and events
Vacancies
Help documents
News items
Tapestry Newsletters
Podcasts
Tapestry Import
Forums
Downloads
Events
Gallery
Store
Everything posted by VannaTapestrySupport
-
A new update to the Tapestry Education Platform app (v1.0.6) is now live across all operating systems. This update includes: Ability for relatives to download their child’s PDF journal through the app Ability for relatives to purchase a printed book of their child’s journal through the app General improvements and fixes If your app is not set to update automatically, please download the latest version from your device’s app store. Please note: On Amazon devices, the update may take up to 24 hours to appear.
-
We’ve released two new updates to Tapestry designed to give you more control over your account and make managing your data even simpler. New Account Management section We’ve introduced a new Account Management area, giving managers more control over subscriptions without needing to contact Customer Service. You can now find this in: Help > Account > Account Management. From here, managers can: Upgrade your subscription Downgrade your subscription Add the Wonde integration These actions can now be completed within your account, making it quicker and easier to manage your subscription. Learn more MIS integration via Wonde You can now connect Tapestry to your MIS using Wonde, allowing you to automatically sync key parent and child data. This integration supports systems such as Bromcom, Arbor, and SIMS, and helps keep your records up to date with minimal manual input. Once enabled, the following data can be synced: Parent data (e.g. name, email address, relationship to the child) Child data (e.g. name, date of birth, classroom group, profile picture) The integration is optional and is not enabled by default. Please note: As this is a Wonde integration (rather than a built-in Tapestry feature), there is a small annual fee of £60 to enable and maintain the secure connection. Learn more
-
You can now log accidents at home, medication and incidents on Tapestry, and request digital sign-off from parents and carers from their own devices (requires a manager to choose a preference). This new feature is available on the updated app (v1.0.5) and also on the browser. You’ll be able to: Record accidents that have happened at home Add, administer and archive medication Record incidents for child or between children To learn more, you can visit our dedicated support page here. The app update also contains: Bug fixes General improvements If your app is not set to update automatically, please download the latest version from your device’s app store. Please note: On Amazon devices, the update may take up to 24 hours to appear.
-
Tapestry Pay is now available for all settings and schools using Tapestry’s Nursery Management System in the UK. Tapestry Pay allows parents and carers to pay invoices directly within Tapestry using: Credit or debit card Google Pay or Apple Pay Bank transfer Tax-Free Childcare Payments made through Tapestry Pay are automatically reconciled on the setting or school’s side, helping to reduce admin time. To learn more about Tapestry Pay and how to set it up, please visit the dedicated support page: Tapestry Pay Tapestry Pay (and the full Nursery Management System) is included as part of your subscription. However, please note that transaction fees apply to payments made using this feature, full details can be found here.
-
A new update to the Tapestry Education Platform app (v1.0.4) is now live across all operating systems. The latest Tapestry app update includes: Faster media upload speeds The underlying code infrastructure for the upcoming Tapestry Pay feature This update also includes a number of bug fixes and general improvements. If your app is not set to update automatically, please download the latest version from your device’s app store. Please note: On Amazon devices, the update may take up to 24 hours to appear.
-
Pin observations
VannaTapestrySupport replied to Claire_Stemp's topic in Weavers Future Development Suggestions
Morning Felicity, I'm afraid it's not a feature that is available just yet. The more interest we have for a feature, the higher up our priority list it goes. I have made a note of your interest so we can keep you updated with any developments. Let us know if there is anything else :) -
We’ve introduced some highly requested improvements to our Nursery Management System. New: Multiple age ranges & staff ratios per room You can now set multiple age ranges within a single room. Tapestry will automatically calculate staff requirements based on the different ages of children in that room, helping you manage ratios more accurately and efficiently. Setting up rooms with multiple age ranges. New: Xero and QuickBooks integrations Tapestry now supports exporting invoicing data for use with Xero and QuickBooks. Simply export your invoices as a compatible CSV file and upload it directly into your accounting software for reporting and bookkeeping. Get started: Configure your account for accounting software. Export invoicing information for accounting software. Updated: Invoice format improvements Invoices have been refreshed to remain compliant with updated regulations requiring additional charges to be clearly itemised. A new summary section has been added to present itemised information clearly without creating multiple invoice pages. This section highlights: Regular sessions Extra bookings Custom charges Learn more about the new invoice layout.
-
nursery Closure Days / Bank Holidays
VannaTapestrySupport replied to SAPLINGSNURSERY's topic in Early Years Setting Management
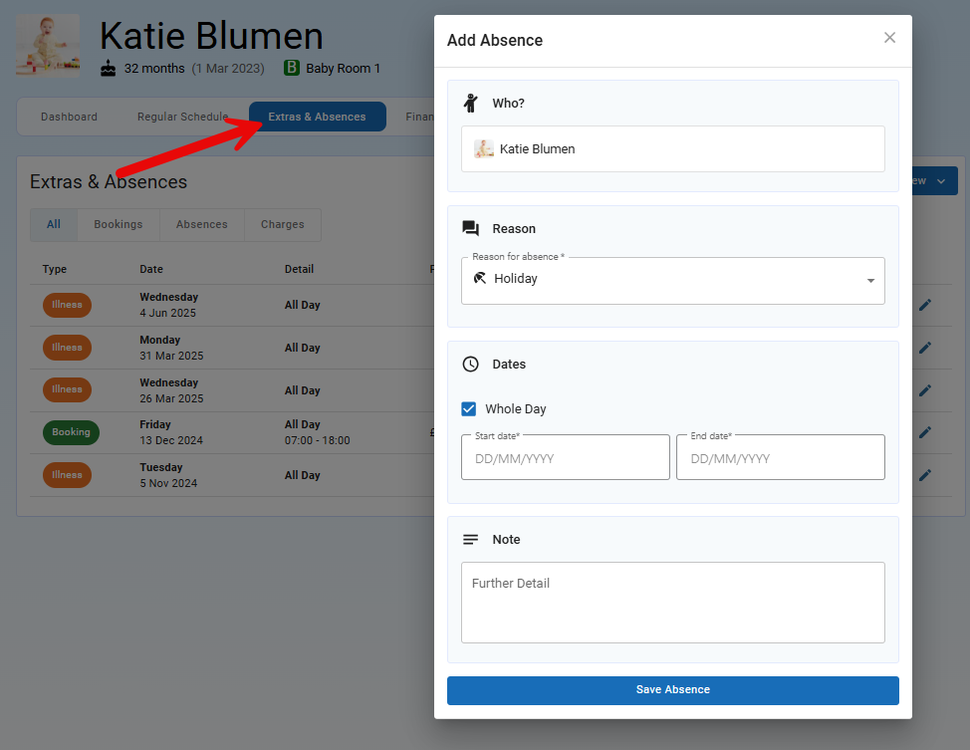
Hi, When you create a child's schedule, you'll have the option of selecting whether they attend during school holidays or not, please see below: If you charge for training days, bank holidays etc. once you have added these as a school holiday (Config > School Holidays and Closures), then any child with this box ticked and has a booking that falls onto one of these days, will still be charged. If a child is on holiday and therefore absent, if you do not know of this in advance you can mark them as absent on the register. Alternatively, if you know of these holidays in advance, you can add their absence through the child's 'Extras and Absences' tab. Please see below: This will then note the child's absence, but again if they have a booking that falls within this period, they will still be charged. I hope this clarifies things. Best wishes, Vanna
-
nursery Closure Days / Bank Holidays
VannaTapestrySupport replied to SAPLINGSNURSERY's topic in Early Years Setting Management
Hi, When setting up your closures and school holidays, please bear in mind that closures are not charged for, therefore if you do charge for these then you you'll need to set these up as a school holiday, but can name it 'Bank Holiday' for example. If children are still charged within these periods, then when you create their schedules you'll need to be sure to tick the 'Attends during school holidays box'. With regard to children going on holiday, if you still charge them then ticking this box will take bookings that fall into this period into consideration. However, when they are actually absent during this period, you will need to mark the absence on the register where you can add the reason for it, such as holiday within the notes. Absences are always charged for. The child's attendance will then reflect accurately through the attendance reporting screen as well as in the absence export. You can read more about adding and editing your closures and holidays in this guide here. Best wishes, Vanna -
Hi Emma, Apologies for the delay in getting back to you about this feature request! The Care Diary feature is available via the IOS app. The Care Diary can be made visible to relatives by enabling it for them to view. This can be done through the Control Panel (or Configuration if you're using the new look) > Features > Care Diary > Care Diary Settings > and tick 'Enabled for relatives'. Then when relatives login, they'll be able to view any entries you have made for their child throughout the day. Please note, if you also tick 'Staff must approve relative access to entries', then you'll need to approve the entry before the relatives will be able to see them through their account. Feel free to pop any further queries to customer.service@eyfs.info. Best wishes, Vanna
-
Hello, I'm afraid we don't have a time frame on when this feature will be released. However we will be sure to update you on this post as soon as it is! Best wishes, Vanna
-
Hi Abigail, Thanks for getting in touch! If you have added 'food' as an extra charge, and this is part of a child's regular schedule, then you'll be able to create a new schedule for the period they are on holiday. When creating the schedule for that week/s, just be sure to remove the extra charge of food. If their current schedule doesn't have an end date, this will pick back up after the holiday schedule has ended. You can read more about adding a new schedule by clicking here. Get in touch with us on customer.service@eyfs.info for any further support.
-
Invoicing: change the invoice number?
VannaTapestrySupport replied to Tweetinat's topic in Tapestry user conversations
Hello, Thanks for getting in touch! At the moment I'm afraid it's not possible to amend the invoice number. Although I can definitely see how this would be beneficial! So I've made a note of your request for this feature and fed it back to our development team. Something that might help in the meantime is the ability to add internal notes? You can add a note to a generated invoice by opening on the invoice > clicking the cog > 'Add Internal Notes'. These notes are not visible to relatives, but is somewhere that you can add an additional invoice reference. If you have any further questions or feature requests please let us know! Best wishes, Vanna -
Invoicing on Tapestry
VannaTapestrySupport replied to BenLittleT's topic in Early Years Setting Management
Hi Ben, I responded to your question via our customer support email, but just in case the answer below can help anyone else, I have copied the reply here as well. If you need for children's schedules to have some weeks that are funded and have other weeks unfunded, what you'll need to do is add new schedules for the child for each period. So you have one schedule which includes funded hours which you end date. You then add a new schedule which starts the day after which has no funded hours. And you can just do that as many times as needed. If you just leave the term time schedule without an end date (assuming the same pattern does pick up again after term break) then when you add in that different week's schedule it will essentially slot itself within the child's regular term schedule, which will just carry on again without you needing to add it again as a new schedule. You'll just need to tick that they attend during the school holidays for those half term schedules so they are invoiced for it. This guide shows you how: https://scribehow.com/viewer/How_to_Add_a_non-funded_period_to_a_Childs_Booking_Schedule__Ia7ii9NRR22C23yOjECp0Q?referrer=workspace But, if you are using annualised billing, then please note that the price each month is worked out from the first week of the schedule within that month. The calculation is as follows: [schedule's weekly cost] x [weeks entered] / [months entered]. That will mean for the months that the half term falls into, unless it falls on the first week of the month, the half term unfunded hours will not be taken into consideration. In this case, you can either add an additional line item to that months invoice for the charge of the unfunded hours, or change the invoice calculation to fixed monthly fee for the month the half term falls in. This would mean you needing to calculate the cost of the invoice for that month, and also ensuring to change the calculation back to annualised monthly fee for the following month. We are looking at an enhancement to Tapestry to allow children to be assigned to more than one schedule, to allow different attendance patterns to be accommodated which you mention your current system does now. So, I've made a note of your interest and fed this back to our development team. If we have an update about this feature we'll be sure to let you know. I hope this helps. Let us know if you have any further questions. Best wishes, Vanna- 1 reply
-
- 1
-

-
Adding Policies and procedures onto Tapestry
VannaTapestrySupport replied to tawny222's topic in Tapestry user conversations
Hi, It isn't currently possible for relatives to sign documents through Tapestry, but this is something we are looking to introduce. When this becomes available, we will get in touch to let you know! If you have any further queries or questions, feel free to contact us on customer.service@eyfs.info. Best wishes, Vanna Tapestry Support Team -
Emergency contacts
VannaTapestrySupport replied to thelearningtreederby's topic in Weavers Future Development Suggestions
Good morning, Thanks for reaching out! I have passed on your feedback to our development team and we will get back to you if we have any updates on this feature. Pop us any future questions or queries you have to us on customer.service@eyfs.info if you need anything else :) Best wishes, Vanna Tapestry Product Support -
In this tutorial we are going to look at enabling fingerprint unlocking on the Android app. Begin by logging into the Tapestry app and going to 'Settings' (1) at the bottom of the screen. To enable fingerprint unlocking for your PIN, tap on 'Allow PIN unlocking with fingerprint' (1). Enter your PIN (2) and if you are happy to to confirm saving it, tap 'Yes' (3). You will then receive confirmation that you can use your fingerprint instead of your PIN. Tap OK to continue. For your password, tap on 'Allow login with with fingerprint' (1). Enter your email address (1) and password (2) and tap 'Save' (3). If you decide you do not want to proceed then tap 'Cancel' (4). You'll then be able to login to the app using your fingerprint. If you wish to disable this feature at any time, proceed back to 'Settings' and you can disable it. And that is enabling the fingerprint unlocking on the Android app. If you need any further support, please contact us on customer.service@eyfs.info. Back to Main Tutorials Page


-
Enabling Face ID / Touch ID on the iOS app
VannaTapestrySupport posted a topic in Tapestry tutorials
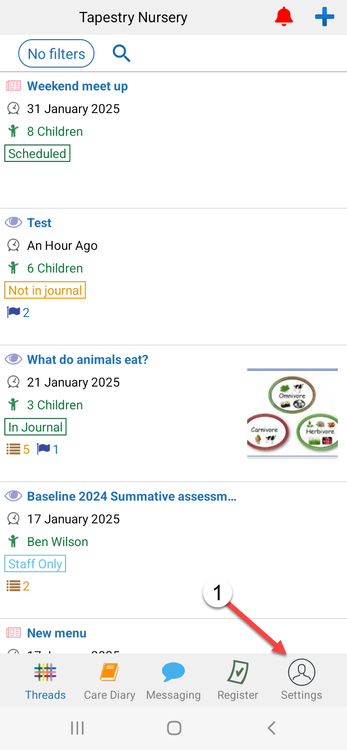
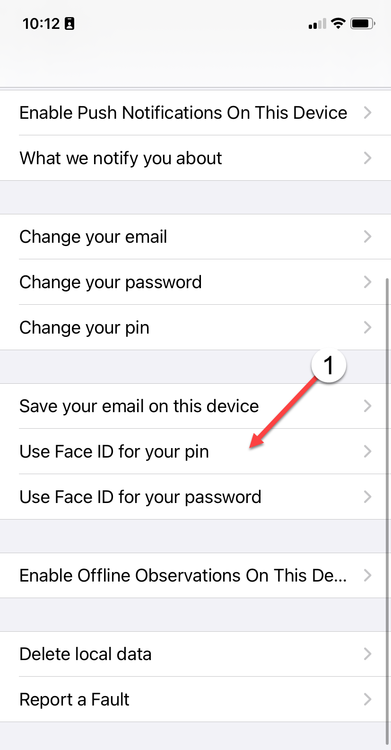
In this tutorial we are going to look at enabling either Face ID or Touch ID on the iOS app. Based on the iOS device you have will depend on the option you are given. Start by logging in to the app and tap 'You' (1) at the bottom of the screen. Touch ID For your PIN, tap on 'Use Touch ID for your pin' (1). Enter your PIN (2) and then tap 'Save' (3). When you go to enter your PIN going forward, you will be given the option to use your fingerprint. For your password, tap on 'Use Touch ID for your password' (1). Enter your password (2) and then tap 'Save' (3). When you go to enter your password going forward, you will be given the option to use your fingerprint. Face ID As before, tap 'You' (1) at the bottom of the screen. For your PIN, tap on 'Use Face ID for your pin' (1). Enter your PIN (2) and then tap 'Save' (3). When you go to enter your PIN going forward, you will be given the option to use your Face ID. For your password, tap on 'Use Touch ID for your password' (1). Enter your password (2) and then tap 'Save' (3). When you go to enter your password going forward, you will be given the option to use your Face ID. And that is enabling Touch ID/Face ID on the iOS app. If you wish to disable this feature at any time, proceed back to 'You' and disable it. If you need any further support, please contact us on customer.service@eyfs.info. Back to Main Tutorials Page


-
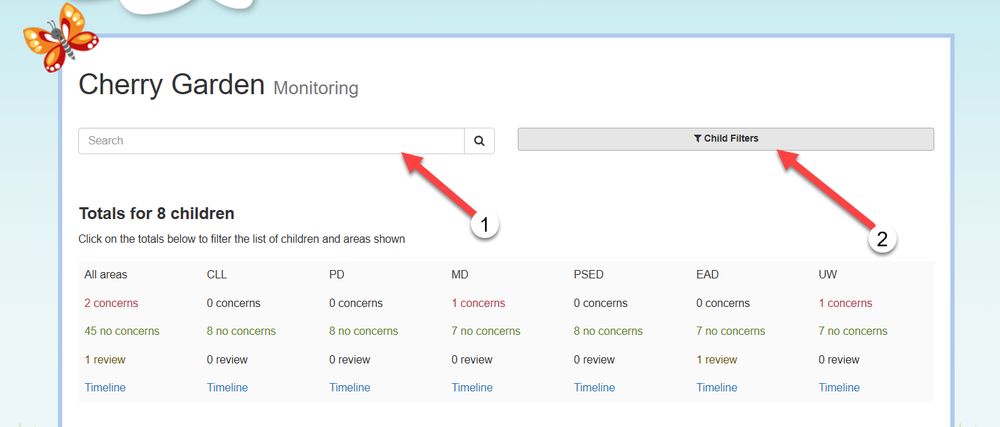
In this tutorial we will be going through how to use the Monitoring Group View for the Cherry Garden Framework. The Group View screen was designed as the quickest way to monitor individual, groups of, or all children at once. To find this screen, simply click on “Tracking” (1), then find “Cherry Garden” (2) on your list of frameworks, and then beneath "Monitoring", select “Group View” (3). At the top of this screen you will see an option to “Search” (1) and the usual “Child Filters” (2) selection box. The Search box (1) is useful if you are just trying to assess one child amongst all of them on your account. If you want to filter more specifically, such as via gender, EAL, Key Person etc. then you could use the “Child Filters” (2) as you can see below. Once you have selected the children you are going to assess at this point, scroll down to the next section. Judgments against the different areas have been split into three categories: Concerns, No Concerns and Review. Very simply, this is the judgment you will assign for each area for each child, based on your knowledge of the child and the information you have collected so far. From this “totals” box, you can quickly see the distribution of these judgments for all children that you have selected (or just all children on your account if you haven’t used any filters). As you can see on my account, all 8 children are “no concerns” for all areas. That’s because “no concerns” is the default. Each of these judgements is also a link, so if I wanted to see only those children with “no concerns” in CL, for example, I could click there (1) and it will automatically filter those results for me (2). This is a helpful feature if you are only inputting judgements for a specific area at this point. If you are sitting down to make judgments on all the areas at once, you can leave the “totals” box as is, and just scroll down. Here you will see all areas for the children, and you can simply apply your judgments to each area by clicking either the “Concerns" (1), “No Concerns” (2) or “Review” (3) boxes. You will also notice some hyperlinks underneath the child’s name and each of the areas. One for Observations and one called Timeline. You can click these hyperlinks at any point and it will show you all the Observations linked to that specific area. Here you can see Abby has an Observation linked to UW. If I click there, I can review the Observations and that will help inform my judgement. The “Timeline” button shows you a chronological order of events for that area. Here you can see the Timeline for Abby’s Mathematical Development. If you wish to create a reflection for a child, you can do so by clicking 'Reflect'/'Reflect on this' beneath the Timeline. To create a general reflection, select 'Reflect' (1), or to link it to a specific area of learning, select 'Reflect on this' beneath the area (2). A new tab will open up on the reflections screen, linking the title to the Cherry Garden framework (and area if selected), as well as linking it to the child. You can proceed with writing and saving your reflection. The last things to consider on the screen are at the very bottom of the page: (1) Is your option for exporting this screen. As with most of the others, you can export this screen to PDF or CSV. (2) Is where you can change the date range for when this screen pulls in data. In other words, you can choose for it to only take into account Reflections and Observations from your “Current Assessment Period”, from the “Past 12 Months” or “All Available” So that’s how you can make your judgments on the Group View screen for the Cherry Garden framework. Back to Main Tutorials Page


-
Hi @Tweetinat, I am getting back in touch to let you know that Full Staff users and 'PIN' only staff users can now add absences through the register! Registers are available on the browser and on both Android and IOS devices. I have attached some guides for support below: Using the Online Register for children on the Android app Using the Online Register on the iOS app Online Register for children Do let us know if you have any questions about this feature🙂
-
In this tutorial we are going to look at how to bulk export your Care Diary data. I'll go through doing this for individual children and for multiple children. Please note, as this is done through the 'Control Panel', only managers on Tapestry will be able to export Care Diary entries. Let's start with individual children. Begin by heading to the Control Panel by selecting your name (1) and then 'Control Panel' (2). Next, navigate to 'Manage Children' (3). Select which child that you would like to export Care Diary entries for (1). Click the cog icon next to their name (2) and then 'Bulk export care diary' (3). Start by choosing which type of entry, or entries, you would like to export (1). By default, all options will be ticked. You can untick any entry types you don't want to include but you must leave at least one selected. Then, choose the time frame of entries that you want to export (2). You can choose what order these are shown in with either latest or oldest showing first. Next, you need to select how you would like to sort the PDF export (3). This can be done by date or by entry type. Lastly, you'll need to decide whether you wish to include comments (4). If you do not wish to proceed you can choose to cancel (5) or, if you are happy, select download PDF (6). The PDF will be generated through your downloads. The next screen you are taken to will allow you to 'View your Downloads' (1) or, go back to the 'Manage Children' page (2). To proceed with accessing the PDF, head to your downloads and select, 'Download' (1). This page can also be accessed through the 'Control Panel' > 'Downloads' (2). A ZIP file will then be generated which you can 'Download' (1). Once accessed (2), you can store/print the Care Diary data as needed. To export the Care Diary for multiple children, make sure you are back on the 'Manage Children' page. Select the boxes next to the children's names (1) or, if you want to select all children on the page, change 'Select Items' to 'All' (2). When the pop-up appears on the bottom right, choose 'Export care diary as PDF's' (3) and then click 'Go' (4). As before, the next page you will be taken to is where you can decide what to include in the export. At the top of the page you will see which children will be included and you can always include more by clicking 'Select Children' (1) and adding them. When you are happy with the details included, click 'Download PDF' (2). Making your way back to your downloads by either selecting 'View Downloads' on the next screen or, accessing it through the Control Panel > Downloads, click 'Download (1) to create the ZIP file containing the PDF (2). Back to Main Tutorials Page


-
In this tutorial we will look at how you can use the Online Register feature for staff on the iOS Tapestry app. This can be accessed by Managers, Full Staff members and PIN only staff. If you want to learn how to take a register for children, please take a look at this tutorial. To open the Online Register, tap on the 'Register' button at the bottom of the screen. At the top of the page you will see the 'Children' tab (1) and the 'Staff' tab (2). For support on using the child register, look at this tutorial. For the staff register, proceed with tapping 'Staff'. You should see a list of all your staff members. Staff can be marked as 'in' or 'out' using the 'In' icon on the left-hand side (1) and the 'Out' icon on the right-hand side (2). The times they have been marked in or out will then show up under the 'Registrations' column (3). Staff who are marked as 'In' are shaded green (4) and staff who are marked as 'Out' are shaded orange (5). You can change the day you are viewing (1) and change the sorting order of the list of staff (2). If you are viewing a past register, you will see a message stating this (3). If you click on a staff members name (1), this will bring up an expanded view for that member of staff. Here you will be able to mark them as in or out (2), as well as edit the times they are registered as being marked in or out (3). Lastly, you can add register notes for them (4). In the screenshot below, I have returned to the main register screen after adding a register note. The register note is indicated by the document icon in the corner of the staff's portrait (1). Back to contents page


-
We at Tapestry are working with a publisher, Group Hugs, to offer parents and carers the ability to purchase printed copies of their children's learning journals. This tutorial will talk you through how to purchase them. Take a look at our video below to see how they will look! To buy a printed version of your child's journal a PDF will first need to be generated. This can either be done by your child's school or setting, or you can also generate the PDF from your own Tapestry account. This tutorial will show you how to do this. Some useful things to note are: The journal needs to be exported by into PDF first. The purchase option will not appear for any other PDFs e.g. the one that can be generated by selecting multiple observations on the Observations page. We recommend including the 'cover page' in the export (this option is included by default). Group Hugs will use your child's Tapestry profile image from the cover page for the front cover of the printed book. If there is no cover page or no profile picture, then the child's photo will be replaced with an image of a tree. Start by logging into Tapestry using the web browser version through our login page, https://tapestryjournal.com/. If you have any difficulties logging in, please contact your child's teacher, key person, or childminder and they will be able to help you. Once you are logged in, click on your name in the top right of the screen (1) and select 'Your Downloads’ from the drop-down list (2). On the Downloads page you should see all downloads you have available. Click the ‘Download’ (1) button to download your PDF copy of the journal or ZIP file of the media. A reminder that you will have 90 days from when the journal or ZIP file was exported to download it, so do make sure to do this in time. To order a printed copy of the journal, click 'Order a printed book' (2). Please note, it is only possible to purchase printed copies of journals when they are between 20 and 1596 pages long. If this is not the case for your child's journal, please contact your child's school or setting. Next, you will be taken to the page where you will be able to order the book. Please read the information on this page before proceeding. You must first select both tick boxes (1) before you are able to click on 'Order Printed Book' (2). Please make sure you have read and understood those before you select them! Once you have selected this, you will get taken to the Group Hugs website where you are able to purchase the book. We have more good news! If your child has already left their school/early years setting and you have a copy of the PDF saved, then you will still be able to purchase a printed copy, it will just need to be done from the Group Hugs website. Some useful things to note here are: If your PDF does not include a cover page or the cover page only shows a silhouette placeholder image, then the front cover of the book will show a tree rather than a picture of your child. If you are uploading a PDF of a previous year directly to Group Hugs, and the PDF you have starts with an observation rather than a cover page or content pages, your printed book will show a tree instead of the child's picture, and the school name will not be shown. If you need any support with a book you have already ordered, or with the ordering process generally, please get in touch with settings@grouphugs.co.uk. Back to the main tutorial page


-
In this tutorial we are going to cover how to add a body map to an accident entry which can be recorded through the Care Diary or Accidents features. If you need any support with enabling or adding an accident to the Care Diary/Accidents, take a look at our tutorial on this here. Before we begin, please note, this feature is only available on the version 4.2.0 and higher of the app. You can check which version of the Android app you are on by going to the app login screen, at the bottom you should see some writing at the bottom that starts 'Version...'. You will need to start by selecting 'Care Diary' or 'Accidents' (1) at the bottom of the page. To add an accident entry for a child or children, tap on their profile icons along the left-hand side (1). Once they are selected a blue tick will appear by their profile photo. A pop-up will appear at the bottom of the screen and from there tap on '+ Add Entry' (2). After doing this, a menu will appear where you will need to tap 'Add Accident' (3). Whilst filling out the details of the accident, you will be able to select 'Add body map' (1). When you tap this you will see the body map appear as presented below. Your screen will rotate to landscape so that you are able to view it at its largest size. To the right, you will see a smaller view of the screen with a magnifying glass (1). By touching a certain area with your finger, the larger body map will zoom in. This is so you can mark the accurate area of the injury. The mark will present in the colour red as exampled below as a cross over where the injury is (2). The injury can be marked however you feel it is best. You are able to mark as many areas as necessary if there are multiples areas of injury. If you mark the wrong area or would like to start again, tap 'Restart' (3). If you are finished click 'Save' (4) and if you don't wish to proceed with the adding a body map, click 'Cancel' (5). Once you have added your body map, you can rotate your device back to portrait. If at this point you decide not to include the body map, you can tap 'Remove body map' (1). If you are happy with the entry then click 'Save' (2). Don't forget you will need to add in details of the accident before you can proceed with saving it. Once the accident entry has been saved and you view it, you will see it displayed beneath 'What led to the accident'. So, that is adding a body map to an accident entry. For more information about viewing a Care Diary entry on the Android app, please see this tutorial. Back to Main Tutorials Page


-
In this tutorial we will take a look at the 'Extra Charges' overview screen. This is where you can view your number of weekly extra charges including what they are and who they relate to. For a guide on how to add extra charges, take a look at this tutorial. To navigate to the 'Extra Charges' overview screen, you will need to start by clicking the 'Management System' option from the top menu (1), select 'Rooms' (2) and then you can either select to view the Whole Setting or a specific room (3) from the options on the left hand side. On the tab across the top of this page, you will need to click 'Extra Charges' (4) which will take you to the overview screen. On this page you can see an overview of extra charges, (defaulting to the week you are in at the top (1)) and a list of extra charges for that week (2). Looking along the week, you will see the number of daily extra charges which align with the extra charge itself (3). You will also see at the end of the week the total number of the extra charges (4). By clicking on an extra charge, you can see which child/ren it relates to. A pop-up will appear which includes the 'Extra Charge Details'. These details include the date the extra charge has been added for (1), the name of the extra charge (2) and the child/ren the extra charge relates to (3). It also shows you the breakdown in quantity of the extra charge for each child, as well as the total (4). As mentioned earlier, the 'week commencing' automatically defaults to the week you are in. To change the date and view extra charges from previous weeks, click inside the box (1) and then you can either manually enter a date (following the same format DD/MM/YYYY) or, select a date (2). You will notice that you are not able to select the weekdays Tuesday-Sunday. This is because the 'Extra Charges' screen format is a weekly view. If you would just like to see the extra charges for a particular room within your setting, you can click which room you would like to view these for on the left hand side (1). With support on assigning children to rooms, have a look at this tutorial. The screen appears the same way as it does in the 'Whole Setting' view. The only difference on these pages are that the extra charges that you can see relate to the children in that room. As mentioned previously, you can view the details of the charge, including which child it relates to, by clicking on it. To view extra charges in upcoming weeks, you can choose to do this in a couple of ways. You can either follow the same process as above, selecting the date beginning the week you wish to view or, you can click 'Load Later Weeks' at the bottom of the page (1). This will load the next 4 weeks and will continue to do so each time you click it. Go back to Main Tutorials Page