
VannaTapestrySupport
-
Posts
67 -
Joined
-
Last visited
Content Type
Profiles
EYFS Articles
Local Authority
Newsletters
Topic support
Book recommendations and reviews
Courses and events
Vacancies
Help documents
News items
Tapestry Newsletters
Podcasts
Tapestry Import
Forums
Downloads
Events
Gallery
Store
Everything posted by VannaTapestrySupport
-
In this tutorial we are going to cover how to add a body map to an accident entry which can be recorded through the Care Diary or Accidents features. If you need any support with enabling or adding an accident to the Care Diary/Accidents, take a look at our tutorial on this here. Before we begin, please note, this feature is only available on the version 4.2.0 and higher of the app. You can check which version of the Android app you are on by going to the app login screen, at the bottom you should see some writing at the bottom that starts 'Version...'. You will need to start by selecting 'Care Diary' or 'Accidents' (1) at the bottom of the page. To add an accident entry for a child or children, tap on their profile icons along the left-hand side (1). Once they are selected a blue tick will appear by their profile photo. A pop-up will appear at the bottom of the screen and from there tap on '+ Add Entry' (2). After doing this, a menu will appear where you will need to tap 'Add Accident' (3). Whilst filling out the details of the accident, you will be able to select 'Add body map' (1). When you tap this you will see the body map appear as presented below. Your screen will rotate to landscape so that you are able to view it at its largest size. To the right, you will see a smaller view of the screen with a magnifying glass (1). By touching a certain area with your finger, the larger body map will zoom in. This is so you can mark the accurate area of the injury. The mark will present in the colour red as exampled below as a cross over where the injury is (2). The injury can be marked however you feel it is best. You are able to mark as many areas as necessary if there are multiples areas of injury. If you mark the wrong area or would like to start again, tap 'Restart' (3). If you are finished click 'Save' (4) and if you don't wish to proceed with the adding a body map, click 'Cancel' (5). Once you have added your body map, you can rotate your device back to portrait. If at this point you decide not to include the body map, you can tap 'Remove body map' (1). If you are happy with the entry then click 'Save' (2). Don't forget you will need to add in details of the accident before you can proceed with saving it. Once the accident entry has been saved and you view it, you will see it displayed beneath 'What led to the accident'. So, that is adding a body map to an accident entry. For more information about viewing a Care Diary entry on the Android app, please see this tutorial. Back to Main Tutorials Page


-
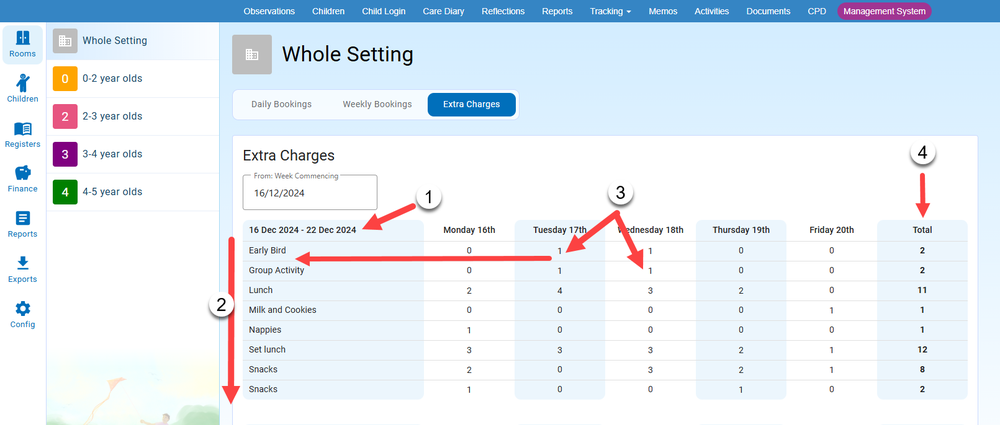
In this tutorial we will take a look at the 'Extra Charges' overview screen. This is where you can view your number of weekly extra charges including what they are and who they relate to. For a guide on how to add extra charges, take a look at this tutorial. To navigate to the 'Extra Charges' overview screen, you will need to start by clicking the 'Management System' option from the top menu (1), select 'Rooms' (2) and then you can either select to view the Whole Setting or a specific room (3) from the options on the left hand side. On the tab across the top of this page, you will need to click 'Extra Charges' (4) which will take you to the overview screen. On this page you can see an overview of extra charges, (defaulting to the week you are in at the top (1)) and a list of extra charges for that week (2). Looking along the week, you will see the number of daily extra charges which align with the extra charge itself (3). You will also see at the end of the week the total number of the extra charges (4). By clicking on an extra charge, you can see which child/ren it relates to. A pop-up will appear which includes the 'Extra Charge Details'. These details include the date the extra charge has been added for (1), the name of the extra charge (2) and the child/ren the extra charge relates to (3). It also shows you the breakdown in quantity of the extra charge for each child, as well as the total (4). As mentioned earlier, the 'week commencing' automatically defaults to the week you are in. To change the date and view extra charges from previous weeks, click inside the box (1) and then you can either manually enter a date (following the same format DD/MM/YYYY) or, select a date (2). You will notice that you are not able to select the weekdays Tuesday-Sunday. This is because the 'Extra Charges' screen format is a weekly view. If you would just like to see the extra charges for a particular room within your setting, you can click which room you would like to view these for on the left hand side (1). With support on assigning children to rooms, have a look at this tutorial. The screen appears the same way as it does in the 'Whole Setting' view. The only difference on these pages are that the extra charges that you can see relate to the children in that room. As mentioned previously, you can view the details of the charge, including which child it relates to, by clicking on it. To view extra charges in upcoming weeks, you can choose to do this in a couple of ways. You can either follow the same process as above, selecting the date beginning the week you wish to view or, you can click 'Load Later Weeks' at the bottom of the page (1). This will load the next 4 weeks and will continue to do so each time you click it. Go back to Main Tutorials Page