


AnyaTapestrySupport
-
Posts
9 -
Joined
-
Last visited
Content Type
Profiles
EYFS Articles
Local Authority
Newsletters
Topic support
Book recommendations and reviews
Courses and events
Vacancies
Help documents
News items
Tapestry Newsletters
Podcasts
Tapestry Import
Forums
Downloads
Events
Gallery
Store
Everything posted by AnyaTapestrySupport
-
 Hi @Tweetinat That's so great to hear! Staff scheduling is something we are currently looking into. I'll make a note for us to get back to you once we have an update for you on this. 🙂 Do let us know if you have any suggestions on what you'd like to see on staff scheduling in the meantime. Best wishes, Anya
 -
Hi @Tweetinat and @Joanne79, I'm pleased to let you know that the Staff Register has now been added to Tapestry! The Staff Register is available on the browser and Android app and we are currently working on adding it to the iOS app. You can find our Staff Register tutorials below: Online register for staff Using the Online Register for staff on the Android app Do let us know if you have any questions about this feature at all or if you'd like us to get in touch with you when this is added to the iOS app. Best wishes, Anya Tapestry Support Team
-
Feedback - register
AnyaTapestrySupport replied to EarlyBirdCIC's topic in Weavers Future Development Suggestions
Hi @Early Bird I'm pleased to let you know that the Staff Register has now been added to Tapestry! The Staff Register is available on the browser and Android app and we are currently working on adding it to the iOS app. You can find our Staff Register tutorials below: Online register for staff Using the Online Register for staff on the Android app Do let us know if you have any questions about this feature at all or if you'd like us to get in touch with you when this is added to the iOS app. Best wishes, Anya Tapestry Support Team -
Staff communication
AnyaTapestrySupport replied to EldenePreschool's topic in Early Years Setting Management
Hi @EldenePreschool I'm afraid it's not currently possible for staff to send each other direct messages, however we are currently working on our Messaging feature which is almost ready for release - we are just waiting for the new iOS app to be ready so that it can be used on all devices. I have added you to the list of people to notify when this is ready for release. As @Mouseketeer mentioned, using Reflections is a great way to talk about your provision with other staff members as relatives can't see reflections. Documents could be a good way of sharing policies or information about an upcoming event but staff wouldn't be able to comment on them as they can only be viewed and downloaded. I hope this helps! Please do let us know if you have any further questions at all. ☺️ Anya Tapestry Support Team -
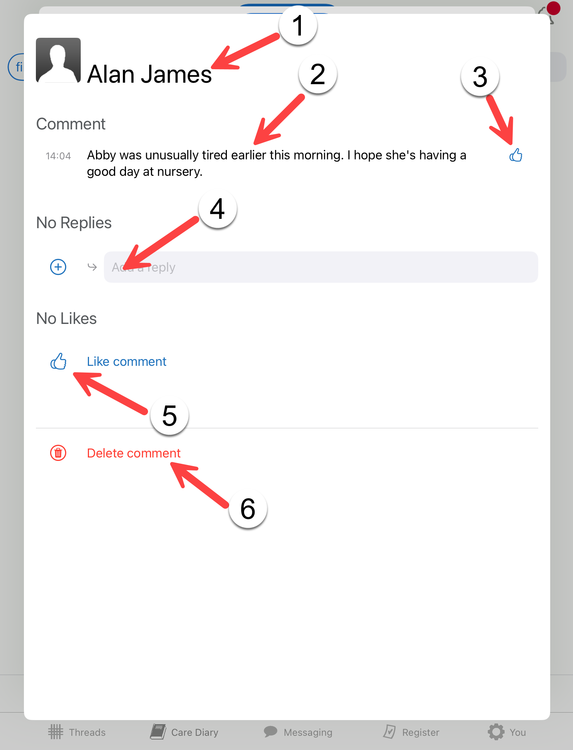
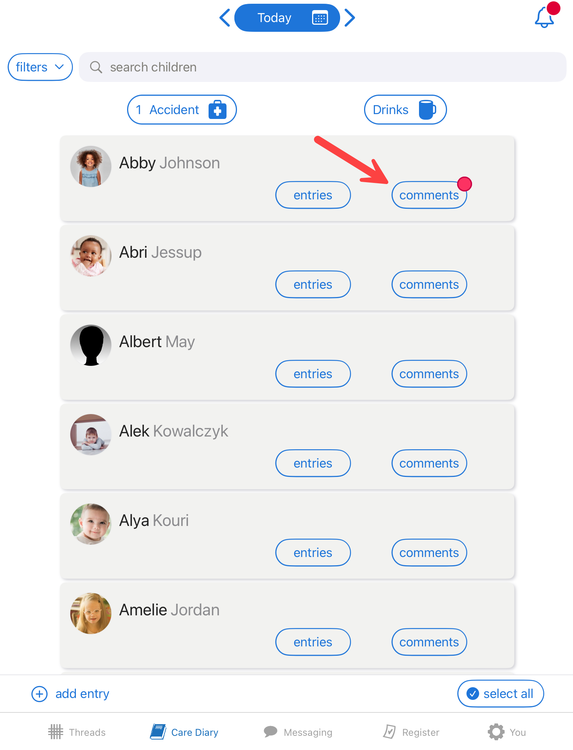
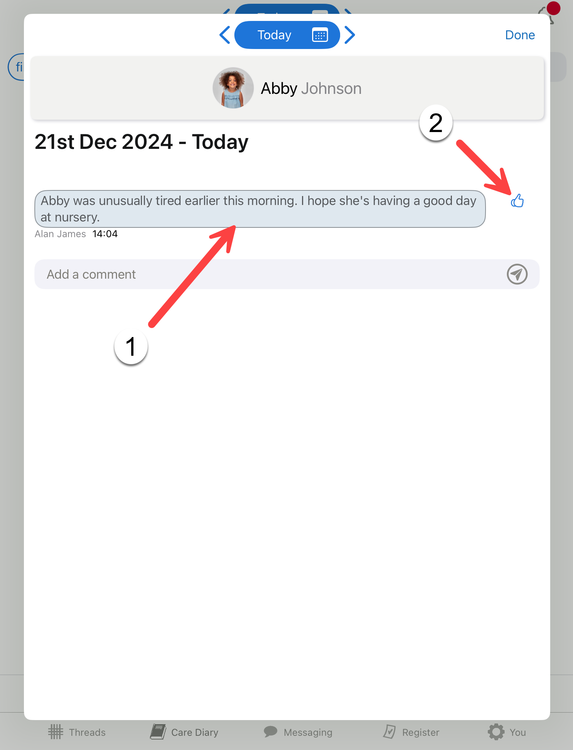
This tutorial will take you through how to use the Comments functionality within the Care Diary on the iOS app. Please note that in order to access the Care Diary on the app you will need to ensure that your Tapestry iOS app is updated to version 5.0.0 or higher. You can find the app version number, beginning "Version..", at the bottom of your app login screen. To add comments to the Care Diary using the web browser version of Tapestry please see this guide here. This tutorial is split up into two sections: adding a comment and replying to a comment. You can use the links below to skip to a specific section. Adding a comment Replying to a comment Adding a comment Comments are messages you can send to relatives through the Care Diary. They are intended for communicating with the relatives of a single child at a time, rather than something you can send to the parents of a whole group or a class. If relatives have access to the Care Diary they can view your Care Diary comments and add their own comments. These comments are attached to a particular day's Care Diary entries for that child. To add a Care Diary comment through the iOS app, login to the Tapestry app and open the Care Diary section: On the next screen you'll see a list of the children on your account. To add a comment for a child just tap the 'Comments' button for their profile. Type your comment into the comments box (1) and tap the paper aeroplane icon (2) to send it. You can also change the date you are viewing entries for by taping the left and right arrows (3): You will now be able to see your comment (1) and a like button (2). Replying to a comment When a child has a new, unread comment, a red dot will appear on their comments button. Tapping on that will take you through to their comments page. Here you will see any comments for the day you are viewing (1) and a like button (2). If you tap on a comment you will be presented with more options and information. These are: The name of the relative or staff member that sent the comment. The comment itself. The ability to like the comment. Any previous replies will show up underneath and you can also add new replies. Any likes will show up in this section and you can also like previous comments here. Staff members or relatives with permission can delete comments. Back to Main Tutorials Page


-
Happy 20th birthday FSF! It's so lovely to read all your messages about being part of the forum and working in the world of education too. Just like some of you, the best part for me was just building those connections. Being part of their world for the time they were with you was so much fun; being creative, exploring the outdoors, building with some lego/blocks... you get to be a kid again but with the added bonus that you get to teach them about it all (for maybe the first time ever too) which I think is pretty cool! 😎
-
Photos wont upload due to format
AnyaTapestrySupport replied to ATurner's topic in Tapestry user conversations
Hi there, If you go into your camera, swipe over the screen from the left to right and a camera and video will appear. On this screen if you look to the right side there is a small cog looking sign (settings) click on this. This will then take you onto another page where you will need to click ‘Resolution and quality’. If you look down the list you should find ‘Image Format’, if you then click on this you can change the format from HEIF to JPEG. I hope this helps but do let us know if you require any further support with this at all! Anya Tapestry Support Team


