RichardTapestrySupport
-
Posts
74 -
Joined
-
Last visited
Content Type
Profiles
EYFS Articles
Local Authority
Newsletters
Topic support
Book recommendations and reviews
Courses and events
Vacancies
Help documents
News items
Tapestry Newsletters
Podcasts
Tapestry Import
Forums
Downloads
Events
Gallery
Store
Everything posted by RichardTapestrySupport
-
Hiya! In this tutorial I'm going to show you how to view Activities on Tapestry either at home or at school. Activities are lessons and tasks added by your teacher on Tapestry. Make sure you are logged into Tapestry first. Click here for help with logging in at school and click here for help with logging in at home. Once you've logged into your account, click Activities at the top of the screen which is shown by the red number 1 arrow. Then click the Open button next to the activity you would like to look at (shown by 2). When you go into the activity you'll be able to see the title (1) and any pictures or videos (2). You can also like the activity by clicking the Like button (3). If you scroll down you can see any Documents your teachers have attached to the activity (1). You can open these by clicking on the button for that document. You can also see any Notes your teachers have written to explain what to do (2). If you have any questions you can type these into the Questions box (3), then click Ask a question (4). Your teacher will then be able to answer this for you. If you click the Write about doing this activity (add observation) button at the bottom of the page (5) this will let you make an observation which your teachers will be able to see. You can do this to tell them how you found the activity. For help with adding observations, click here. You can go back to the Activities list at any point by using the Back to list button at the top of the page (1), or you can use the Previous (2) and Next (3), buttons to go to the previous activity or the next one on the list. So that's how to view Activities on Tapestry!


-
 Hello! I'm going to show you how you can write observations on Tapestry. Observations are a way of sharing what you have been doing at school or at home with your teachers and family. Make sure you are logged into Tapestry first. Click here for help with logging in at school and click here for logging in at home. When you log into Tapestry you will start on the Observations page. This has a list of different observations made by you and your teacher and family. If you get lost you can go back here by clicking the Observations button at the top of the screen next to your name. This has a picture of an eye and in the picture below it's being pointed at by the red number 1 arrow. You can open any observation by clicking on it's title or the Open button, which you can see pointed out by the number 2 arrows. You'll then be able to see the title of the observation. You can see this pointed out by number 1 in the picture below, the title of this observation is Abby is reading "The Koala Who Could" this week (27/7/2020). You can also see any pictures or videos attached, like the Koala pointed out by number 2. You can like the observation by clicking the Like button, which is pointed out by number 3. If you scroll down you will be able to see what your teacher has written in the Notes box (pointed out by 1) and any comments (pointed out by 2). These could be written by your teachers or your family. If you would like to add a comment, write into the comments box (pointed out by 3), then click Save Comment (pointed out by 4). Once you are done you can scroll back to the top and click Back to list (shown by 1) to go back to the main Observations page, or Next (shown by 2) to see the next observation. If you want to write your own observation click the Add Observation button from the main Observations page. Firstly you need to write a title for your observation (shown by 1). Make sure to do this as you can't save your observation without adding a title! You can then add the Notes you want to write (2) and pictures, videos or other documents from your computer (3). The observation Notes are where you can write what you have done. Once you're done, click the Save button at the bottom right (4). If you change your mind you can click Cancel (5) to go back to the main Observations page without saving. If you have any trouble, or don't have the option to add an observation, ask your teacher for help.


-
Hiya! I'm going to show you how to log into Tapestry at home, If you are logging in at school click here. You'll use Tapestry to look at observations your teachers write and the lessons they want you to do. You can even write your own comments and observations! When you login at home your parent or carer will need to log in first at https://tapestryjournal.com/. They should click on Child Login at the top of the screen (where the red number 1 arrow is pointing), then click the orange button that says Log out & switch to child (2). If you have any trouble, or the Child Login option isn't appearing for your parent or carer, make sure to contact your teacher for help. On the next page click on your name or picture. If your brother or sister goes to the same school you may see them here, but don't click on them! Next type your password into the Password box (1) and click Log in (2) and you will have opened your Tapestry account. If you don't know or can't remember your password let your teacher know, as they should be able to set a new password for you. You have now signed into Tapestry! If you want some help with looking at and writing observations click here If you want some help with looking at the lessons your teachers have set, which are known as Activities, click on this


-
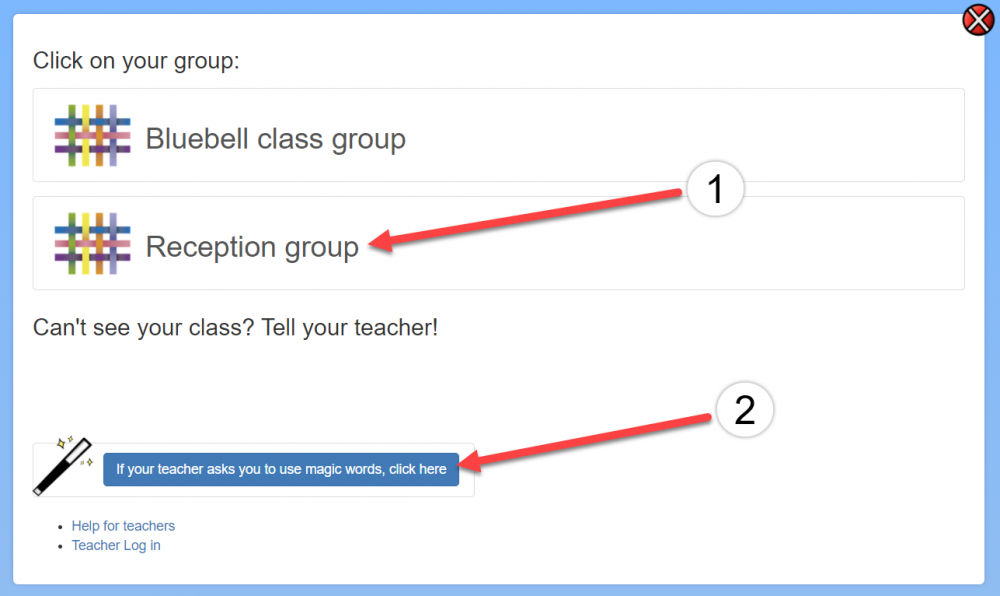
Hiya! I'm going to show you how to login to Tapestry when you are at school. If you are at home and want to login, click on this . You'll use Tapestry to look at observations your teachers write and the lessons they want you to do. You can even write your own comments and observations! First up, go to the website https://tapestryjournal.com/ and click the green box which says Child log in. In the picture below this is being pointed at by a red arrow. Next you will see a list of different groups at your school. In the picture below, the Reception Group is being pointed at by the red arrow with a number 1 at the end. Click on your group. If you don't know your group or if you can't see your group in the list let your teacher know, they can help! Your teacher might give you some magic words to write in which will help you find your group. Click on the blue box next to the picture of the magic wand and type them. In the picture below this is being pointed at by the red arrow with number 2 at the end. If something goes wrong you will see a page asking where you are. If this happens click School pointed at by the red number 1 arrow and then ask your teacher for help. Once you find your group, the next page will show different ways of logging in depending on what your teacher has decided. Sometimes you will see a picture of you and pictures of the other children in your group. Sometimes you won't see any pictures and will just see your name. Sometimes you will see pictures and names. Whatever you see, find yourself by looking for your picture or looking for your name, and then click on yourself! Below, a photo of a child is being pointed at with a red arrow with a number 1 at the end. If you can't see your photo when you do it, you may have picked the wrong group. Click on the red X with I'm not in this group! next to it. This is being pointed at by the number 2 arrow. If you have the right group but can't find your login, speak to your teacher. On the different login page below you can see children's names. There are two children and they are called Anna Smith and Tomás Martínez. Tomás does not have a photo saved on Tapestry so he appears as a shadow, this might be the same for you. If your group is very big you can type your name into the Search for your name box at the top to make it easy to find yourself! Next write your password in the box pointed at by the number 1 arrow. Your teacher should have told you the password to use, but if you don't remember, tell them and they can help you. When you have typed your password click on the blue Log In button pointed at by the number 2 arrow. If it doesn't work ask your teacher for help. You should now be logged into your Tapestry account! If you want some help with looking at and writing observations click here. If you want some help with looking at the lessons your teachers have set, which are known as Activities, click on this.