


RichardTapestrySupport
-
Posts
74 -
Joined
-
Last visited
Content Type
Profiles
EYFS Articles
Local Authority
Newsletters
Topic support
Book recommendations and reviews
Courses and events
Vacancies
Help documents
News items
Tapestry Newsletters
Podcasts
Tapestry Import
Forums
Downloads
Events
Gallery
Store
Everything posted by RichardTapestrySupport
-

online Register
RichardTapestrySupport replied to AndreaStClares's topic in Weavers Future Development Suggestions
Hi AndreaStClares, Just to let you know, it is now possible to view future dates on the online register. You can do this by changing the 'Day' field at the top of the online register to a future date. If you have any questions, please let us know. Best wishes, Richard Tapestry Support Team -
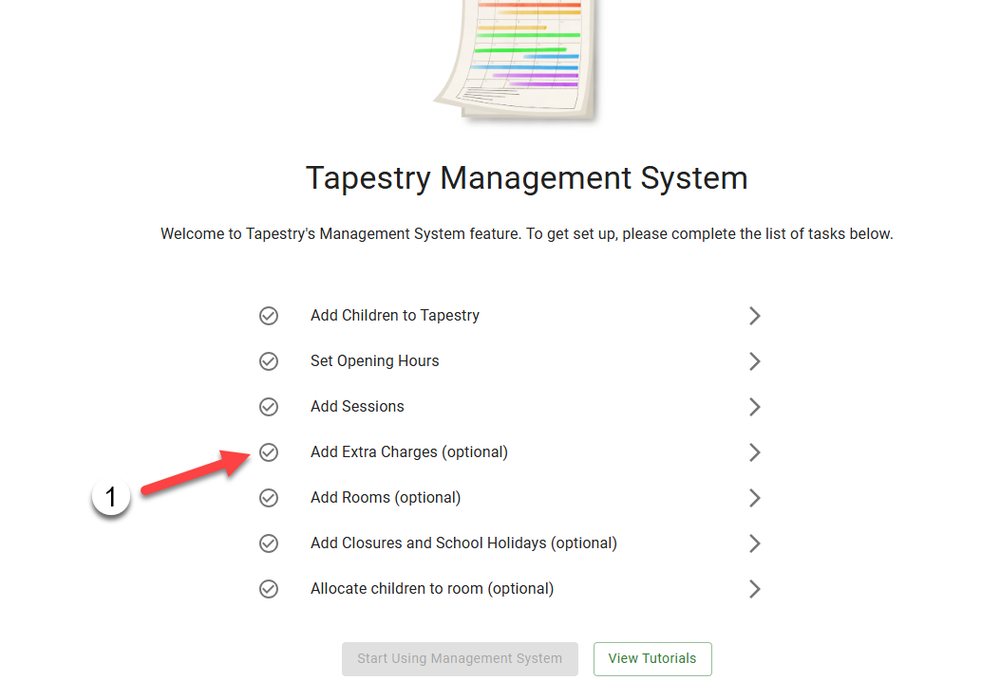
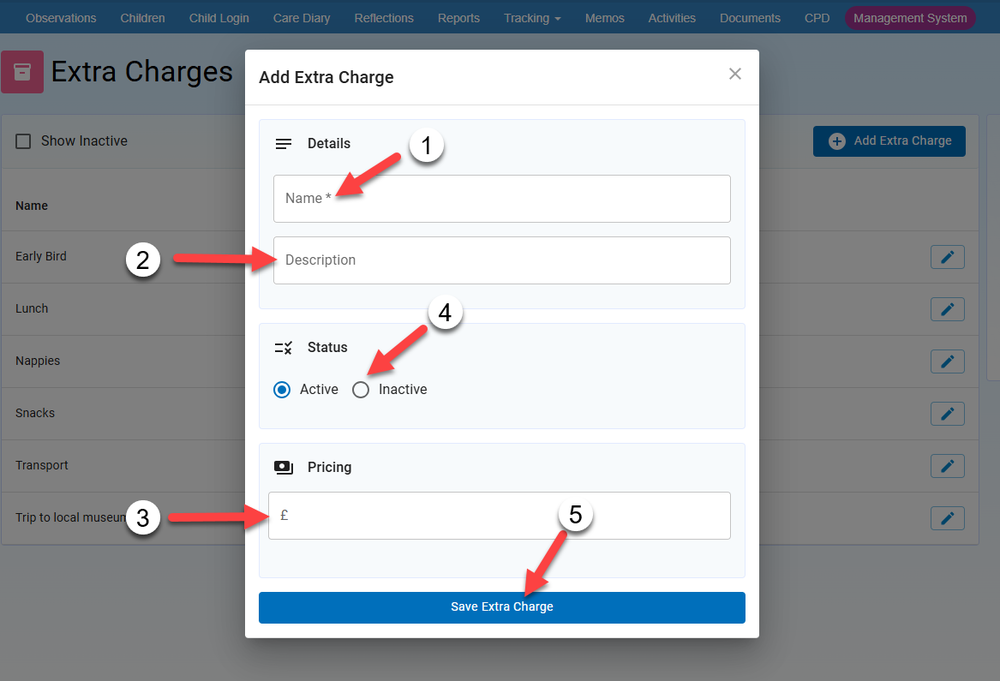
In this tutorial we will look at how you can add extra charges to your account. You will then be able to add these extra charges to a child's regular schedule or as a one-off charge, and they will be reflected on any invoices for that period. To set these up, click on 'Management System' in the blue bar at the top of the page. If this is not showing up, you may need to enable the Management System feature on your account first. You can find a link to our tutorial on this here. If you have not accessed the Management System section before, you will see a set up screen with a list of tasks which includes adding extra charges (1). You will need to compete the top 3 actions in order to access the Booking and Invoices features. If you have accessed Management System before you will be able to configure any extra charges by selecting 'Config' on the left (1), then 'Extra Charges' (2). If you, or anyone else on your account has added any extra charges previously, they will be listed on this page. By default, only active extra charges will be visible, but you can click the box at the top of the list (1) to include inactive extra charges. To add a new extra charge, click the 'Add Extra Charge' button (2). Once you select 'Add Extra Charge' you will be able to select a name (1), description (2) and price (3) for your extra charge. You will also be able to choose whether you would like to make it active immediately or keep it inactive for now (4), meaning it will not be selectable when adding a schedule or extra charge for a child. Once you are done, click 'Save Extra Charge' (5). To edit an existing extra charge, click the pencil icon to the right of it. When editing an extra charge you will be given the same options as when adding a new extra charge. However, if you choose to change the price - by clicking the 'Add Price Change' button (1), you will need to select a date from which the price change will take effect (2). If the date you select is within an invoiced period you will receive a message informing you that this may cause adjustments to appear on your next invoice to make up for the difference in price (3). Once you've added your extra charges, you'll then be able to apply these to children's regular schedules or add one off extra charges for children. You will also be able to see an overview of your extra charges through the 'Extra Charges' overview screen. The tutorials that talk you through these are linked below. How to add extra charges to a child's regular schedule Adding a one off extra charge for a child Extra charges overview screen Back to Main Tutorials Page


-
You can send direct messages to members of staff at your child's school, nursery or childminder through the Tapestry app by tapping the 'Messaging' icon at the bottom of the screen. You will see any existing conversations here. If you have a new message this will appear as a number attached to an envelope icon next to the conversation (1). To send or respond to a message in an existing conversation, tap the conversation (2). Otherwise you can begin a new conversation by tapping 'New Conversation (3). If you select 'New Conversation' you will be given a list of staff members. Select the name of the person you would like to message (1). You can also use the search box at the top of the list to search for a specific user (2). To send a message, type your message into the box labelled 'Type your message here' (1) then tap the arrow icon (2). You can also view your other conversations from this page, or access them by tapping them (3). You can return to your main conversations list or refresh the messages by clicking the circular arrow in the top left corner (4). Back to contents page


-
Hi, Thanks for getting in touch. I'm afraid it's not possible to export your reports to a Word document. It should be possible to save the PDF as a Word document after you have downloaded it, but this can mess with the formatting. If, when you go to export your report to PDF, you set the format to 'Compact' rather than 'Default', this should make the text smaller. Please let us know if you have any questions. Best wishes, Richard
-
As long as it has been enabled, you will be able to use Messaging to send direct messages to staff at your child's school or setting . You can access this feature by clicking the speech bubble icon at the top right of the page. If you have any unread messages you should see a number in a red square showing this, as you can see in the screenshot below. If you haven't sent or received any messages yet, you won't see any conversations listed when you are taken into the main Messaging page (1). To start a new conversation, click the 'New Conversation' button at the top left (2). You will then see a list of staff members. Clicking on a staff member's name will allow you to start a conversation with them (1). You can also use the search bar to help you find a staff member from the list (2). This will then open a new conversation with the selected staff member. You will their name appear at the top of the conversation box (1). To send a new message, type your message into the box at the bottom of the page (2), then click the arrow icon (3). If you selected the wrong staff member by mistake you can start another new conversation with someone else at the top (4) or you can return to the main Messaging page (5). If you have previously sent or received messages, you will be able to see your conversations listed on the main page. If you have any unread messages this will be indicated by an envelope icon, with the number of unread messages in a red circle (1). To view or reply to a message, click on the conversation (2). Messages you've sent will appear in green (1) and messages you've received will appear in grey (2). You can also see the time/date a message was sent just above the message (3) and you can delete a message you have sent by clicking the bin icon above it (4). To send a new message to this user, use the box at the bottom (5). You can also access your other conversations from the left-hand side (6). Back to Main Tutorials Page


-
Messaging on Tapestry allows you to send direct messages to staff members and relatives on your account. If you want some more general information on why this feature was added and how it can help you or template guides for staff members and relatives, please use the links below: Messaging: General Guide Messaging: Template of info for staff Messaging: Template of info for relatives This feature won't be turned on by default but if another manager hasn't explicitly turned it on or off, when you click on the speech bubble icon in the top right-hand corner on the browser version of Tapestry (1) you will see the below screen. If you don't see this icon, it means Messaging has been disabled by another manager. Don't worry though! It can still be enabled, just skip to underneath this screenshot. On this screen at the bottom you have two options of how to proceed. You can activate Messaging now (2) which will take you through into Messaging or you can click 'I'm not interested' (3). If you, or another manager, select 'I'm not interested' on the screen above and later change your mind, you can enable Messaging at any time on your account by going to the Control Panel (1) > Features (2), then scrolling down and clicking the 'Enable' button next to the Messaging feature (3). A final thing to note is that there is a user permission you can enable or disable, which allows users to see and use the Messaging feature. So, for example, you could set your account so only staff members are able to use the Messenger, and not relatives, or that only specific users are able to use the feature. Managers will always have full permissions, so will be able to access the Messaging feature as long as it is enabled on your account. You can adjust this user permission by going to the Control Panel (1) > User Permissions (2), then navigating to either the 'Staff' tab or 'Relative' tab (3) - depending on whether you would like to adjust the permission for staff members or relatives. At the bottom of the page, under the 'Messenger' heading (4), there should be a permission to 'Allow users to see and use the messaging feature'. To adjust this permission, click the 'Edit' button (5). So that's how to enable Messaging on your account! To learn how to use this feature, you can take a look at this tutorial. Back to Main Tutorials Page


-
In this tutorial we will look at how you can use the Online Register feature on the Android Tapestry app. To open the Online Register, tap on the 'Register' button at the bottom of the screen. You should see a list of your children, along with their expected times for the day. You can mark a child as 'in' or 'out' using the 'In' icon on the left-hand side (1) and the 'Out' icon on the right-hand side (2). The times they have been marked in or out will then show up under the 'Registrations' column (3). Children are marked as 'In' are shaded green and children who are marked as 'Out' are shaded orange. At the top of page you will see options to change the day you are viewing (1), filter your list by a specific room (2), and change the sorting order of the list of children (3). There is also a box you can tick to show children who do not have bookings that day (4). If you are viewing a past register you should see a message stating this (5). If you click on a child's name (1), this will bring up an expanded view for that child. Here you will again be able to mark the child as in or out (2), as well as edit the times they are registered as being marked in or out (3). You can also add an absence for a child here (4), or add a register note (5). If you select to add an absence for a child a menu will pop up that will allow you to select the reason for their absence - the options are 'Illness', 'Holiday' or 'Other Absence' (1) - the dates and times they are expected to be absent (2), and any notes (3). Once you are done, click the 'Save Absence' button (4). In the screenshot below, I have returned to the main register screen after adding a register note and an illness absence for the child, Georgia Williams. The register note is indicated by the document icon in the corner of her portrait (1), and the absence appears under her expected times (2). Back to Main Tutorials Page


-
Keyworkers
RichardTapestrySupport replied to ELEANOR_Downing's topic in Weavers Future Development Suggestions
Hi @Claire_Stemp, Thanks for your comment! We've registered your interest in this feature. Best wishes, Richard -
It is possible to take an online register on Tapestry. The online register uses the children's schedules entered though our Management System feature. You can find our tutorials on setting up and using our Management System feature here. If you would prefer to print off a paper register from Tapestry you can find our tutorial on this here. Both managers and staff members have permission to use the Online Register but a manager can disable staff access from the User Permissions tab. This tutorial talks through enabling and disabling user permissions on Tapestry. Using the online register If you're a manager user or a staff member with permission, you can access the Online Register from the 'Management System' tab (1), selecting 'Registers' on the left (2), then 'Children' in the 'Online Register' section (3). Or if you're a regular staff user or PIN only staff user, you can access it by clicking on the 'Online Register' tab. To learn more about the Staff Register, please refer to this tutorial. From the Online Register page you will be able to select a date (1), room (2) and sorting order (3). By default the page will show the current day and the whole setting, and it will be ordered alphabetically by the children's first names. You can also select whether or not you would like the page to show children without bookings (4). If you have a closure on the day you have selected you should see a message noting this. If you are viewing a past register you will also see a message informing you of this. You can mark a child in by clicking the green 'In' icon (1). When they have left you will be able to mark them out by clicking the orange 'Out' icon (2). At the top you'll also see a totals count of the day which will tally the number of children currently attending and expected (3). The children's boxes will be shaded in green or orange to show whether they are currently in or out. The times shown will reflect the time you clicked the 'In' and 'Out' buttons - provided you are on the current day - but we'll look at how you can edit these next. If you click a child's name on the list (1) some further options will appear on the right. These will allow you to edit the times the child was marked in or out (2), add an absence for the child (managers only) (3), check their bookings (4), or add a note for the child (5). Any notes you add will appear under the 'Notes' section on the register (6). If you need to delete or edit a register note, just amend or delete the text under in the 'Register Notes' field (1) and click 'Save Register Notes' (2). If you would like to export the register, please refer to this tutorial here. Back to Main Tutorials Page


-
In this tutorial we'll look at how to set up the Cherry Garden Bridging framework. This follows on from the main Cherry Garden framework and includes branches 11 and 12 in the areas of Mathematics and English. If you are looking to set up the main Cherry Garden framework you can find our tutorial on this here. To enable the Cherry Garden Bridging framework you will need to go to the Control Panel (1) > Settings (2) > Assessments (3) and then click the 'Configure' button next to the framework. You will then need to tick the box to enable the Cherry Garden Bridging framework (1). You can also select whether or not you would like the framework to be visible to relatives (2). If you tick this box they will be able to see assessments made using this framework on their children's observations. Below this you will see options to set your Best Fit Threshold (1) and the number of refinements (2). Your Best Fit Threshold will be the point at which each branch for each strand is considered complete. The percentage is worked out based on the number statements and which refinements have been added to a child's observations. So to reach 100% they would need to have all statements for a branch ticked and the highest refinements for each. You can view a child's progress with this on our Best Fit tracking screen. You can find our tutorial on this here. Under this you will be able to select the name for each of your refinements (3) as well as a short name (4) and colour (5) which will help you identify your refinements when tracking. Once you are done, click submit. The Cherry Garden Bridging framework will now be enabled on your account. You will be able to see it under the 'Assessments' section when you are adding or editing an observation. You will also be able to view the tracking screens for the Cherry Garden Bridging framework by clicking the 'Tracking' tab (1) then 'Cherry Garden Bridging' (2). Back to Main Tutorials Page


-
In this tutorial we will look at the Best Fit tracking screen for the Cherry Garden Bridging framework. It's worth bearing in mind that to use the Best Fit screen you will need to have the Cherry Garden Bridging framework enabled on your account. You can find our tutorial on how to enable the Cherry Garden Bridging framework here. The Best Fit screen will allow you to see what percentage of each branch a child has completed, based on the statements and refinements you have used in your observations. Before we do so, you may want to set your Best Fit Threshold. This is the percentage at which a branch will be considered complete for a child. Once a child has reached their Best Fit Threshold for branch 11 in a strand, the Best Fit screen will update to show their completion for branch 12 in that strand instead. By default the Best Fit Threshold will be set to 80%, but you can adjust this by going to the Control Panel (1) > Settings (2) > Assessments (3), clicking the 'Configure' button next to the Cherry Garden Bridging Framework (4) and editing the percentage (5). To access the Best Fit screen you will need to go to Tracking (1) > Cherry Garden Bridging (2), then click the 'Individual View' button under 'Best Fit' (3). You will then need to select a child (1) and a year (2). The child's scores will then show up on a table below, which shows each area (1), strand (2), branch (3) and completion percentage (4). The completion score is based on the number of statements the child has been assessed with and which refinements. The score will go up whenever a child is assessed and a new statement is selected, or if a statement is selected with a higher refinement than a previous assessment. So, for example if a child has had all of the statements for a particular strand a branch ticked, and the highest refinements for each, they would have 100% completion for that strand and branch. As mentioned above, once your best fit threshold has been reached for branch 11, the child will progress onto branch 12 for that strand. Please note that Geometry will begin on branch 12 and does not include branch 11 assessments. This score takes into account all of your observations throughout the year, so you won't need to tick all of the statements on a single observation. Back to Main Tutorials Page


-
It's possible to view a list of your recorded accidents using our accidents tracking page. We'll start by looking at how to access and use this page. To skip to the section of downloading accident forms to PDF click here. Viewing accidents You can track your accidents by clicking the 'Tracking' tab at the top of the page (1), selecting 'Accidents'(2) then clicking the 'Overview' button (3). At the top of the page you will be able to set a date range (1) and apply an filters (2). Your filters will allow you to search for accidents relating to specific children or groups of children. Once you have set your dates, click 'Submit' (3). You should then see a list of your accidents within the date range you have selected. This will show you a simple overview of your accidents which includes: what led to the incident, the first aid administered, the time of the accident, the time it was signed off, who approved it and who signed it off. Exporting accidents At the top right of the list you will see two options for exporting your accidents for download. You can either export your accident forms or download the accident overview. Selecting the 'Download Overview' option will create a PDF copy of the accident tracking screen you are viewing, so you will be provided with a printable list for the accidents within the date range you have selected, and according to any filters you have set. Selecting 'Export Accident Forms', on the other hand, will allow you to download a separate PDF file for each child containing their accident forms. If you select this option you will be taken to a screen that will allow you to select which children's accident forms you would like to export (1), and a date range (2). By default any children you were viewing on the accident tracking screen will be selected, but you can add or remove children as necessary. The date range will be set from the first recorded accident to the present, but this can also be changed. You can also select the order you would like accidents to appear in your download - either latest to earliest, or earliest to latest (3). Once you are ready click the 'Download PDF' button' (4). Depending on the amount of data to be exported, the files can take a moment before they are ready to download. You can download the files either by clicking the 'View your Downloads' button on the next page (1) or by clicking your name in the top right (2) and selecting 'Your Downloads' (3). Back to Main Tutorials Page


-
It is possible to reply to observations with another observation. This can be helpful if you would like to add a more in-depth reply than would be possible in a comment (for example if you wanted to include media) or would like to quickly add an observation that is linked to the one you are replying to. We'll look at how to reply to observations with an observation first. To skip ahead to how to enable this for relatives, click here. To do this you will need to go to the main observations list (1) and click to access an observation (2). If you then scroll down to the bottom of the observation you will see the option to reply with an observation. Clicking this will allow you to add a new observation. If you scroll down you will see that the new observation has automatically been linked to the one you selecting to reply to. You can also allow relatives to reply to observations with their own observations. In order to do this you will need to set two user permissions to 'permitted', the permission for relatives to 'Add observations', and to 'Manually add & edit links between pages'. Please note that only managers on Tapestry will be able to do this. You can do this by going to the Control Panel (1) > User Permissions (2) > Relatives (3). The option to 'Add observations will appear under the 'Observations' (4) heading and the option to 'Manually add & edit links between pages' will appear under the 'Page Links' (5) heading. If these options aren't permitted you will just need to click 'Edit' (1) to the right of them then set the default permission to permitted (2), or set individual permissions for relatives if you would prefer (3), then click save (4). You can also find our tutorial on setting your user permission for relatives here. Back to Main Tutorials Page


-
You can access our continuing professional development (or CPD) courses using your Tapestry login. Please note, currently this is only available to managers and full members of staff on Tapestry and not PIN-only staff. You can do this by logging into Tapestry and clicking the 'CPD' tab in the blue bar at the top of the screen or by going to https://cpd.tapestry.info/. On the CPD home page click 'Log in' (1) in the top right-hand corner and then select to log in with your Tapestry account (2). This will take you to the main Tapestry log in page. You will just need to enter the email address and password for your Tapestry account here, then click the 'log in; button, and you will be directed back to the CPD site. If you are already logged into Tapestry you won't need to enter your login details here, but you will be asked to confirm you are happy to log in with the Tapestry account you are currently using. If you are logging in for the first time you will receive an email from us containing a link that will allow you to confirm your account. If this email doesn't appear in your inbox you may need to check your spam or junk folder. This link will take you back to the CPD site. To return to the main page just click the 'Courses' button. To learn how to navigate around the Tapestry CPD site, you can follow this tutorial here. Go back to Main Tutorials Page


-
It's possible to add your own customisable flag sets to Tapestry, which you will then be able to link to observations and reflections. We'll start by looking at how you can add a new bespoke flag set to Tapestry. To skip to the section on editing, deleting and enabling or disabling bespoke flag sets you have already created, click here. Adding a flag set To add a new bespoke flag set you will first need to go to the Control Panel (1) > Settings (2) > Flags (3), then click 'Add a new set of bespoke flags' (4). On the next page you will be able to select a title for your flag set (1), a short description of your flag set (2) and the default colour (3). Below this you should see the 'Flags' section. You will be able to see any flags you have added and you will have the option to add a flag (1) or to add multiple flags (2). Clicking one of these options will open a pop-up box that will allow you to pick a name for your flag(s) (1) and the colour you would like to use (2). If you do not select a colour here the flags will be show up as the default colour for your flag set. Once you are done click 'Save flag' (3) If you are adding multiple flags at once you will need to separate the name of each flag with a line break. # You should then see your flags appear. If you click the cog icon to the right of one of your flags (1) you will be given the option to edit your flag, add one or more flags within the flag, move or delete the flag. You can also use the arrows to the left of the flag to quickly move it. Adding a flag within a flag, means that the second flag will appear indented under the first flag when you add them to an observation or reflection. You can add multiple flags within a single flag, and you can also add flags within flags within flags, so each layer will appear indented, as shown in the image below. Once you have finished creating your flag set click the 'Save changes' button at the bottom right. You will then be asked if you would like to enable your new flag set. If you are ready to enable the flags you can click the 'Enable now' (1) button. If not you can click 'Cancel' or the 'X' at the top right of the pop-up (2). If you choose to enable the flags now you will be given the option to enable them for observations (1) and/or reflections (2). If you enable them for observations you will also be able to decide whether you would like the flags to be visible to relatives (3). Tick any boxes that apply and then press 'Submit'. Once you have enabled your flag set you should see it appear under the 'Flags' section whenever you add or edit an observation or reflection (depending on whether you enabled the flag set for observations and/or reflections). To learn more about using flags on Tapestry, take a look at this tutorial. Editing, deleting and enabling/disabling flag sets If you would like to make any changes to a flag set, delete a flag set or enable/disable a flag set you can do this by going back to the Flag Settings page (Control Panel > Settings > Flags) and clicking on the 'Bespoke Flag Sets' heading (1). You should then see your saved flags sets and your draft flag sets, if you have any. Draft flags sets are ones you may have been working on but did not complete or save. If you do have any draft flag sets you can continue adding to them or discard them using the buttons to the right (2). This tutorial talks you through draft flag sets in more detail. Next to any saved flag sets you will see buttons to edit, delete and configure the flag set (3). Selecting 'Configure' will allow you to enable or disable the flag set from reflections and observations, or make it visible to relatives when they view observations. Please note that deleting a flag set will delete it permanently, and will remove it from any observations and reflections it had previously been added to. If you believe you may need to use the flag set again in future we would recommend disabling it instead, that way it can always be enabled again later. Go back to Main Tutorials Page


-
Hi Finleysmaid, Thanks for getting back to us, and for bringing that point up. If they are recording accidents we would recommend using our accident forms. However, this depends partly on what exactly they would like to record. For incidents that aren't accidents or any more general information Memos might be more suitable. They are also the closest thing we have to observations that aren't added to the children's journals. Best wishes, Richard
-
Hi finleysmaid, Accidents won't be added to a child's journal. So if you download a PDF journal for a child who has had an accident recorded, this won't appear in the journal. However, parents will be notified of accidents if they have been marked as having parental responsibility. They will receive a notification when you mark an accident as discussed. Best wishes, Richard


