OliverTapestrySupport
-
Posts
3 -
Joined
-
Last visited
OliverTapestrySupport's Achievements
18 months (3/7)
0
Reputation
-
On the Bespoke Flag Sets section of the Flag Settings page in the Control Panel, when you expand it you will see a section called Draft Bespoke Flag Sets. This is where you'll see any bespoke flag sets that you've started adding but haven't saved yet, for whatever reason, and so have left as unfinished. You can return to keep editing these, or choose to discard them, at any time that you like. Please note that you can't enable draft bespoke flag sets on your account or add them to Observations or Reflections - you will need to save them first to do this. Draft bespoke flag sets are created first by clicking 'Add a new set of bespoke flag' in the Flags section of the Control Panel: After which you will see the following page: As soon as you make any change on this page (e.g. adding a title or description, changing the default colour, adding a flag or multiple flags), a draft will be created that you can return to later. Once the draft has been created by making a change (or many changes) on the 'Add new set of flags' page, you can click away from that page - either to another part of the Tapestry site or onto another website altogether - and then when you return to the Flag Settings section of the Control Panel you'll be able to see it listed in the Draft Bespoke Flag Sets section: If you didn't add a title to your draft, you will see that it's automatically listed as Unnamed flag set. You'll also see that below each draft title is the date and time that it was last modified, which should help you to identify it. You can click to 'Continue Adding' a draft set, which will immediately take you to the latest version of your draft. You can leave your draft and return to it again via 'Continue Adding' as many times as you like! You can also click to 'Discard' a draft set, which will bring up the following options: Simply 'OK' that and it will be gone forever! Once confirmed, you will see the draft flag set disappear from the Draft Bespoke Flag Sets list, and after that it will be unrecoverable. If you do want to save your bespoke flag set, so that it can be enabled on your account and added to Observations and Reflections, all you need to do is click 'Continue Adding' and then 'Save changes' at the bottom: Once you've done that, you'll have the option to enable the bespoke flag set, and you'll see that it's moved from the Draft Bespoke Flag Sets section to the Saved Bespoke Flag Sets section in the Control Panel: Go back to Main Tutorials Page


-
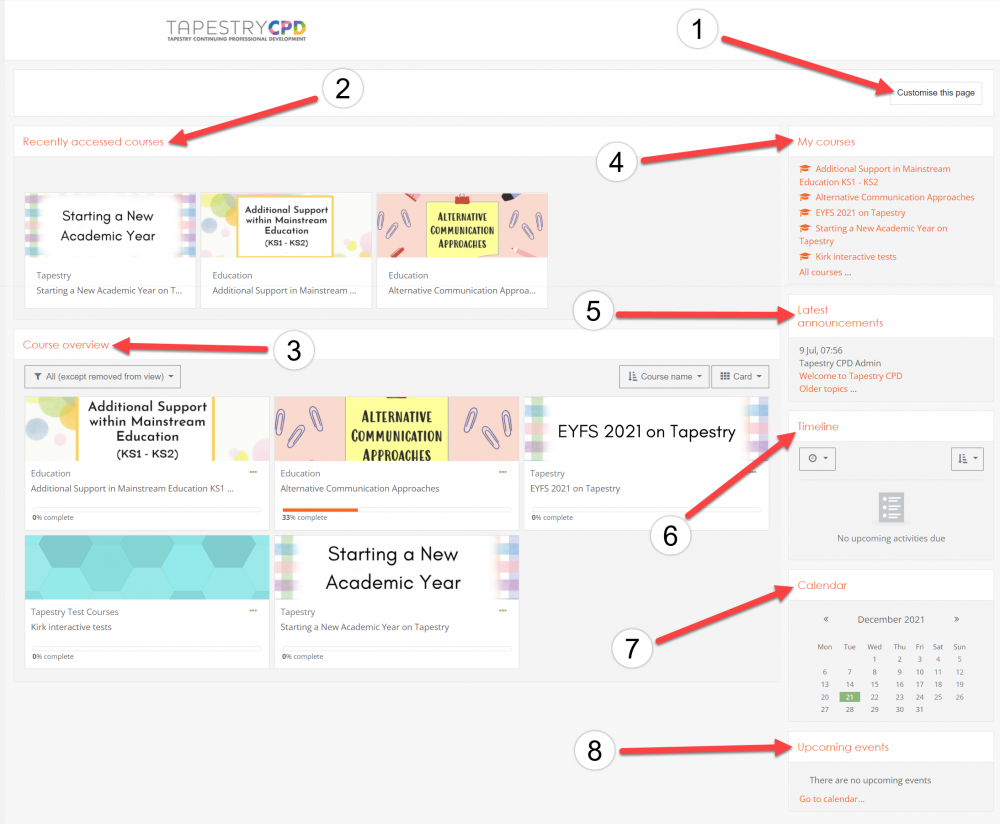
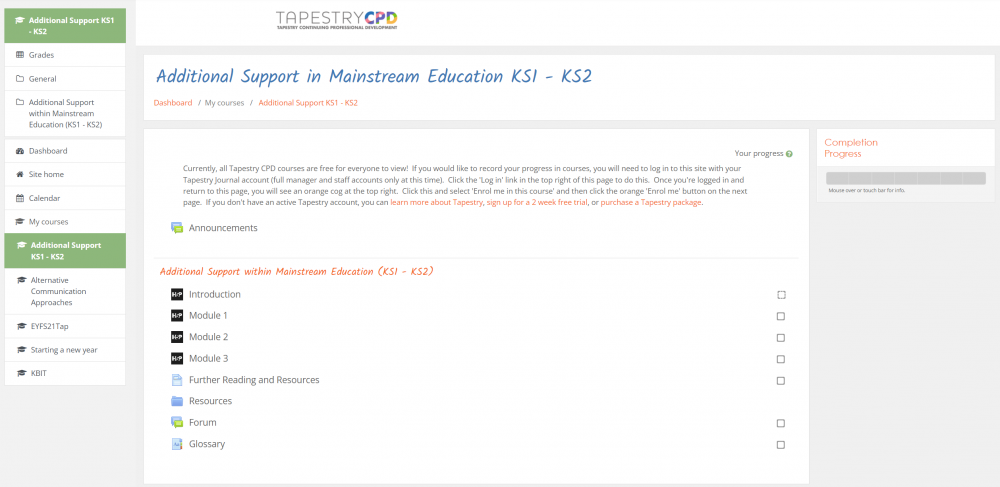
You can access the CPD site either on the browser version of Tapestry from the CPD link at the top of the page within your account or from https://cpd.tapestry.info/. This tutorial talks you through the whole process of logging in but please note in order to do so, you will need to be a manager or full staff member on Tapestry. To log in on the CPD site click 'Log in' (1) in the top right, and then select 'Tapestry' (2) to login using your Tapestry details. This will take you to the main Tapestry log in page. You will just need to enter the email address and password for your Tapestry account here, then click the 'log in; button, and you will be directed back to the CPD site. If you are already logged into Tapestry you won't need to enter your login details here, but you will be asked to confirm you are happy to log in with the Tapestry account you are currently using. Once you've logged into Tapestry CPD for the first time, you will need to agree to the privacy terms first, and then you will be taken to the home screen. Now you can get started! This tutorial will take you through the different sections of the site and give a brief overview of what you can expect to see there. We're now going to run through the different sections from the side panel, and then other pages you can get to from your name's drop-down menu. You can read through all of these sections or click on a section to jump straight there: Side panel menu A. Dashboard B. Site home C. Calendar D. My Courses Drop-down menu A. Dashboard B. Profile C. Grades D. Preferences E. Announcements F. Log out Side panel menu In order to navigate around the site, there is a side panel which you can toggle on by clicking the three lines. You can then hide the menu by clicking the big 'X', in the top left-hand corner. A. Dashboard Where you can see an overview of your courses and events. What you see on this page can be changed via the 'Customise this page' button (1), but includes: Recently accessed courses (2): Any courses that you've viewed recently will appear in this section. Course overview (3 ): A lis t of the courses with an overview of the percentage you've completed; these can be filtered to show In Progress/Future/Past/Starred/Removed from view courses only, and you can also change how they're ordered (alphabetical or by date) and how they appear (with pictures or in a list form). My courses (4): Quick links to the courses on your account. Latest announcements (5): Where any admin announcements are listed. Timeline (6): Where any activities you have coming up are listed, which can be filtered by due date and ordered to be sorted by date or course. Calendar (7): To peruse dates and plan activities. Upcoming events (8): Links to the calendar. B. Site home This is the quickest and easiest way to browse all of the available courses (1), or search for them via the categories (2) or search function (3). Under 'My Courses' you'll also see all of the courses that you've joined up to (4). C. Calendar A detailed interactive area where you can add, view or edit events for the year ahead. There are various filters that will help you to narrow down what you want to see, both on the calendar itself (1) and in the 'Events key' on the right hand side (2), where you can hide certain types of event if you so choose (e.g. site events, group events, user events). There are also options to export the calendar (3) so that it can be linked to another application such as Google or Outlook, and a button for managing your subscriptions (4) where you can either import from those applications or upload a calendar file from a URL. D. My courses A list of your courses that you can quickly click into and access. After clicking on one, you'll be taken to the course's overview page, and a further box in the side panel will open up to navigate to different sections of that course. In this example you can see I've clicked on the course 'Additional Support KS1 - KS2'. Once you have completed a course, you will get an option to download the certificate, which we strongly advise doing for safekeeping as proof that you have completed it. Then if your Tapestry subscription ends and you're unable to access the Tapestry CPD, you will still have it as evidence of completion. Drop-down menu In the top right hand corner, you will see a notifications icon in the form of a bell (1). Clicking on this will reveal any notifications you might have, in the same way as on Tapestry. You will also see your name and a dropdown icon (2), clicking on which will give you some more options which we'll now go into. A. Dashboard This takes you to the same side panel dashboard screen mentioned above. B. Profile Here you can edit your user details, such as your email address (if you haven't used Tapestry to login), first and last name on the account, visibility of your email address, and your time zone. These can all be edited by clicking on 'Edit profile', from either under user details (1) or via the cog on the right hand side (2). You can view information about privacy settings, and choose to delete your account if you so wish, under the 'Privacy and policies' section (3). You'll also find information about your courses (4), reports (5), and your certificates for completed courses and forum posts and discussions (6). The cog on the right hand side (2) will give you options that are shown on the 'Preferences' section, that we'll cover below. C. Grades This is where you can see the grades and scores for all of the courses you're taking. You can click on the course name for a breakdown of the information. D. Preferences You can change various settings here, such as preferred language, linked logins, and your preferences for the different parts of the site (forum, editor, calendar, courses etc.). E. Announcements Just as it sounds, where any general news and announcements are listed. F. Log out Once you've finished your session, it is advisable to always log out for security reasons. And that's it! If you have any questions about Tapestry CPD at any point, you can always email us at customer.service@eyfs.info and we would be more than happy to advise. Go back to Main Tutorials Page