



EmilyB
-
Posts
1,005 -
Joined
-
Last visited
-
Days Won
9
Content Type
Profiles
EYFS Articles
Local Authority
Newsletters
Topic support
Book recommendations and reviews
Courses and events
Vacancies
Help documents
News items
Tapestry Newsletters
Podcasts
Tapestry Import
Forums
Downloads
Events
Gallery
Store
Everything posted by EmilyB
-
Tapestry automatically saves your work as you add your Bespoke Framework to Tapestry. Your partially uploaded Bespoke Frameworks are saved as Draft Bespoke Frameworks which you can later edit and finish, or if you don't need them, delete them from Tapestry. For extra peace of mind there is also the option to manually save your work at certain points in the process (1). You can find your Draft Bespoke Frameworks in the Tapestry Control Panel, under Settings> Assessments, and then under Assessment Frameworks. Drafts which you haven't given a title will be known as 'Framework import' while titled Drafts will display the title. Each draft will have the date and time it was last modified to help you determine which one you were last working on. Click on Finish import (1) to continue importing, and Discard (2) to delete the Draft Framework. It's not possible to recover a discarded framework so make sure you are sure before you delete it. Go back to Main Tutorials Page


-
In this tutorial we will look at how to delete and disable bespoke frameworks. Please note that once you have deleted a bespoke framework it will not be possible to recover it, and it will be removed from your account immediately. If you have previously made observations using the framework you are deleting, the observations will remain, but the assessments will disappear. On the other hand, if you disable a framework you will be able to enable it again later if you choose to. We'll look at how to delete a bespoke framework first. To skip to the section on disabling them click here. Deleting a bespoke framework To delete a bespoke framework you will need to go to the Control Panel (1) > Settings (2) > Assessments (3), and click the 'Delete' button next to the framework you would like to delete (4). You will then need to confirm you are happy to delete the framework by clicking the 'Delete' button on the next screen. If you would like to delete a draft bespoke framework you can do so from the Assessments page by clicking the 'Discard' button next to it. Disabling a bespoke framework To disable a framework you will need to go to the Assessments sections of the Control Panel - by going to the Control Panel (1) > Settings (2) > Assessments (3) - and then click 'Configure' (4) next to the framework you would like to disable. You will then need to untick the 'Enable' (1) box and click 'Save' (2). Back to Main Tutorials Page


-
In this tutorial we're going go through how to edit a bespoke framework once it's been saved on Tapestry. If you haven't already uploaded a bespoke framework, this tutorial will walk you through it. We'll start by accessing the Assessment Frameworks settings, which can be done from the Control Panel (1), Settings (2) then Assessments (3). Next, find the saved framework you'd like to amend, and click on 'Edit'. Here I'm going to edit my Progression Step 1 framework. Once you've pressed 'Edit' you'll be taken to a screen where you can amend the different elements of the framework. At this stage it's important to note that if you edit an element of an enabled framework that's already used in an observation, then this edit will reflect in the observation. For example, changing the name of a Detail that's been selected in an observation will rename this Detail in the observation, and deleting it will remove it from the observation. But let's get back to it. So, the first section is to edit the name and description of your framework. If you want to make any changes simply click into the relevant box and amend the text. If you make a change, you'll see a green 'Edited' badge appear (1). Next, you can make changes to the Scale, which is what you use to assess your framework against. If you have no Scale at the moment then you can add one if you'd like to (1). Or if you already have a Scale, you can make changes to it by clicking on 'Configure Scale' (2). A Popup box may appear for you to make your changes so just remember to click 'Save' if this appears to save your edits. Once an edit has been made you'll see the 'Edited' badge (3) to confirm. And you can always undo your Scale edit if you've made a mistake or change your mind (4). Moving on from the Scale, you can then edit the Details. These are the elements that make up the bulk of your framework, such as titles, statements, objectives, etc. These can be edited by either adding a new Detail (1), or by amending an existing Detail by clicking on its cog (2) and then the relevant action (3). The badge (1) will show to indicate that a change has been made. To undo any changes you've made, click on the 'Undo all detail changes' button (2). The final section you can edit is the Components, which is where you tell Tapestry how each Detail should look and behave. You can add a new one (1), or edit or delete an existing Component (2). To make a change, a popup box will appear. So again, remember to press save at the bottom of the popup box to apply the changes. After editing, you'll see the Edited badge (3) to confirm a change has been made to that Component. Should you want to revert back to the Components' original configuration then click on 'Undo' (4). After you've made any changes, at the bottom on the page you'll see a 'Discard all changes' (1) button. You can press this if you want to undo all of the changes you've made to the framework since last saving. Or if you're happy with the changes and want to save them, then simply select 'Save Assessment Framework' (2). If you leave the editing page at any time without saving then rest assured you won't have lost any of your changes. Back on the Assessment Frameworks page you'll see that your bespoke framework now has edits that need to be reviewed. This means that the edits won't reflect within current or new posts until you have reviewed and saved them. And that's it! If you're having trouble or require any further assistance with this, contact us at customer.service@eyfs.info and we'll be happy to help. Go back to Main Tutorials Page


-
In this tutorial I'm going to cover the three vital elements that make up a bespoke framework: Scales, Details & Components. I'll go through each concept one by one, but if you would like to travel to a specific point in the tutorial, please use the links below. Scales Details Components Let's get started looking at Scales. Scales Scales are what you use to assess your framework against. You might call these refinements, tiers or levels. They allow you to fine tune your assessment when completing it in your observations. For example, you may want to set a Scale to show how well a child is demonstrating that selected statement. Below you can see an example of a Scale in action. With the Key Stage 1 & 2 frameworks on Tapestry the Scales are called 'tiers' (when setting up the Key Stage frameworks you can choose how many tiers you have and what these are called). In the example below, we have 4 tiers set up (absent is not a tier as such). These are: needs additional support, working below, working at and working above. You can assess the KS1 & 2 Scales (tiers) against all of the KS statements. Details Details are what make up your framework. They are everything from the titles of each part of your framework, to the statements, objectives, or targets that you may have included in your framework. In the screenshot below you can see the KS1 Year 1 framework on Tapestry. All the elements highlighted make up the Details of the framework. The Details for the KS1 framework are: What the subjects are called (English, Maths etc.). What the areas within each subject are called (in the screenshot you can see one area of the English framework - spoken language). What the statements within each aspect are. Components Each Detail in your framework needs to be given a Component. Components are important because they tell Tapestry how this Detail should look and behave and, later on, will be helpful when you start filtering and analysing your assessments. A Component should be a broad word which describes the type of Detail you are adding. Using KS1 as an example again, this is split into four different Components: A. Subject B. Area C. Aspect D. Statement When you add a new Component, you’ll need to say how Details added as this type of Component should look and behave. Components can either be a 'Category' or they can be 'Selectable'. If they are a category it means they only appear as a heading. For example, the Component of 'Subject' in KS1 would be a 'category' as you cannot tick it. The Component of 'Statement' in the KS1 framework would be 'selectable', because you can tick the statements when making an assessment. Finally, within your framework you need to choose which Components your Scale can be used against. Within the KS1 framework it is the statements that are assessed. Therefore it would be the Component 'Statement' that would need to have the Scale enabled.


-
- 1
-

-
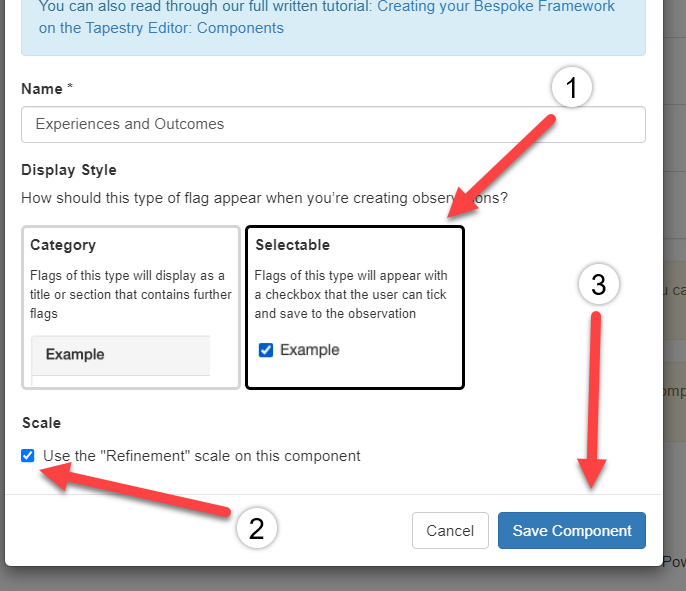
In this tutorial we'll look at how you can upload your CSV file to Tapestry and create your bespoke framework. If you need any help creating your CSV file you can find a link to our tutorial on this here. To add a bespoke framework you will first need to click your name in the top right (1) and go to the Control Panel (2). You will then need to select 'Settings' (1) then 'Assessments', (2) and click the button to 'Add a new bespoke framework' (3). There's some information and a video about bespoke frameworks on the next page. We do recommend reading this information and watching the video. Once you are happy click to begin adding your framework. At the bottom of the next page you will be able to upload your CSV. To do so you will just need to click 'Choose file' (1) then select the CSV file from your computer and select 'Upload' (2). If you change your mind or want to edit your CSV file before uploading, clicking 'Cancel' (3) will take you back to the Assessments page. You will then be shown a preview of the structure of your framework, including your Details and their Components. For more information on how bespoke frameworks are structured I would recommend looking at our tutorial on Scales, Details and Components, which you can find here. If you are happy with how the framework looks click to continue (1). Otherwise you can go back and upload a different file (2). You will then be able to enter a title (1) and a brief description of your framework (2). Once you're done click the 'Next' button (3). Alternatively, you can choose to exit and save your framework as a draft to continue adding later (4). Any draft frameworks will be visible from the 'Assessments' section of the Control Panel, along with options to continue adding (1) or discard them (2). The next step after selecting a title and writing a short description is adding a Scale. This is not mandatory so you can skip this step if you choose to. A Scale acts like a refinement or like tiers in our Key Stage frameworks, and will allow you to add more of a fine-grained assessment. If you have any trouble there is a short video you can watch and a link to our tutorial on Scales, Details and Components on this page. To add a Scale, click the 'Add Scale' button (1) or click 'Next' (2) to continue. If you select to add a Scale you will be prompted to name your Scale (1), select the number of items (2) and to give your items a name and short name (3). In this case the 'Items' will be similar to the individual refinements or tiers. For example, you could add three items and call them 'Emerging', 'Developing' and 'Secure'. Item one will always be the lowest in the Scale. Once you are done click 'Save Scale' (4). Next you will be able to adjust your Components. These are the categories included in your framework and will tell Tapestry how each Detail should look and behave . An example of a few different Components could be 'Areas', 'Aspects' and 'Statements'. You should be able to see a list of your Components, added from your CSV spreadsheet. If you would like to make any changes you will be able to add a new Component (1), edit (2) or delete (3) a Component. Before you are able to proceed you will need to make at least one Component selectable, which means you can tick items under this category when you add an observation. For example, if your framework includes statements you may choose to make these selectable. If you have added a Scale you will also need to apply this to at least one of your Components. Again, if your framework includes them, your statements might be a good choice for this. In the example below we will make the Component 'Experiences and Outcomes' selectable and apply our Scale to it by clicking the 'Edit' button (2). To make a Component selectable, click the option under 'Display Style' (1). To apply a Scale to your Component you will just need to click the relevant box under 'Scales' (2). Once you're done click 'Save Component' (3). Once you are happy click the 'Save Assessment Framework' button at the bottom right of the screen. If you then go back to the 'Assessments' section of the Control Panel your framework should appear under 'Saved Assessment Frameworks'. Clicking 'Preview' (1) will allow you to see what your framework will look like when you use it with an observation. You will also have the option to edit (2) or delete (3) your framework. To enable your framework you will need to click 'Configure' (4), and tick the box to 'Enable' (5). If you would like relatives to be able to see the assessments linked to their children's observations you can also click the box to 'Display to relatives' (6). Please note this will not affect the visibility of the observations themselves, only the assessments. To save your setting's click 'Submit' (7). You will now be able to add your bespoke framework to your observations. Back to Main Tutorials Page




-
Well I'm glad they managed to find the issue! Hopefully they can sort it soon for you. 😃
-
Great, we will keep you updated about the 2 year check and we will wait to hear from you about the issues you are experiencing with the app. 😃
-
Hi finleysmaid, I'm sorry to hear you are having issues with the app. So we can help you with the app issues would you mind contacting us by emailing customer.service@eyfs.info with the version number of the app you are currently using. You can find this this on the app login screen, at the bottom you should see some writing that starts 'Version...'. Could you let us know what all of this says? In terms of the the 2 year check report template, there currently isn't one for the new EYFS, though you could use the new EYFS report template. We are working on adding a specific report template for 2 year checks with the new EYFS though. Would you like us to keep you updated about this? Best wishes, Emily


